WooCommerce has enjoyed so much success in the past few years that it has now become the king of eCommerce!
With a 92% market share, the plugin is not only the most popular eCommerce plugin for WordPress. It’s also the most popular in any plugin category!
Setting up your WooCommerce store for success requires paying a great deal of attention to many business-related and technical details. One of which is product shipping.
For store owners who sell physical goods, one of the most important questions you need to resolve is how to get your products to your customers.
We’ll be tackling this question today.
This post will outline the various shipping options you can use with WooCommerce and how to set them up.
By the end of the page, you’ll know everything you need to begin shipping products from your WooCommerce store!
Before Setting up WooCommerce Shipping
The first step to setting up WooCommerce shipping is to prepare your site for the process. As a basic prerequisite, you should already have a functional WordPress site with the WooCommerce plugin activated.
In ideal circumstances, we recommend setting up shipping before launching your WooCommerce store. However, if your store is already live, you should consider using a staging site.
A staging site is a duplicate of your live website that allows you to test out multiple shipping options without disrupting your visitors’ user experience.
How to Set Up WooCommerce Shipping Options
To set up WooCommerce shipping, we’ll focus on the default shipping options the platform offers. These options can all be created within your WordPress dashboard following four simple steps.
Step 1: Create New Shipping Zones
WooCommerce allows you to offer specific shipping options to visitors from different geographic regions.
In WooCommerce terms, these regions are called shipping zones.
In the past, WooCommerce offered two shipping zones by default: “US” and “Non-US.” Now, a Locations not covered by your other zones entry is available out of the box.
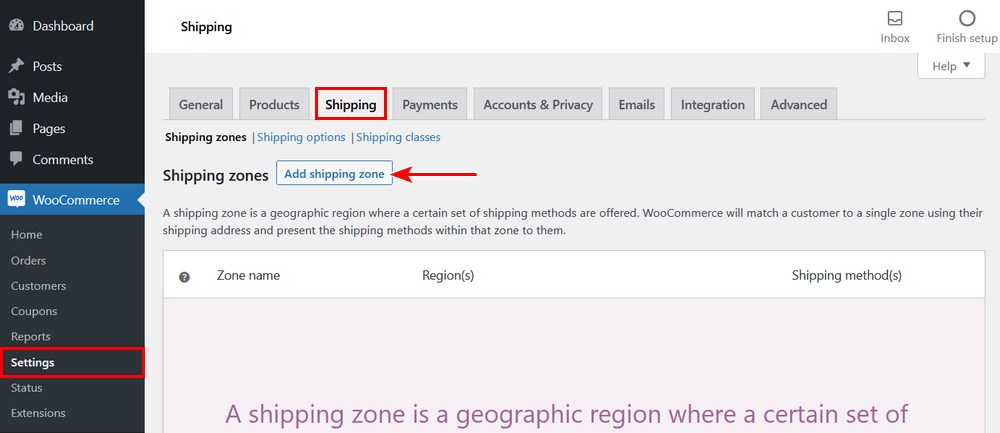
To create your first WooCommerce shipping zone, all you need to do is navigate to WooCommerce > Settings > Shipping and click Add shipping zone.
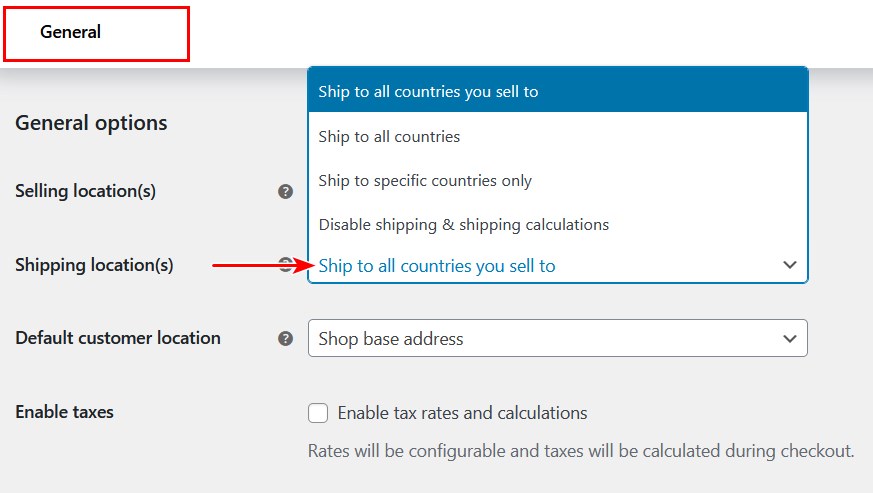
In the rare case where the Shipping tab is not available, you need to first re-enable shipping settings.
To do this, go back to the General tab and look for the General options section.
In the Shipping location(s) field, select any other option other than Disable shipping & shipping calculations.
Go back to the shipping settings page. After clicking Add shipping zone, you’ll be directed to a new shipping zone editor page.
On this page, fill in the necessary fields based on your requirements.
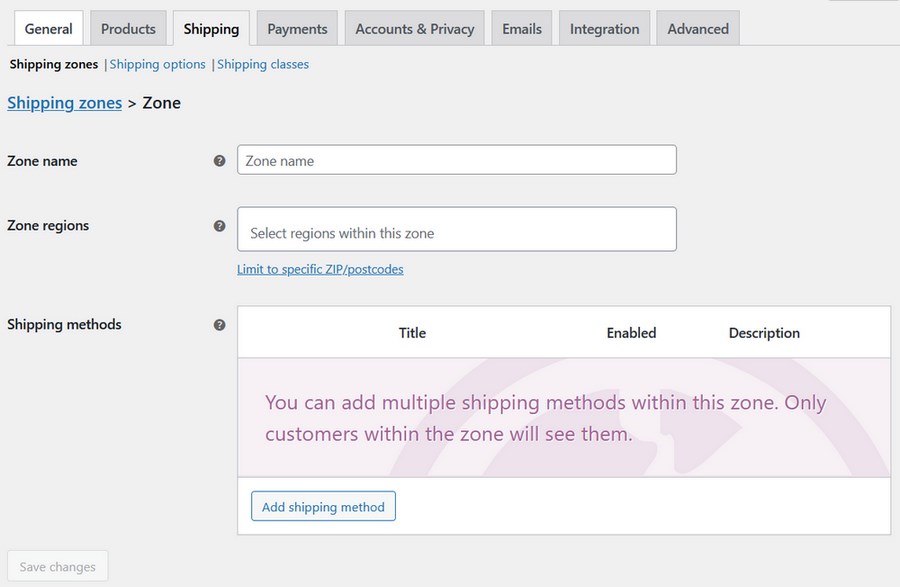
The Zone name is a simple descriptive title for referencing your new shipping zone.
In the Zone regions field, add a specific location either by searching or selecting from the long list of locations available. The selection can either be a city/state, country, or an entire continent.
Similarly, you can add individual postcodes or a numeric range such as 90210…99000. Very handy!
Step 2: Adding and Editing Shipping Methods
After adding all the necessary locations to the zone, apply the shipping methods you’d like to make available for this zone.
To do this, click Add shipping method. A pop-up menu then allows you to choose from the available shipping methods.
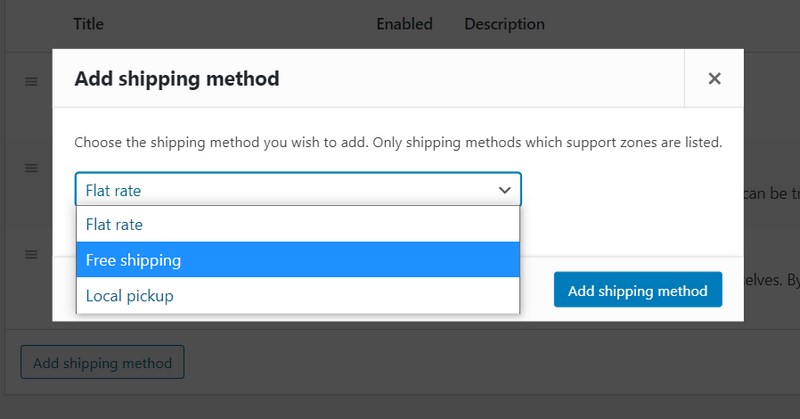
Select any option and click Add shipping method. You can add all three shipping methods to a zone.
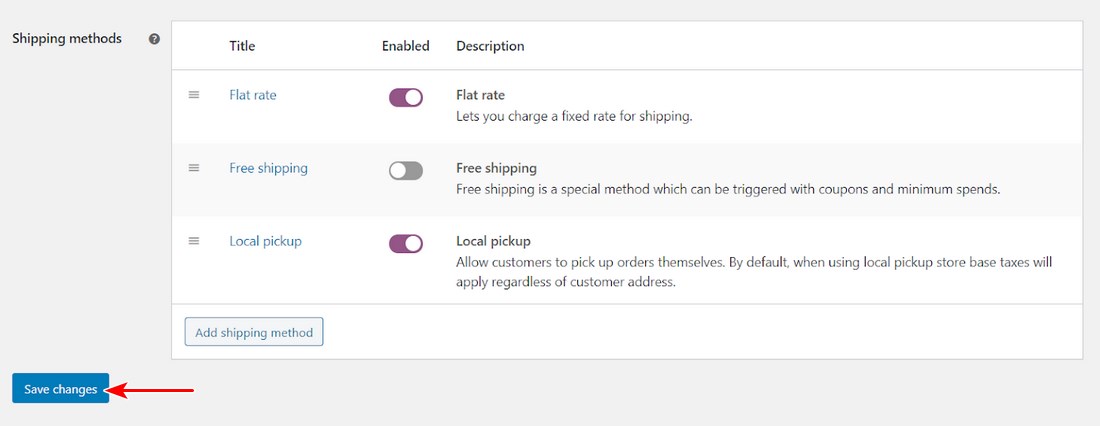
You can also toggle any method of your choice on and off after adding it. Once your zone settings are all in place, click Save changes and you’ve now successfully created your first shipping zone!
If you choose, you can also make changes to your shipping methods.
To do this, simply hover over the method and click Edit. The available options in the pop-up settings menu depend on the shipping method you’re editing.
For example, for flat rate shipping, you can set the fixed cost of shipping for that zone, the title of the shipping method (for the front-end), or the tax status.
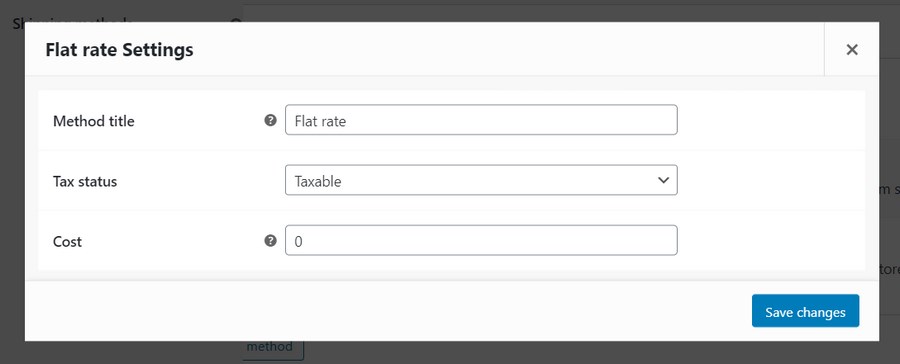
In the Cost field, you can set variable values to apply advanced cost rules for customer orders.
Here are a few useful scenarios:
- Standard flat rate shipping: Input a simple digit such as 10 to charge a fixed rate on all orders from that zone (shipping will cost $10.)
- Additional fee per item quantity: Input 10 + (2 * [qty]). Shipping will cost $10 plus $2 for each cart item.
- Additional fee equal to percentage of cart total: Input 10 + [fee percent=”2” max_fee=”100”]. The base cost of shipping is $10 plus 2% of the cart total (the maximum additional fee is $100.)
When you’re done, click Save changes.
Step 3: Configure Shipping Classes
Besides shipping zones, you can also determine WooCommerce shipping rates based on pre-defined groups containing similar products. These groups are called shipping classes.
Typically, you want to classify products with similar weight or dimensions in the same shipping classes.
Go to WooCommerce > Settings > Shipping > Shipping Classes and click Add shipping class.
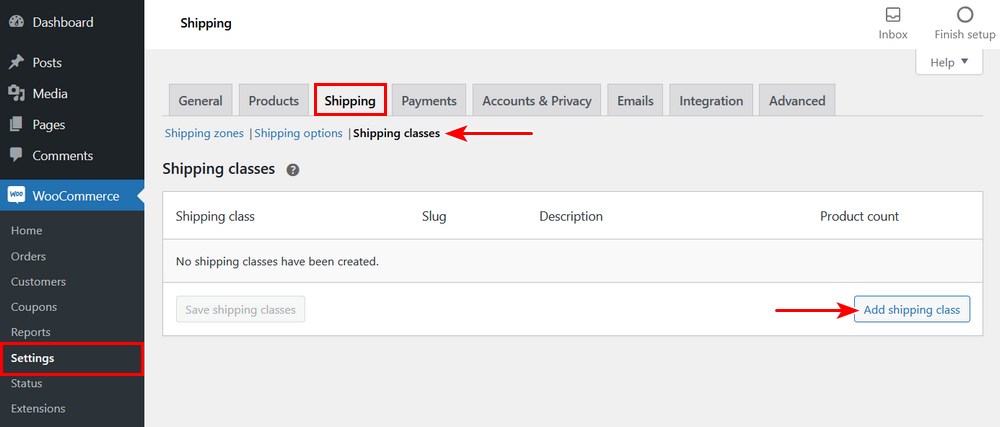
Now, you can fill in the shipping class name, slug, and a description for the class. The slug is simply a unique identifier. Leave the field blank if you want the system to generate a slug automatically.
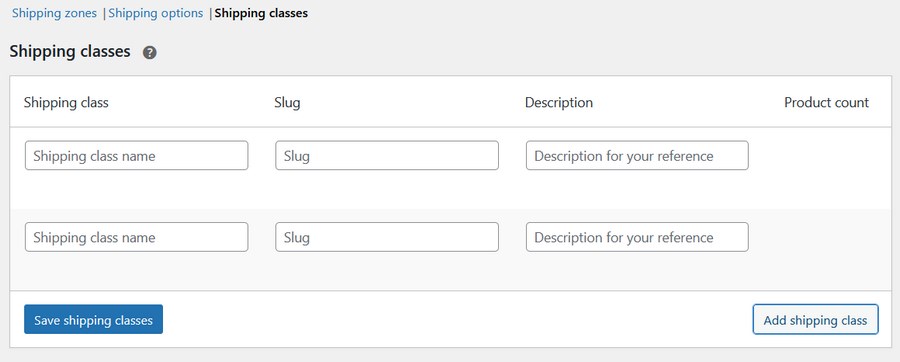
You can add multiple shipping classes by clicking the Add shipping class button multiple times. Afterward, click Save shipping classes to save your progress.
After adding shipping classes, you can now attach specific flat rate shipping costs to them.
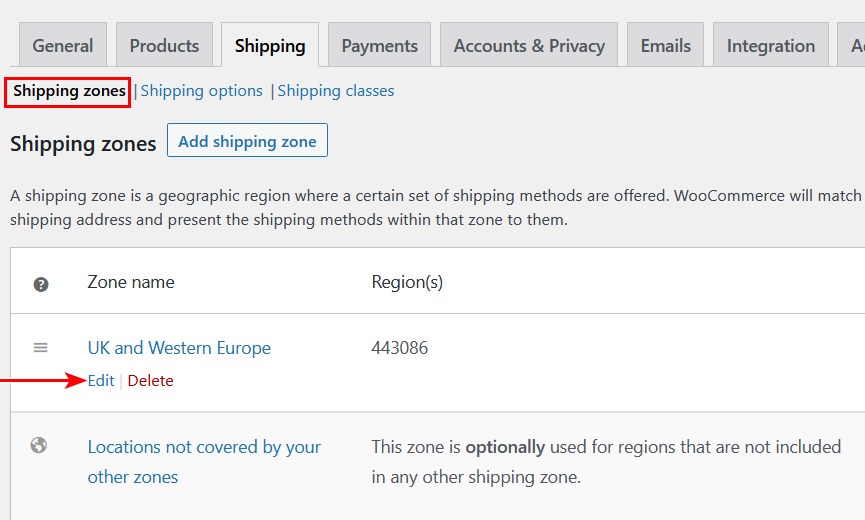
To do this, navigate back to WooCommerce > Settings > Shipping > Shipping Zones and click edit while hovering over any existing shipping zone.
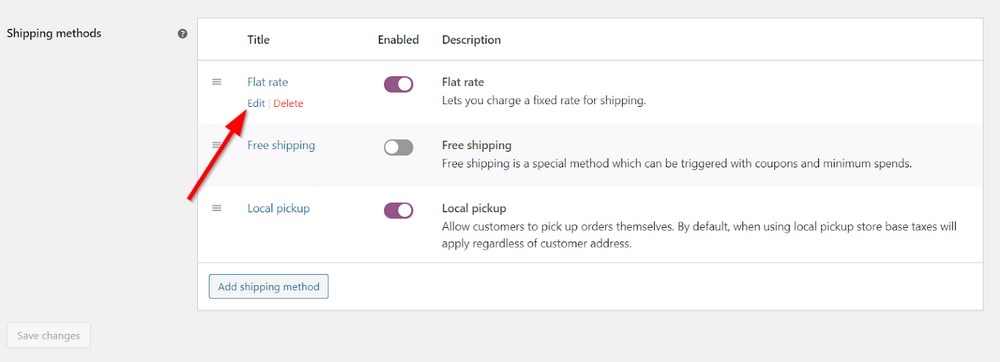
On the next page, scroll down to the Shipping methods section and click Edit under the Flat rate method.
Now, you can add additional shipping cost rules for each of the shipping classes you’ve created.
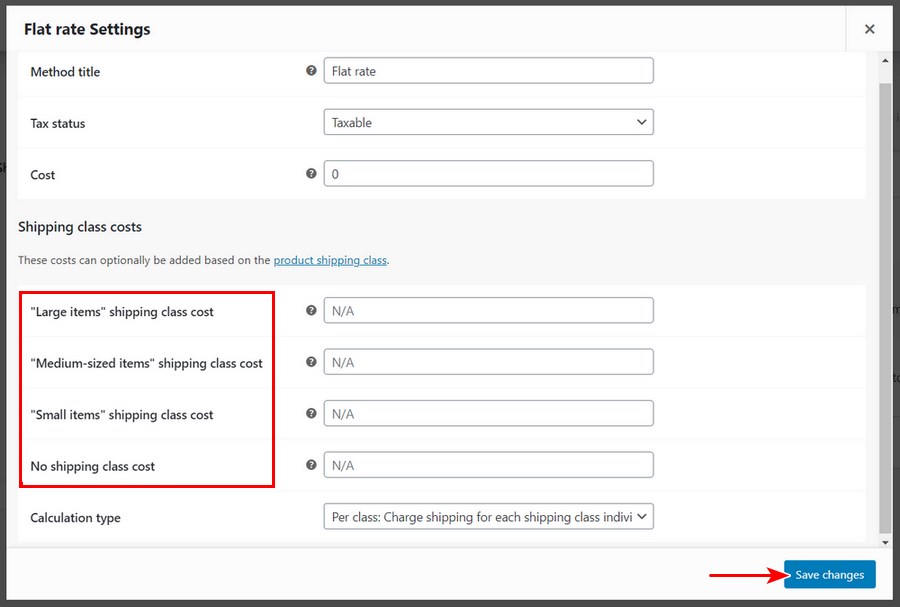
As you can see, you can also assign a defined shipping cost to all products without a shipping class.
Once you’re done, click Save changes.
Step 4: Add or Edit a Product and Assign Shipping Classes
Having set your shipping zones and classes to meet your needs, it’s time to assign these shipping options to individual products.
If you have already added products to your store, you can easily edit them.
Otherwise, assign these shipping options directly while adding a new product.
To do this, locate your product settings by going to Products > All Products or Products > Add New.
On the product settings page, scroll down to the Product data section. We’re only concerned with the Shipping tab.
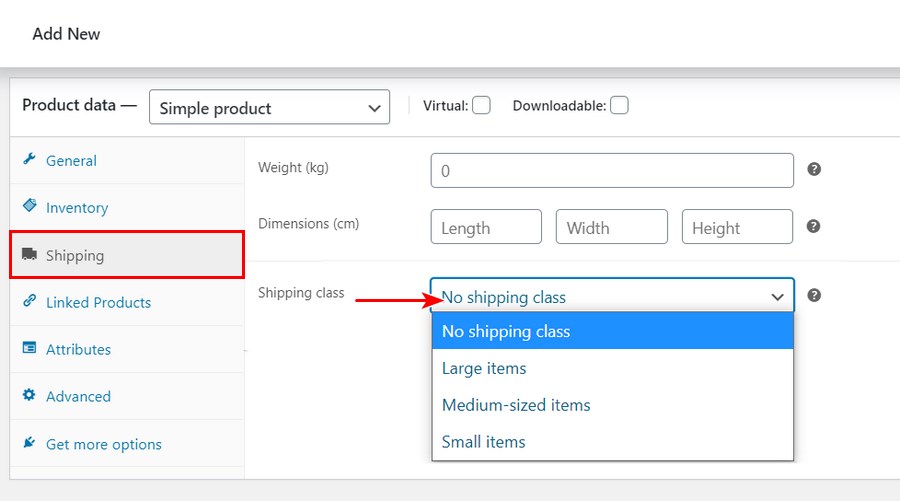
On this screen, you can select any shipping class of your choice for the product. This way, all its flat-rate cost rules will be applied to the product automatically.
You can also add a shipping class to multiple products while bulk-editing them.
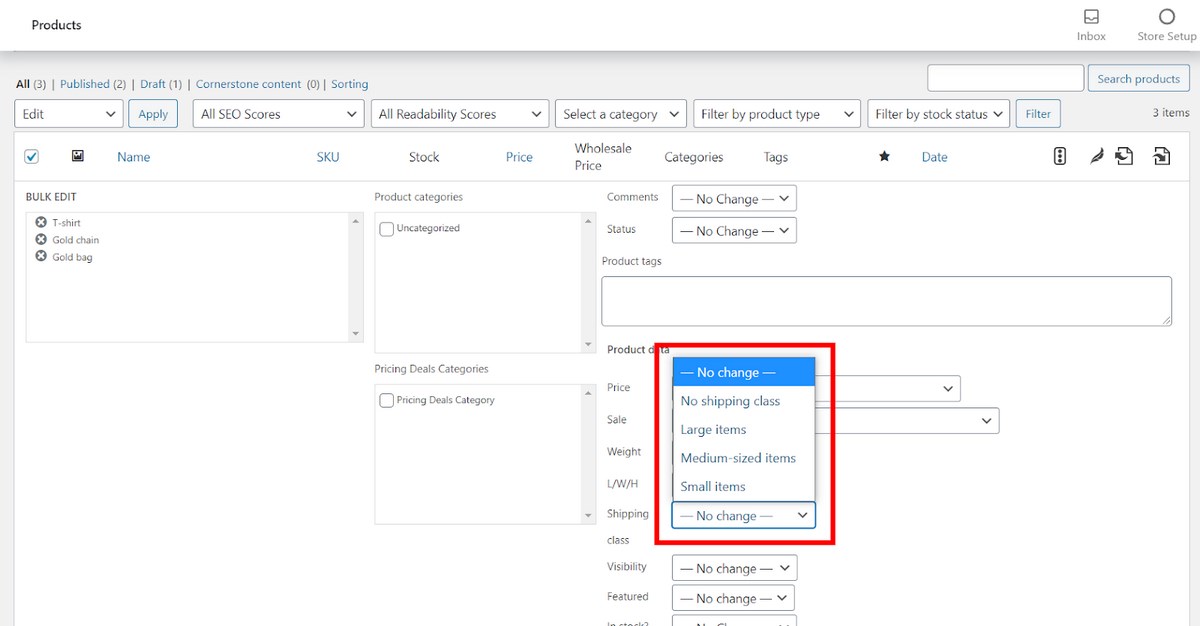
At the moment, these are the only two ways to assign shipping classes to products. Hopefully, we’ll be able to add products to a shipping class while editing the shipping class in the future.
Step 5: Test Your Shipping Setup
Before presenting your new shipping offerings to your store visitors, it’s important to take your store on a test run. This will help you see how well your shipping strategy works from a user’s perspective.
Testing your shipping configuration generally involves imitating the average user flow on the front-end with the aim of detecting shipping-related errors.
Here are some important areas you want to pay close attention to:
- Shipping classes and zones: Test at least one product in each shipping class and shop from one location in each shipping zone. A VPN can come in handy here. (Security website Cybernews recommends using a VPN for everything to ensure a secure browsing experience). When testing ensure that the shipping rates are accurately displayed in the cart and on the checkout page.
- Product combinations and cart size: If you’ve set up certain free or discounted shipping rules based on product combinations or cart size, now is a good time to confirm these settings.
- Third-party integration: If your site features any third-party shipping plugins, you want to ensure all the technical considerations are in place. Are important data such as real-time shipping rates, tracking information, and return policies synced accurately? We’ll talk more about such integrations later in this article.
- Accessibility of information: Do your site visitors have easy access to key information such as discount announcements and free shipping based on cart size?
- Complete checkout: Finally, you want to complete the entire checkout to ensure nothing breaks in the process.
Once these key elements are well covered, it’s safe to say you’re ready to start shipping your products.
Official WooCommerce Shipping Extension – What You Get
Before considering shipping plugins from other great WooCommerce developers, let’s take a look at what the official WooCommerce Shipping extension has to offer.
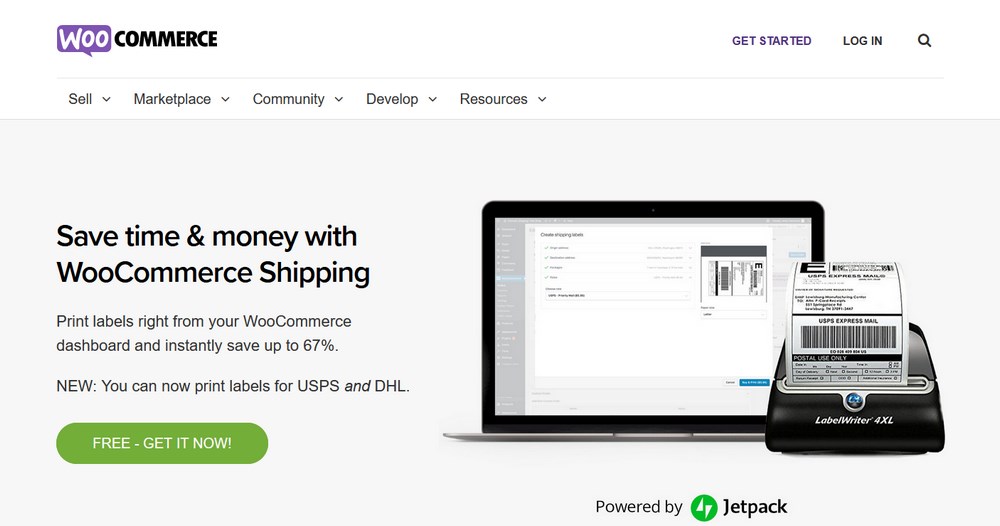
The extension helps you to manage the following directly from your WordPress dashboard:
- Shipping labels: Shipping labels are a great addition to your shipping strategy. With the official plugin installed, setting them up is pretty straightforward. Navigate to WooCommerce > Settings > Shipping > WooCommerce Shipping. Here, you can select the paper size for printing the labels and set up the payment method. (Label printing is a paid service and is limited to USPS and DHL presently.)
- Shipment packaging: On the same page as labels, you can add details (such as dimensions and weight) of your most commonly used packages. They could be custom envelopes and packages or packages from shipping carriers. Carrier-provided packages are called Service packages.
- Tracking information: After completing an order, you can track it using the tracking number which can be found in the shipping label metabox. However, you may need a more robust solution such as Shipment Tracking for extensive tracking.
- Refunds and pickup: Beyond checking the details of a shipment’s location, you can also schedule a pickup or request a refund from the carrier (for packages yet to be shipped.)
WooCommerce Shipping is a handy tool for bringing useful additional shipping features to your WordPress dashboard.
Bear in mind though that you’ll need an active Jetpack connection to access these features.
Frequently Asked Questions
What types of shipping methods does WooCommerce offer by default?
WooCommerce offers three types of shipping methods by default. They include flat rate shipping, free shipping, and local pickup. Using flat rate shipping, you can ship items to your buyers at a flat or standard rate per item, order, or shipping class. Otherwise, you can ship for free or allow customers to pick up their orders at a physical location. If you need more shipping methods, there are tons of shipping plugins that can deliver them.
Is WooCommerce compatible with USPS, FedEx, and other shipping carriers?
WooCommerce is compatible with USPS, FedEx, and other shipping carriers. You can use plugins such as WooCommerce FedEx Shipping with Print Label and USPS Shipping Method to connect them to your WordPress dashboard. You not only get to display real-time shipping rates at checkout, but also print labels and monitor tracking information.
Can I offer free shipping with WooCommerce?
You can offer free shipping with WooCommerce. This shipping method is one of the three methods available by default. It can be either triggered when a coupon is activated, a minimum spend amount is reached, or when both conditions are satisfied. Similarly, you can restrict free shipping to a certain shipping zone or class.
What are WooCommerce shipping zones and classes?
WooCommerce shipping zones and classes are simple eCommerce terminologies that make it easy to manage shipping processes based on certain rules and conditions. A shipping zone is a geographic region. Shipping class is a pre-defined group containing products based on weight or dimensions.
Does WooCommerce allow local pickup?
WooCommerce allows local pickup right out of the box. Provided you have a location where you can store and sort your products, you can allow customers to simply pick up their orders there. This option can save you a lot of logistics workload.
Setting Up the Perfect WooCommerce Shipping Strategy
Shipping is a broad eCommerce category that requires combining several moving parts to make things work flawlessly. WooCommerce shipping is not any different.
There’s hardly any universal one-fits-all shipping strategy. The ideal solution for you will mostly depend on your needs and the size of your business. But in most cases, you’ll need to combine different plugins and shipping options to achieve success.
You can set up the default WooCommerce shipping options in four easy steps:
- Create new shipping zones
- Configure shipping classes
- Add or edit a product and assign shipping classes
- Test your shipping setup
Once you’ve exhausted these default options, you may want to try additional features to add more punch to your shipping offerings.
Bear in mind though that the final outcome depends largely on the plugin vendor you opt for. This is why you want to prioritize top-notch support and robust features when making your choice.
With the right tools, you can always guarantee your customers a wholesome shipping experience.
If you still have pending questions about WooCommerce shipping options, share them in the comments section below. Otherwise, check out our article on different ways of offering free shipping in WooCommerce.

Sujay Pawar is the co-founder and CEO of Brainstorm Force. He brings a one-of-a-kind fusion of tech brilliance, business savvy and marketing mojo to the table. Sujay has consistently spearheaded the development of innovative products like Astra, CartFlows, ZipWP and many others that have become market leaders in their respective niches.
Disclosure: This blog may contain affiliate links. If you make a purchase through one of these links, we may receive a small commission. Read disclosure. Rest assured that we only recommend products that we have personally used and believe will add value to our readers. Thanks for your support!



I recently created a woo-commerce website for my clients with Astra Pro. But I could not add the shipping option in any way. But later I tried this blog later, and finally, I succeeded. Thanks WP Astra.
Glad to hear that it helped!
This shipping set up has been driving me crazy and I finally figured it out, thanks to you! I have even been working with someone from support and this was so much easier. Thank you!
Glad to hear that our article had an upper hand this time! 🙂
Hi, in Woocommerce > Settings > Shipping > Woocommerce Shipping > Payment, there is an email that connects directly to Wordpress.com to buy shipping labels. How can I change the email assigned there?
Thanks.
Hello Adan, Sorry, we are unsure on how to modify the shipping labels. Please do check with the WooCommerce knowledge center or support for help on this.
Hi, I wonder if you can advise me how to set up a shipping method in Woo Commerce that has set costs for a number of products. For example :
1 to 5 products = $10 shipping
6 to 10 products = $15 shipping
Etc!
Is this possible ?
How do you do that ?
I do not want to purchase a plug-in but a recommended free version would be considered.
Thanks