Are you looking to install some WordPress plugins to give your website some nice extra features?
Plugins are one of many ways to add new features to any WordPress website. There are also many ways to install a plugin in WordPress and we’ll show you how to use each one.
Armed with this knowledge, you’ll be able to do anything from scanning for spyware with the simple click of a button to performing on-page SEO without having much technical knowledge.
The best part is, installing and using these plugins is relatively straightforward.
You can have a WordPress plugin up and running in just a matter of minutes.
Before we continue, though, it‘is important to state that this article is about installing plugins on self-hosted WordPress websites, not WordPress.com.
If you’re wondering what the differences are between the two, this is the article to read!
4 Easy Ways to Install a WordPress Plugin
Below, we’ll show you how to install plugins directly, by downloading them from the WordPress repository or from a developer’s site, and manually, through FTP or cPanel.
Let’s get down to it!
Method 1: Installing a Plugin From the WordPress Repository
You can automatically install a plugin using the WordPress plugin search feature. This will connect you to the WordPress plugin directory, and is generally the simplest and fastest method.
On the other hand, it can be limited as not every WordPress plugin gets uploaded onto the WordPress plugin directory.
To use this method, here are the steps to take:
Click on the ‘Add New’ tab under the ‘Plugins’ menu then use the search bar on the top right to search for the plugin you need.
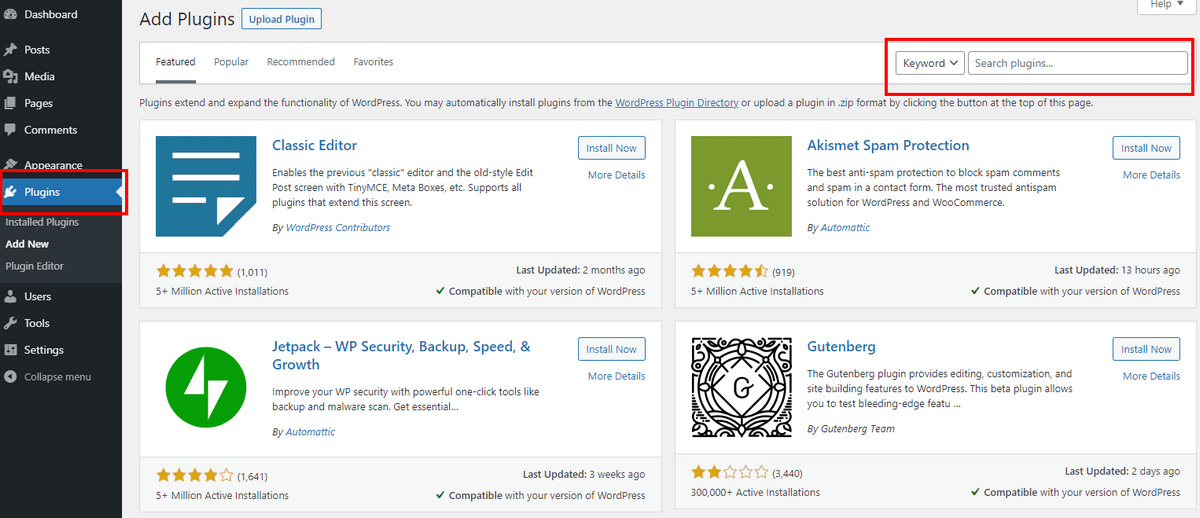
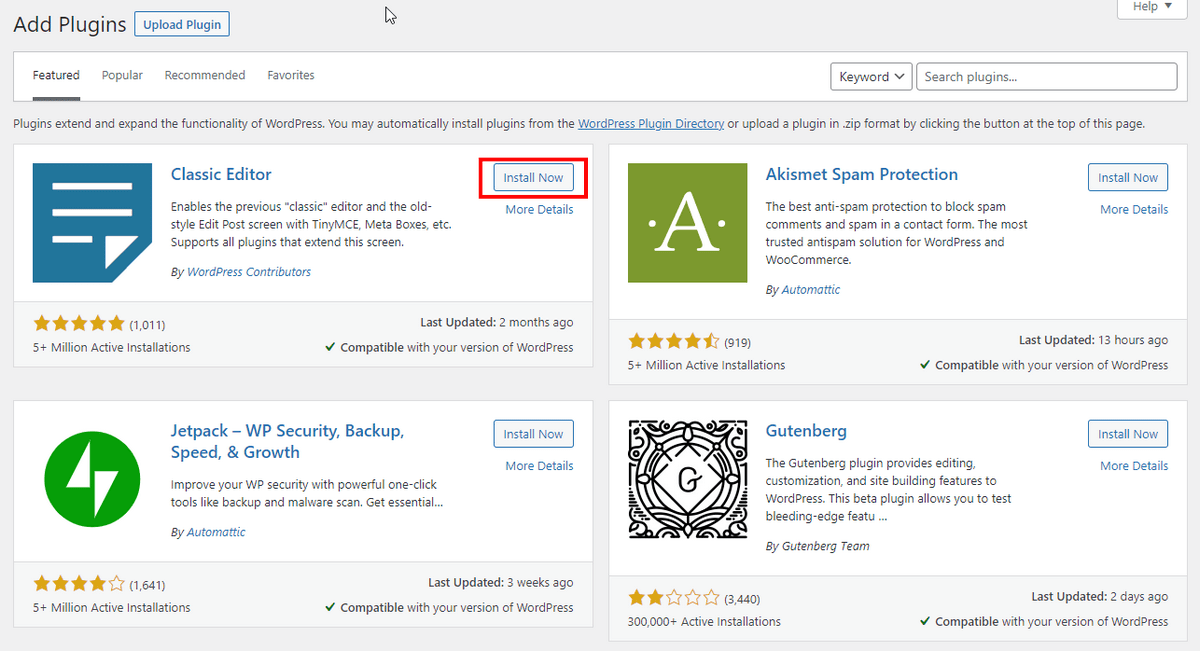
You should get a few results and all of them will have a button labelled ‘Install Now’ that you can click to (you guessed it) install the plugin of choice.
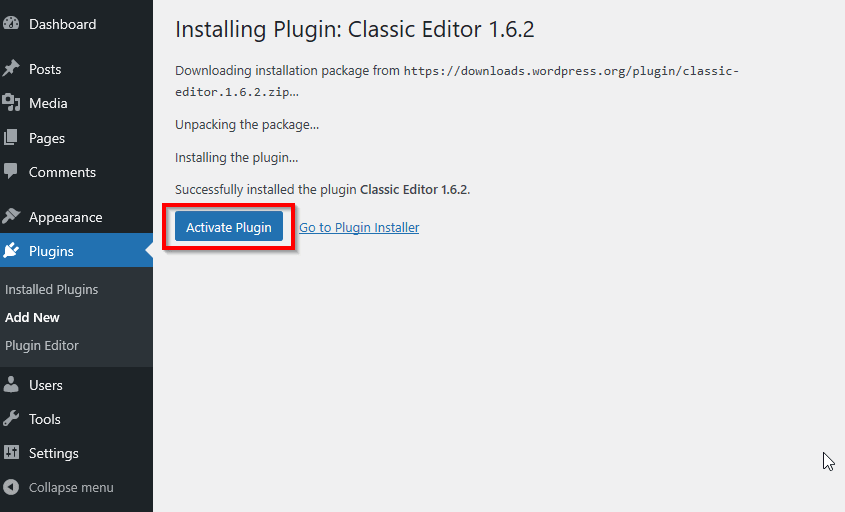
After installation, the plugin will not yet be enabled. You should see the ‘Install Now’ button turn into an ‘Activate’ button that you can click to activate the plugin for use on your current project.
Method 2: Installing Plugins Manually
Installing a plugin from the WordPress repository is generally the easiest method. But there will be occasions when a manual install is preferable.
For example, there may be a more current version of a plugin on the developer’s website or when you install a premium plugin directly from the developer’s website.
Premium plugins can be excluded from the WordPress repository so you have to download them from the developer’s site or from a plugin market like Envato Market.
Keep in mind that there is a certain level of risk in downloading a plugin directly from a developer’s website.
Plugins on the WordPress repository have been vetted to a reasonably safe degree. You won’t have that safeguard when you download a plugin directly from a developer’s site.
As a general rule of thumb, it is best to only download from the most trusted websites and scan all files with an antivirus before uploading and your security plugin after loading!
If you need to download a plugin directly, here are three ways of doing this, and how to do each one.
Method 3: Download From the Developer
Step 1 – Download the Plugin
Head on over to the developer’s website, download the plugin to your laptop or PC.
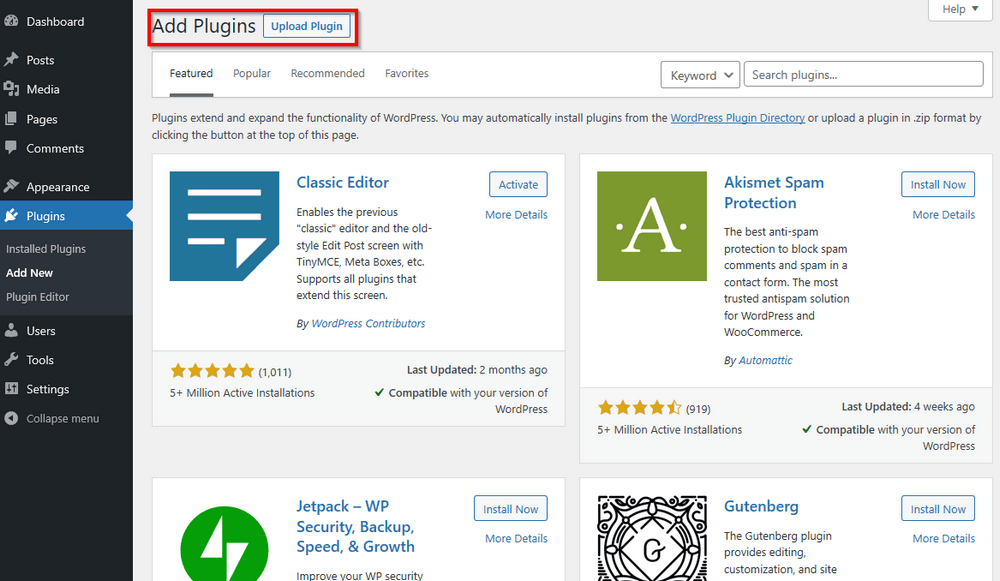
Next, just as before, open up your WordPress dashboard, and click on Plugins > Add New.
Step 2 – Upload the Plugin
Upload the plugin in its zip folder and click install.
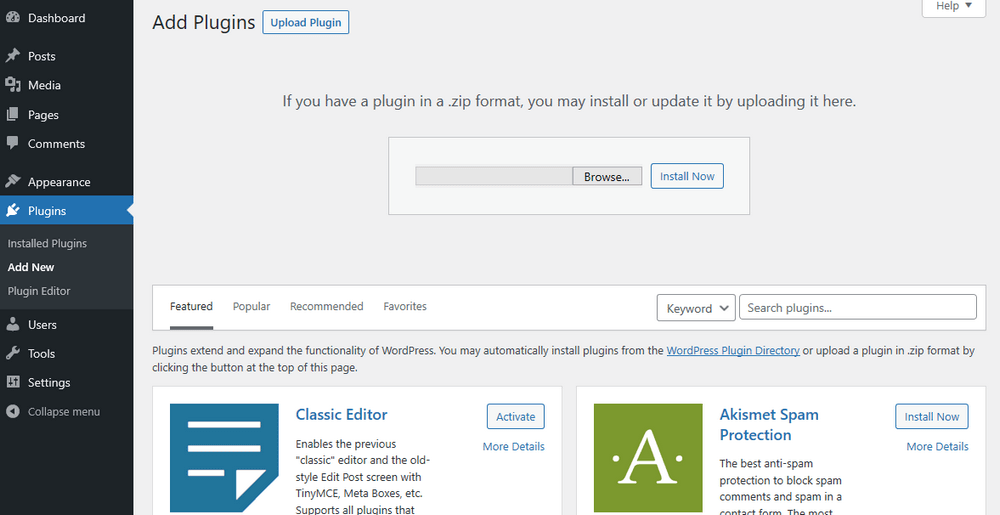
Step 3
Once installed, you will be redirected to the plugin page where you can activate the plugin to start using it.
Simply click the Activate button to get it working!
Upload Directly Using FTP
FTP stands for File Transfer Protocol, and is the traditional way of uploading and downloading files to and from websites.
To use FTP, you’ll need a piece of software called an FTP client. FTP clients enable you to connect to remote web servers and initiate file transfers.
There are several FTP clients out there but to narrow down the list, FileZilla and FireFTP are compatible with all major platforms and are the two we would recommend.
Here’s how to use an FTP client to upload a plugin (we’ll be focusing on the exact process for FileZilla.
Step 1 – Configure Your FTP Client
Download one of the FTP clients mentioned above. For this example, we’ll go with FileZilla. You’ll need to download and install it to your laptop or PC.
Next, head over to your cPanel account for your website. This is where you will create your FTP account.
cPanel is where a lot of the really technical bits of website management get done.
Many web hosts create the main FTP account for you when you first set up your hosting plan. We’ll show you how to set one up, just in case.
The precise location of our cPanel login will differ based on the hosting service that you’re using, however, it is generally accessible via your hosting account.
Once you’ve logged into cPanel, look under the Files section, and you will see the FTP Accounts button.
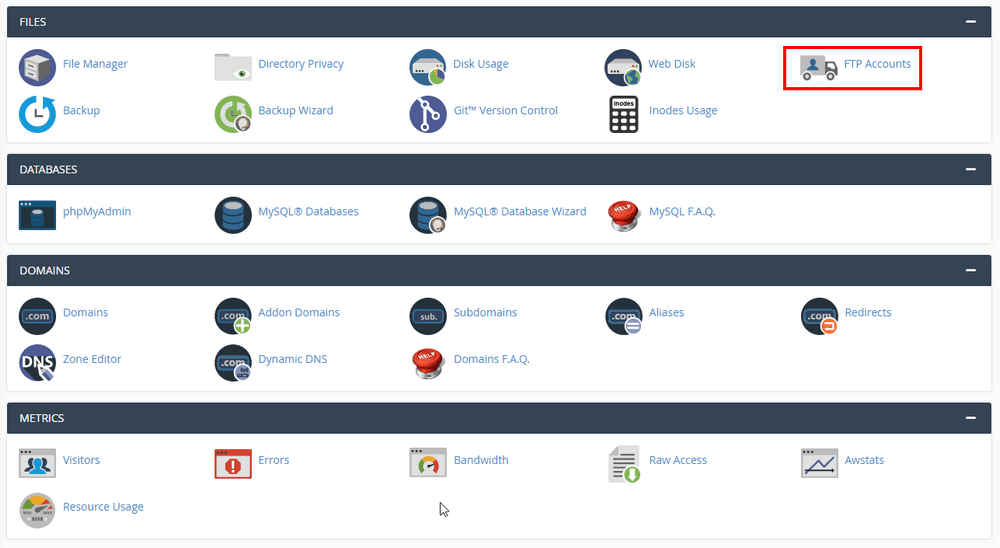
If you don’t see it, it is possible that your hosting service has not enabled this option for you. Simply contact them and ask that they do so.
You’ll then need to create an FTP account — it’s possible your hosting service has already created one so check the welcome email they sent you.
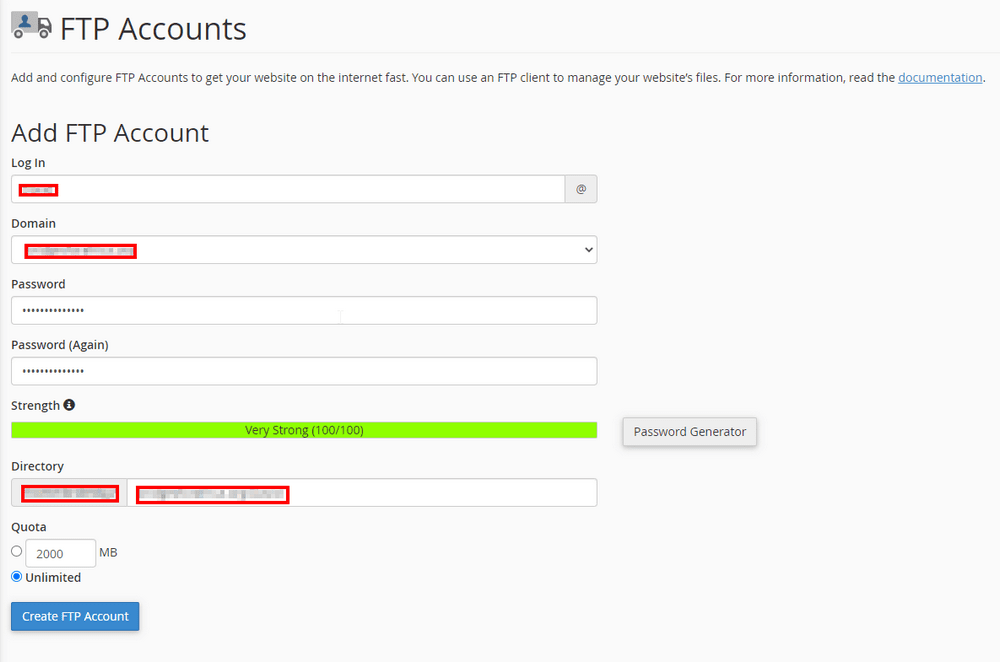
Enter your username and the domain you would like to connect to via FTP.
Click Create FTP Account.
You will now see your new FTP account below, under the heading, FTP Accounts.
Under your new FTP account, you should then see an option to configure FTP Client. Click on it.
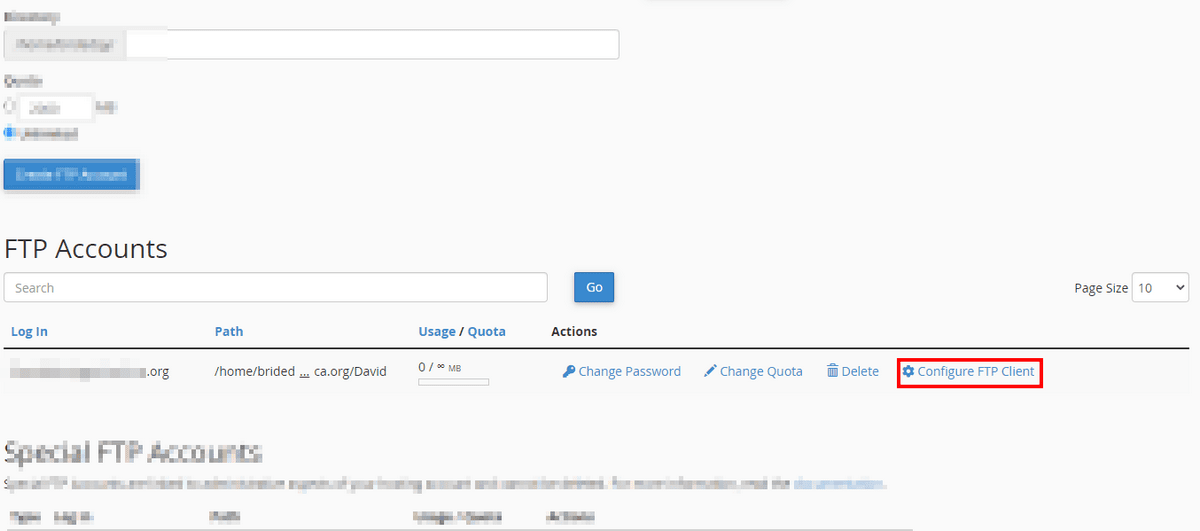
A set off configuration details will then appear. You should copy and input these into your FTP client. We’ll show you how shortly.
You will also see a section labelled Configuration Files — these are more direct ways of configuring FTP if you are using a Namecheap default FTP Client.
At the moment, these are CoreFTP for Windows, and Cyberduck for mac.
Ignore these for now, since we’re using FileZilla in this example.
Just copy the details under Manual Settings and enter them into your FTP Client.
Here’s how:
Open up FileZilla (or any other FTP client).
At the very top you will see three blank spaces labeled Host, Username, and Password.
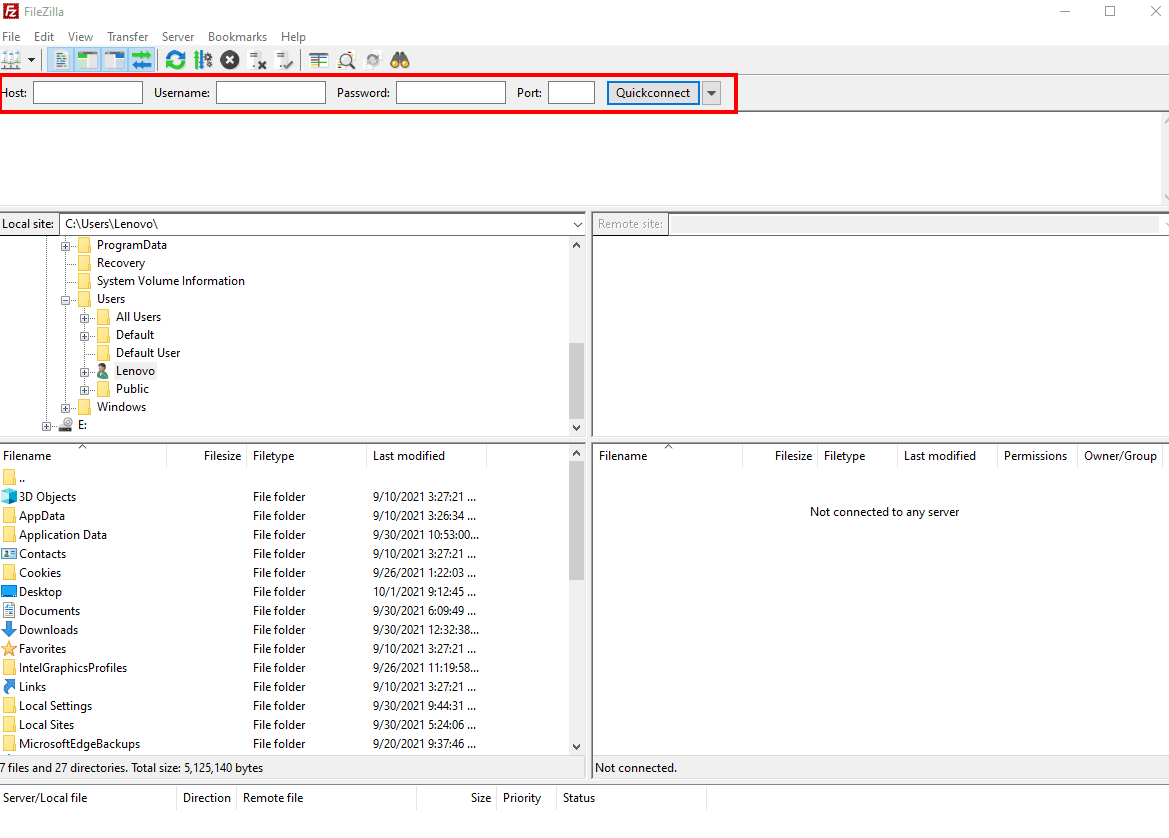
The host is ftp.yourdomain.com (or whatever extension your domain name uses).
Your username – remember the name you entered when you created your FTP account in cPanel? Your username is [email protected].
Your password is the one you entered when you created your FTP account in cPanel.
So, if your website is example.com, and your name is Ted, your host would be ftp.example.com and your username would be [email protected]. Your password would be whatever you entered when you created your FTP account in cPanel.
Once you’ve entered these details, click Quickconnect.
This will sync your FTP account in cPanel, with your FTP Client on your laptop or PC. You will now see your desktop files in a panel on the left, and your website files in a panel on the right.
To upload or download a file, you can simply copy it from one panel to the next.
That’s what you’re going to do with the plugin you downloaded earlier. The next steps will show you how.
Step 2 – Download the Plugin
Download the plugin to your laptop or PC.
Step 3 – Access Your Website’s Root Folder
In the FTP client, find the directory where you have saved the plugin. This might be in the downloads, documents, or desktop folders on your laptop or PC.
Then on the Remote Site navigate to the folder called public_html > wp-content > plugins.
Step 4 – Paste the Plugin into the Plugin Folder
This step is quite straightforward. Simply copy and paste the plugin zip folder into the Plugins folder.
Step 5 – Activate It on Your Live Website
Go to the dashboard of your live WordPress site and either refresh or click the Installed plugins tab and you’ll find your plugin installed but not yet activated.
As before, click Activate and that’s it!
Remember how to get there?
In the WordPress dashboard, click Plugins. A list of all plugins on your site will appear.
Underneath the plugin that you have just installed, click Activate.
Method 4: Adding Plugins in cPanel
In the previous method, we showed you how to work in cPanel to upload plugins via FTP. This time, we’ll show you how to upload plugins directly into cPanel without using FTP.
Step 1 – Get into cPanel
In cPanel, find the File Manager icon under the Files section.
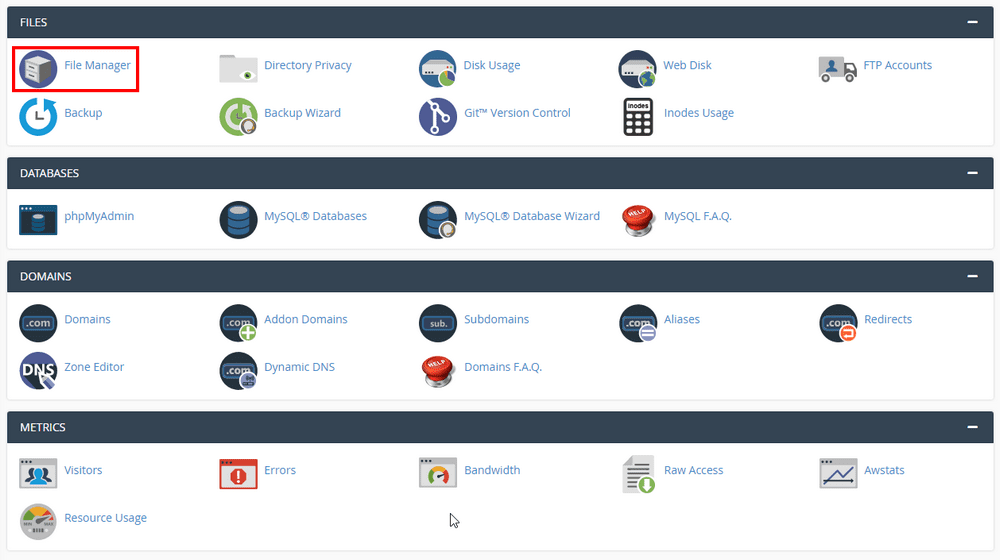
Once in, click on the public_html folder as before.
Once in, you will see a series of folders. The one that you’re looking for is called wp-content. In this folder, you will see another folder called plugins.
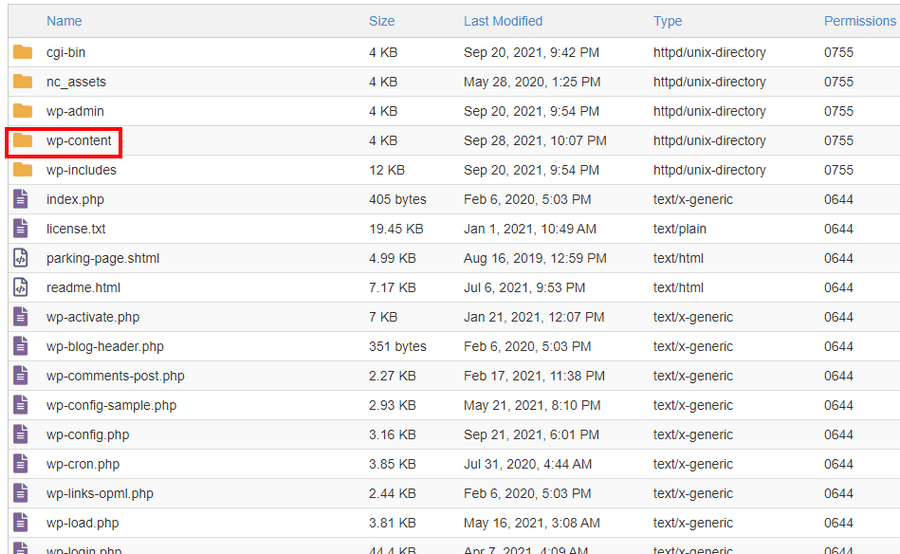
You might have noticed that the process is quite similar to using FTP. That’s because you’re essentially working with the same folders.
This time, though, you won’t be able to copy and paste in the plugin, but you will see an upload button at the top of your screen.
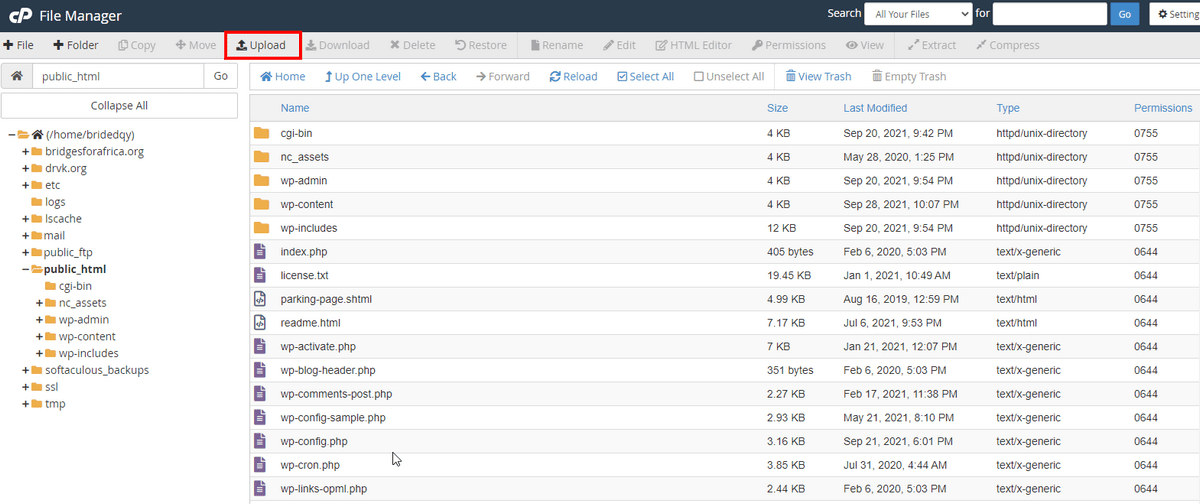
Click on upload, select the plugin file and upload.
Once done, head over to your WordPress dashboard, and activate the plugins.
Choosing the Best WordPress Plugins
That’s it! Now you know the four different methods of installing WordPress plugins. The next step is finding some useful plugins and installing them.
As you get on with this, though, you’ll need to exercise some caution.
There are more than 55,000 WordPress plugins in existence. So, for any particular function, you are likely to find hundreds of plugins.
The problem is, not all of them work well or are well-maintained by their developers. Worse, some of these plugins can expose your website to security risks.
So how do you choose the best ones for your specific needs?
Here are a few things to look out for:
1. Functionality
The first and most obvious quality to look for is functionality. If a plugin cannot adequately perform the function that you need it for, it has no place on your website.
Even plugins that you do not use will take up some space and potentially slow your website down.
To be sure you find and use the right ones, simply read through the plugin’s description and check out its reviews to be sure that it does what its developer’s say.
Another clever practice would be to set up a local development area using software like XAMPP or WAMP. There you can try out any plugins you would like to use before you use them on your live website.
2. Relevance
While browsing through the plugin repository, you might be tempted by all sorts of plugins offering lots of interesting features.
You’ll have to resist the urge to try them all because, as we’ve mentioned, having too many plugins on your site will increase the size of your website and potentially reduce its speed.
3. Reputation
The best way to find excellent plugins and avoid problematic ones is to comb through reviews to find out what experiences other people have had.
Also, consider the download count. This will generally lead you to great developers that offer customer service, maintenance, and a good product.
Generally a plugin with good ratings and lots of active users can be relied upon. But if its developer does not actively maintain it, there is a chance that it could become obsolete, or incompatible with the WordPress core.
4. Affordability
Quite often, the deciding factor when it comes to your choice of plugins will be pricing. There are a few plugins that are completely free to use with no paid upgrades or premium versions.
If you are going for basic functions, these are usually sufficient. However, premium versions of plugins will generally offer better services, exclusive features, more responsive customer care, and more.
Get Started With WordPress Plugins
Plugins are an essential part of what makes WordPress suitable for building almost any kind of website.
Now that you know how to install them, using the four different methods we’ve covered, you can get started installing all the plugins you need to enhance the features of your website.
Just remember to exercise some caution by sticking to the WordPress repository for free plugins, and only downloading premium plugins from the most trusted developers.
Similarly, we have covered an article on how to change the WordPress theme; check that out.
Have you tried out any of the four methods we described here? We’d love to know which one worked best for you. Let us know in the comments below!

Pratik Chaskar holds the pivotal role of CTO at Brainstorm Force, serving as the backbone of the company. Renowned for his organizational skills, strategic thinking, problem-solving attitude, and expertise in leading and executing plans, Pratik plays a crucial role in the BSF’s technological landscape.
Disclosure: This blog may contain affiliate links. If you make a purchase through one of these links, we may receive a small commission. Read disclosure. Rest assured that we only recommend products that we have personally used and believe will add value to our readers. Thanks for your support!




Thank you, this is the article I was looking for. Btw may I know what you use for your great and fast website? I’m also planning to create a simple website for my business, but I need a domain and hosting recommendation. I hear asphostportal has a good reputation for that. Can you recommend them or are there any alternatives?