What is robots.txt? How do you create a robots.txt file? Why do you need to create a robots.txt file? Does optimizing the website’s robots.txt file help improve your search rankings?
We’ll cover all this and more in this in-depth article on robots.txt!
Have you ever wanted to tell the search engines not to crawl a particular file? Wanted to stop search engines crawling a particular folder in your website?
That’s where the robots.txt file comes in. It’s a simple text file that tells search engines where, and where not to crawl when indexing your website.
The good news is you needn’t have any technical experience to unleash the power of robots.txt.
Robots.txt is a simple text file and takes seconds to create. It is also one of the easiest files to mess up. Just one character out of place, and you have messed up your entire site’s SEO and prevent search engines from accessing your site.
When working on a website’s SEO, the robots.txt file plays an important role. While It allows you to deny search engines from accessing different files and folders, it’s often not the ideal way to optimize your site.
In this article, we’ll explain how you should use the robots.txt file in optimizing your website. We’ll also show you how to create one and share some plugins we like that can do the hard work for you.
What Is Robots.txt?
Robots.txt is a simple text file that tells the search engine robots which pages on your site to crawl. It also tells the robots which pages not to crawl.
Before we get in-depth into this article, it’s important to understand how a search engine works.
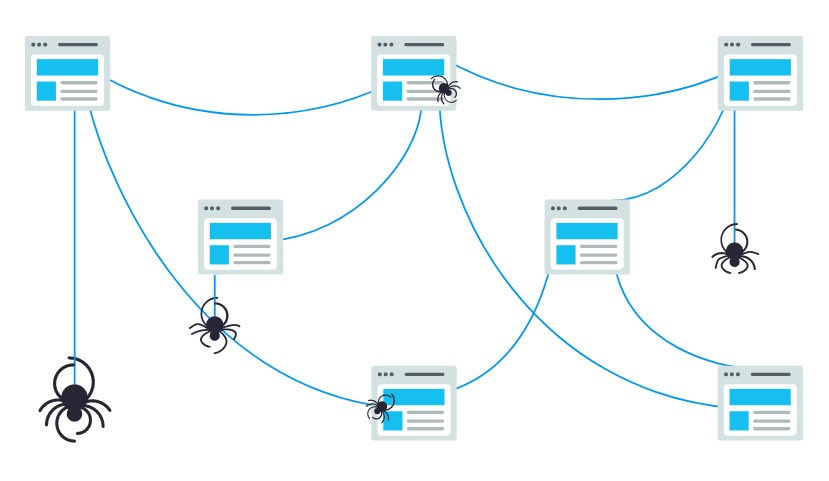
Search engines have three primary functions – crawling, indexing, and ranking.
(Source: Moz.com)
Search engines start by sending their web crawlers, also referred to as spiders or bots out across the web. These bots are pieces of smart software that navigate through the entire web to discover new links, pages, and websites. This process of scouring the web is called crawling.
Once the bots discover your website, your pages are arranged in a usable data structure. This process is called indexing.
And finally, it all comes down to ranking. Where the search engine provides its users with the best and most relevant information based on their search queries.
What Does Robots.txt Look Like?
Let’s say a search engine is about to visit your site. Before it crawls through the site, it will first check the robots.txt for instructions.
For instance, let’s say the search engine robot is about to crawl our WPAstra site and access our robots.txt file, accessed from https://clone.wpastra.com/robots.txt.
While we are on this topic, you can access the robots.txt file for any website by entering ‘/robots.txt’ after the domain name.

OK. Getting back on track.
The above is a typical format of what a robots.txt file looks like.
And before you think it’s all too technical, the good news is, that’s all there is to the robots.txt file. Well, almost.
Let’s break down each element mentioned in the file.
The first is User-agent: *.
The asterisk after User-agent indicates that the file applies to all search engine robots that visit the site.
Every search engine has its own user-agent that crawls the web. For example, Google uses Googlebot to index your website’s content for Google’s search engine.
Some of the other user-agents used by popular search engines are,
- Google: Googlebot
- Googlebot News: Googlebot-News
- Googlebot Images: Googlebot-Image
- Googlebot Video: Googlebot-Video
- Bing: Bingbot
- Yahoo: Slurp Bot
- DuckDuckGo: DuckDuckBot
- Baidu: Baiduspider
- Yandex: YandexBot
- Exalead: ExaBot
- Amazon’s Alexa: ia_archiver
There are hundreds of such user-agents.
You can set custom instructions for each user-agent. For instance, if you’d like to set specific instructions for the Googlebot, then the first line of your robots.txt file will be,
User-agent: Googlebot
You assign directives to all user-agents by using the asterisk (*) next to User-agent.
Let’s say you want to block all bots except the Googlebot from crawling your site. Your robots.txt file will be as follows,
User-agent: *
Disallow: /

User-agent: Googlebot
Allow: /
The slash (/) after Disallow tells the bot not to index any pages on the site. And while you have assigned a directive to be applied to all search engine bots, you’ve also explicitly allowed the Googlebot to index your website by adding ‘Allow: /.’
Likewise, you could add directives for as many user-agents as you like.
To recap, let’s get back to our Astra robots.txt example, i.e.,
User-agent: *
Disallow: /wp-admin/
Allow: /wp-admin/admin-ajax.php
The directive has been set to all search engine bots to not crawl anything under the ‘/wp-admin/’ folder, yet follow the ‘admin-ajax.php’ file under the same folder.
Simple, right?
What Is a Crawl Budget?
By adding the slash after Disallow, you tell the robot not to visit any pages on the site.
So, your next obvious question would be, why would anyone want to stop robots from crawling and indexing your site? After all, when you’re working on the website’s SEO, you want the search engines to crawl your site to help you rank.
This is precisely why you should consider optimizing your robots.txt file.
Any idea how many pages you have on your website? From actual pages to test pages, duplicate content pages, thank you pages, among others. A lot, we presume.
When a bot crawls your website, it will crawl every single page. And if you have several pages, the search engine bot will take a while to crawl all of them.

(Source: Seo Hacker)
Did you know that this can negatively affect your website ranking?
And that is due to the search engine bot’s ‘crawl budget.’
OK. What is a crawl budget?
A crawl budget is the number of URLs a search bot can crawl in a session. Every site will have a specific crawl budget allocated to it. And you’ll want to ensure that the crawl budget is spent in the best possible way for your site.
If you have several pages on your website, you’ll most definitely want the bot crawling your most valuable pages first. Thus, making it essential to explicitly mention this in your robots.txt file.
Check out the resources available on Google to know what crawl budget means for Googlebot.
How to Create a Robots.txt File in WordPress?
Now that we’ve covered what a robots.txt file is and how important it is, let’s create one in WordPress.
You have two ways of creating a robots.txt file in WordPress. One uses a WordPress plugin, and the other is by manually uploading the file to the root folder of your website.
Method 1: Create a Robots.txt File Using Yoast SEO Plugin
To help you optimize your WordPress website, you can use SEO plugins. Most of these plugins come with their own robots.txt file generator.
In this section, we will create one using the Yoast SEO plugin. Using the plugin, you can easily create the robots.txt file from your WordPress dashboard.
Step 1. Install the Plugin
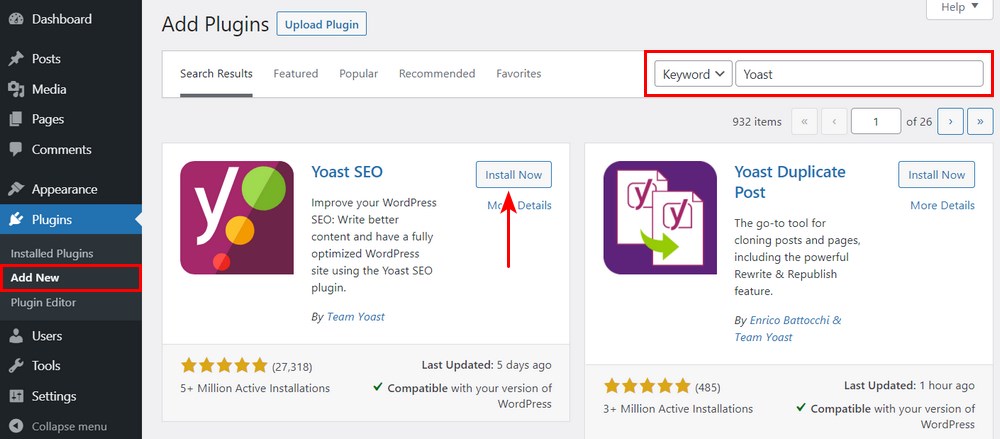
Head over to Plugins > Add New. Then search, install and activate the Yoast SEO plugin if you don’t have it yet.
Step 2. Create the robots.txt File
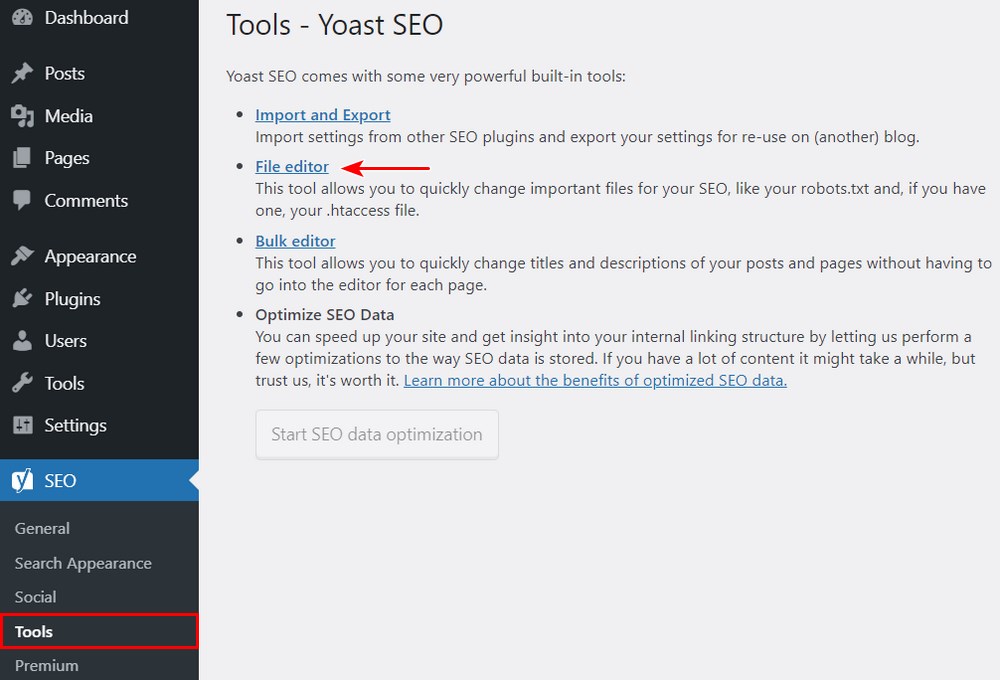
Once the plugin is activated, go to Yoast SEO > Tools and click on File editor.
Since this is the first time we are creating the file, click on Create robots.txt file.
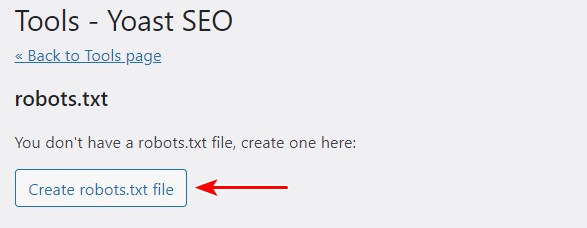
You’ll notice the file created with some default directives.
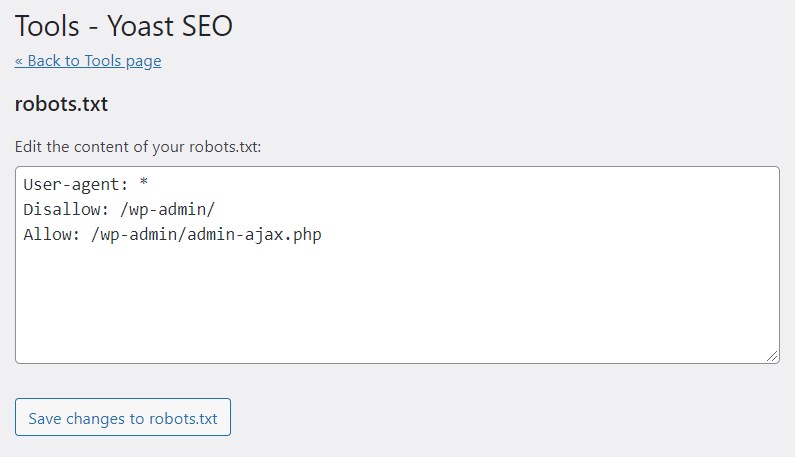
By default, Yoast SEO’s robots.txt file generator will add the following directives,
User-agent: *
Disallow: /wp-admin/
Allow: /wp-admin/admin-ajax.php
You can add more directives to the robots.txt if you choose. When you’re done, click on Save changes to robots.txt.
Go ahead and type out your domain name followed by ‘/robots.txt.’ If you find the default directives displayed on the browser, as shown in the image below, you’ve successfully created your robots.txt file.

We also recommend that you add the sitemap URL in your robots.txt.
For instance, if your website sitemap URL is https://yourdomain.com/sitemap.xml, then consider including the Sitemap: https://yourdomain.com/sitemap.xml in your robots.txt file.
Another example is if you’d like to create a directive to block the bot from crawling all the images in your website. And let’s say, we’d like to restrict this only to the GoogleBot.
In such case, our robots.txt will be as follows,
User-agent: Googlebot
Disallow: /uploads/

User-agent: *
Allow: /uploads/
And just in case you’re wondering how to find out the image folder name, simply right click on any image on your website, select open in a new tab, and note the URL in the browser. Voila!
Method 2: Create Robots.txt File Manually Using FTP
The next method is to create a robots.txt file on your local computer and upload it to your WordPress website’s root folder.
You will also require access to your WordPress hosting using an FTP client, such as Filezilla. The credentials required to log in will be available in your hosting control panel if you don’t have them already.
Remember, the robots.txt file has to be uploaded to the root folder of your website. That is, it should not be in any subdirectory.
So, once you’ve logged in using your FTP client, you will be able to see if the robots.txt file exists in your website’s root folder.
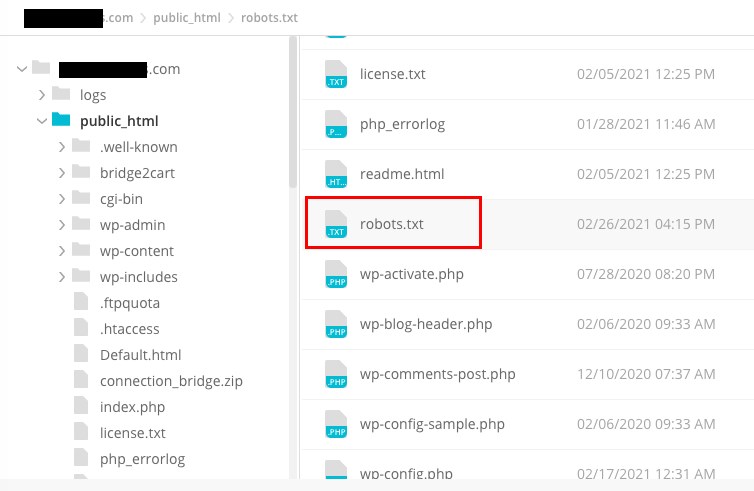
If the file exists, simply right-click on the file and select the edit option.
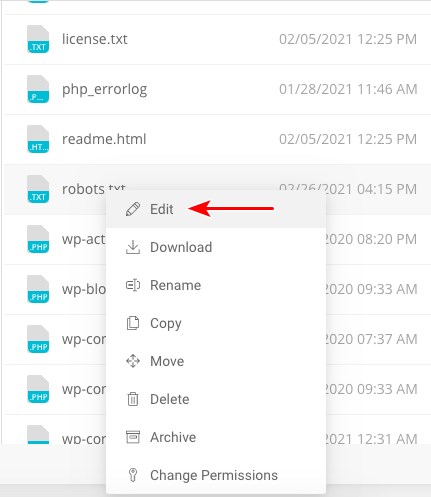
Make the changes and click on save.
If the file doesn’t exist, you’ll need to create one. You could create one by using a simple text editor such as Notepad and add the directives to the file.
For instance, include the following directives,
User-agent: *
Disallow: /wp-admin/
Allow: /wp-admin/admin-ajax.php
… and save the file as robots.txt.
Now, using your FTP client, click on ‘File Upload’ and upload the file to the website’s root folder.
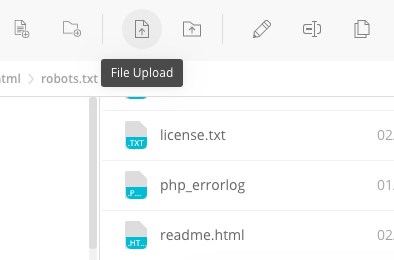
To verify if your file has been uploaded successfully, key in your domain name followed by ‘/robots.txt.’
And that’s how you upload the robots.txt file manually to your WordPress website!
Pros and Cons of Robots.txt
- It helps optimize search engine’s crawl budgets by telling them not to waste time on pages that you don’t want to index. This helps ensure that search engines crawl the pages that are most important to you.
- It helps optimize your web server by blocking the bots that are wasting resources.
- It helps to hide thank you pages, landing pages, login pages, among more than needn’t be indexed by search engines.
- You now know how to access the robots.txt file for any website. It’s pretty simple. Just enter the domain name followed by ‘/robots.txt.’ This, however, poses a certain amount of risk too. The robots.txt file may include URLs to some of your internal pages that you wouldn’t like to be indexed by search engines.
For instance, there may be a login page you wouldn’t want to get indexed. However, mentioning it in the robots.txt file does allow attackers to access the page. The same goes if you’re trying to hide some private data. - While creating the robots.txt file is pretty straightforward, if you get even a single character wrong, it will mess up all your SEO efforts.
Where to Put the Robots.txt File
We guess by now you are well aware of where the robots.txt file has to be added.
The robots.txt file should always be at the root of your website. If your domain is yourdomain.com, then the URL of your robots.txt file will be https://yourdomain.com/robots.txt.
In addition to including your robots.txt in the root directory, here are some best practices to be followed,
- It’s essential to name your file robots.txt
- The name is case sensitive. So get it right, or it won’t work
- Each directive should be on a new line
- Include a “$” symbol to mark the end of a URL
- Use individual user-agents only once
- Use comments to explain your robots.txt file to humans by starting the line with a hash (#)
How to Test Your Robots.txt File
Now that you have created your robots.txt file, it’s time to test it using a robots.txt tester tool.
The tool we recommend is the one inside Google Search Console.
To access this tool, click on Open robots.txt tester.
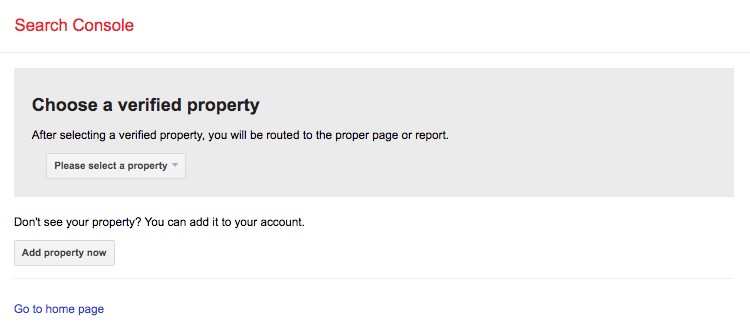
We are assuming that you have your website added to Google Search Console. If it’s not, click on ‘Add property now‘ and complete the easy-to-follow steps to include your website to Google Search Console.
Once done, your website will appear in the dropdown under ‘Please select a property.’
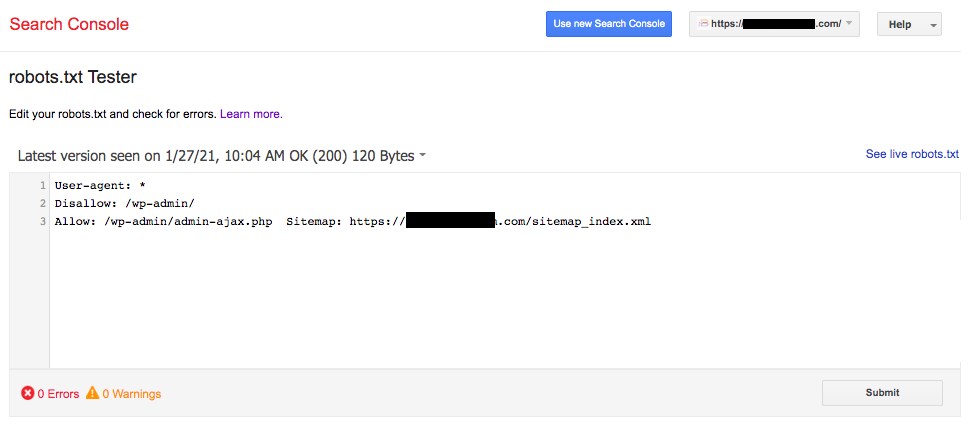
Select the website, and the tool will automatically fetch your website’s robots.txt file and highlight the errors and warnings, if any.
Do You Need a Robots.txt File for Your WordPress Site?
Yes, you do need a robots.txt file on your WordPress site. Irrespective of you having a robots.txt file or not, search engines will still crawl and index your website. But having covered what robots.txt is, how it operates, and the crawl budget, why would you not want to include one?
The robots.txt tells the search engines what to crawl and, more importantly, what not to crawl.
A primary reason to include the robots.txt is considering the adverse effects of the crawl budget.
As indicated earlier, every website has a specific crawl budget. This boils down to the number of pages a bot crawls during a session. If the bot doesn’t complete crawling all pages on your site during the session, it will come back and resume crawling in the next session.
And this slows down your website indexing rate.
A quick fix to this is by disallowing search bots from crawling unnecessary pages, media files, plugins, theme folders, among others, thereby saving your crawl quota.
Final Thoughts
When working on your website’s SEO, we place a lot of importance on optimizing the content, researching the right keywords, working on backlinks, generating a sitemap.xml, among other factors. An element of SEO some webmasters pay less attention to is the robots.txt file.
The robots.txt file may not be of great importance when you are starting with your website. But, as your website grows and the number of pages increases, it pays rich dividends if we start following the best practices as far as the robots.txt is concerned.
We hope this article has helped you gain some insightful information on what is robots.txt and how to create one on your website. So, what directives have you set up in your robots.txt file?

Pratik Chaskar holds the pivotal role of CTO at Brainstorm Force, serving as the backbone of the company. Renowned for his organizational skills, strategic thinking, problem-solving attitude, and expertise in leading and executing plans, Pratik plays a crucial role in the BSF’s technological landscape.
Disclosure: This blog may contain affiliate links. If you make a purchase through one of these links, we may receive a small commission. Read disclosure. Rest assured that we only recommend products that we have personally used and believe will add value to our readers. Thanks for your support!




Thank you for this detailed article. Before reading your guide, I was not aware that we could create a robots.txt that easily. I created a robots.txt file for my website in seconds using Yoast SEO plugin.
Hello Mae,
So glad that you found the article useful. 🙂
Thank you for sharing this great resource. This article was helpful for me to know robots.txt in a better way. This guide gave us a piece of new information. I have updated my website’s robots.txt as per your suggestions given in the article. Thanks for keeping us updating with new ideas.
That’s great!
I have just finished reading the article you wrote on customer feedback. I really appreciated your clarity in article and the way you explore the things. The topic is very interesting. Keep up the good work.