Want to explore WordPress without buying a domain or hosting? Need a safe space to build, test, or tweak your site before going live?
A local WordPress installation is the perfect solution. With XAMPP, you can turn your computer into a private testing ground – experiment with themes, plugins, and site designs without any risk.
In this guide, we’ll show you how to set up WordPress on your local computer using XAMPP.
Pro Tip: XAMPP is a great option, but we’ll also introduce a powerful alternative – a modern sandbox environment that lets you test anything in WordPress without any setup hassles. Stay tuned!
Before we dive in, let’s look at why setting up WordPress locally is a game-changer.
Why Set up a WordPress Website Locally?
I recall my early days as a website developer.
To create a website, the first step would be to set up a server on a local computer. If the website required having a database, my next step would be to set that up as well.
In short, I would have to set up a development environment in my local system.
For this, I would download two separate applications, the web server application, and the database. Each has its own installation procedures and you have to run them independently to start working on your website. Before you know it you have spent a couple of hours figuring out and setting up the environment, even before you have even begun developing the website!
What developing locally allows you to do is to ensure you have a working model of the website on the live server from day one. It is a great option when you’d like to test the functionality locally before the world gets to see your website.
Learn WordPress Without a Domain and Hosting
Another reason to create a local WordPress site is if you are starting out.
If you want to learn WordPress, you would normally have to invest in a domain name and hosting. Yes, there are free options too, such as WordPress.com.
But do these free options allow you to exploit all the features and functionalities that WordPress.org has to offer? No, they don’t! And we have already compared WordPress.com and WordPress.org detail by detail.
So, if you’d like to learn WordPress without investing upfront in a domain and hosting, it makes sense to create a local version of your site.
Just in case you’d like to create a WordPress website after purchasing a domain name and hosting, this article on How to Make a WordPress Website should help.
As you may have realized by now, to create a WordPress website locally, we need to set up a local server. Or in networking terminology, we need to set up a localhost.
What is Localhost?
Localhost refers to your computer and how you access it.
The localhost is used to access the network services, such as directory, database, email, files, printers, that are running on the host via the loopback network interface.
Too technical? Well, let me break this down.
The loopback mechanism may be used to run a network service on a host computer without requiring a physical (i.e., hardware) network interface, such as a network port or a socket, or even a network interface controller.
For example, a locally created WordPress website may be accessed from the browser by the URL ‘http://localhost’, as long as XAMPP, WAMP, DevKinsta or other software is running.
As is the case with any domain name, the localhost also has an IP (Internet Protocol) address. The IP addresses range from 127.0.0.0 to 127.255.255.255. However, the loopback address has a default IP of 127.0.0.1.
Typically, when you use an IP address, you are trying to connect to a remote computer over the internet.
For example, when typing wpastra.com in a web browser it directs you to Astra’s web server and Astra’s main page.
However, with the loopback address, you are calling the localhost, i.e., your computer.
And, for the sake of this article, we will go ahead and set up our local server using XAMPP.
Which takes us to the next topic.
What is XAMPP?
While we did cover what localhost is, we haven’t covered why we need the localhost.
WordPress is written using PHP (Hypertext Preprocessor). Just like WordPress, PHP is also open-source and is a widely-used programming and scripting language to create dynamic and interactive websites.
And where do you think all the data, such as blog articles, product details, shown on your website is stored? That’s where the MySQL database comes into the picture.
MySQL is a DBMS (Database Management System) that is used by WordPress to store and retrieve all your website information.
Again, just like WordPress and PHP, MySQL too is open-source.
And just in case you are wondering what an open-source is.
Well, an open-source is software for which the source code is made freely available and it may be redistributed and modified to best suit your requirements.
And to run PHP and MySQL, which in turn is required to run your WordPress website, you require a web server.
Yes, you’ve guessed it right.
To create your local web server, you will need to install XAMPP.

As their website puts it across, XAMPP is a very popular PHP development environment.
For a newbie, setting up the Apache, PHP, and MySQL environments individually on your local computer could be overwhelming. That’s where using XAMPP helps.
XAMPP is a completely free and easy to install software package that helps you set up a local server environment.
You can download the software for Windows, Linux, and Mac.
How to install WordPress using XAMPP?
The following are the 3 simple steps to follow for installing WordPress using XAMPP
Step 1: Download and Install XAMPP on Your Local Computer
Step 2. Download and install WordPress on your local computer
Step 3. Setting up the MySQL Database
In this article, we will go ahead and install XAMPP so we can use the localhost on both Windows and Mac.
Step 1: Download and Install XAMPP on Your Local Computer
Installing XAMPP on Windows
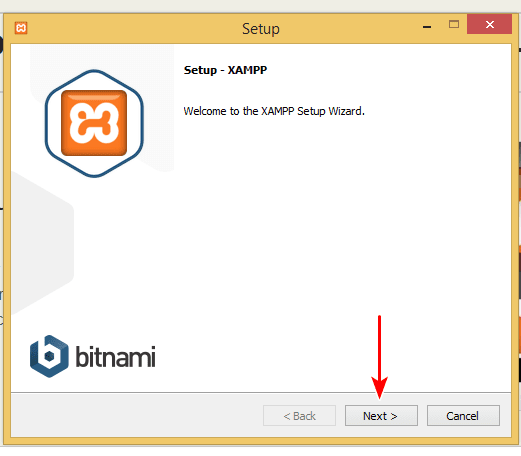
Visit the XAMPP website and click on the ‘XAMPP for Windows’. An installer file (EXE file) will download. Click on the installer and proceed as instructed.
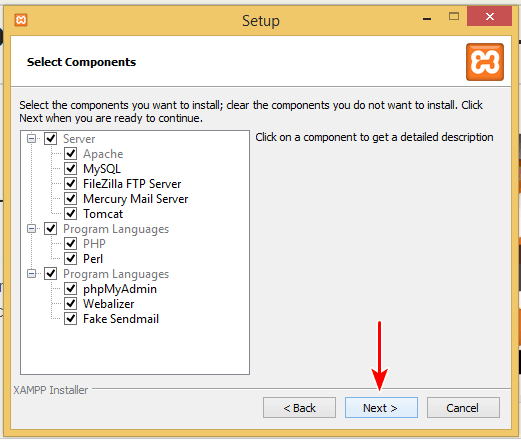
You can leave the default settings as shown in the image below.
You could decide on the folder where you’d like to install XAMPP.
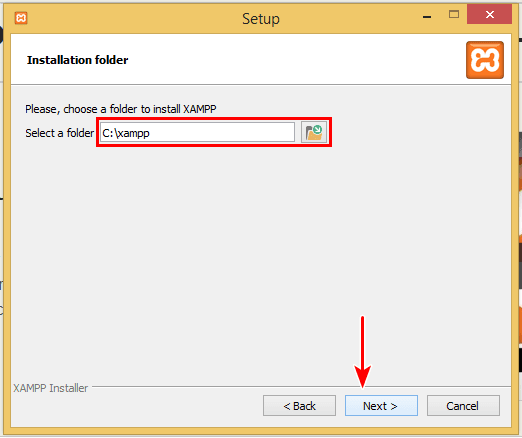
By default, the destination drive and folder will be “C:\xampp”.
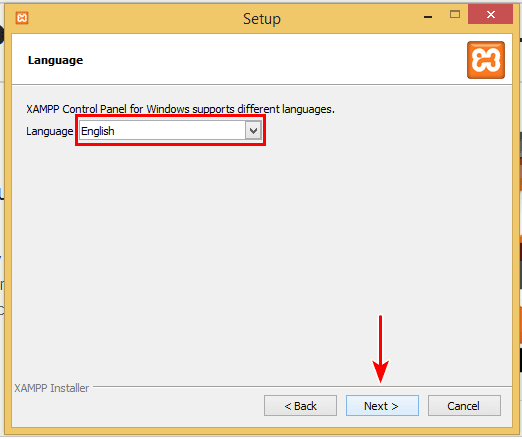
And the default language will be set to English.
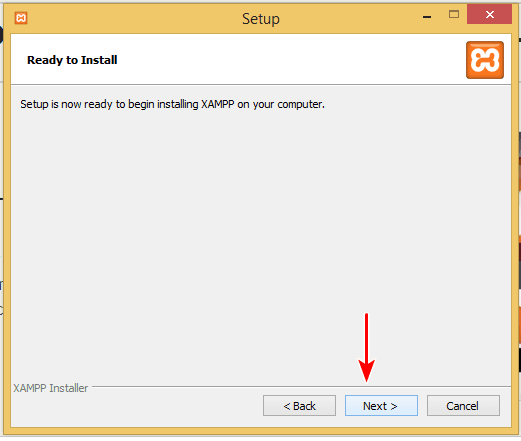
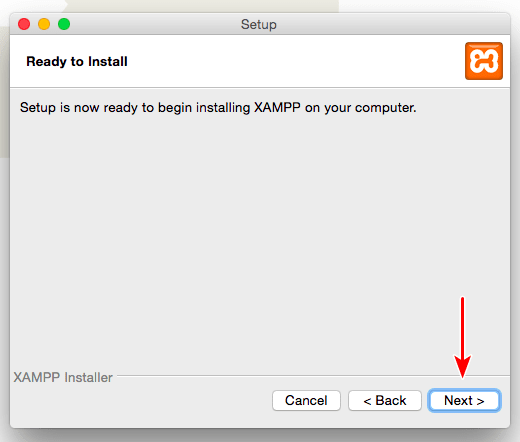
Click on ‘Next’ when you find the above window, wherein you are prompted ‘Ready to Install’.
You may also be prompted via a security alert to allow access to the installation.
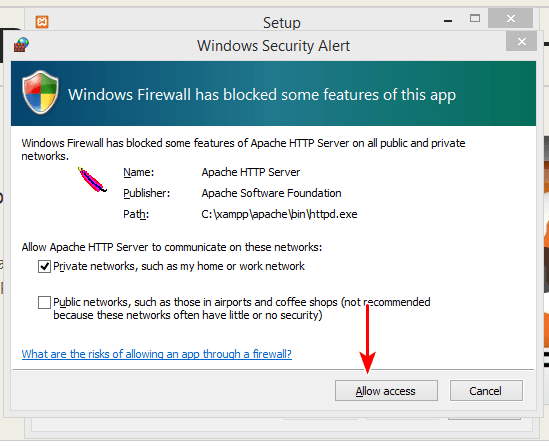
Click on ‘Allow access’ to continue.
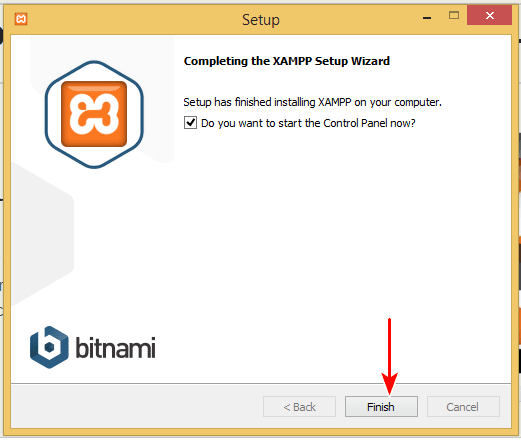
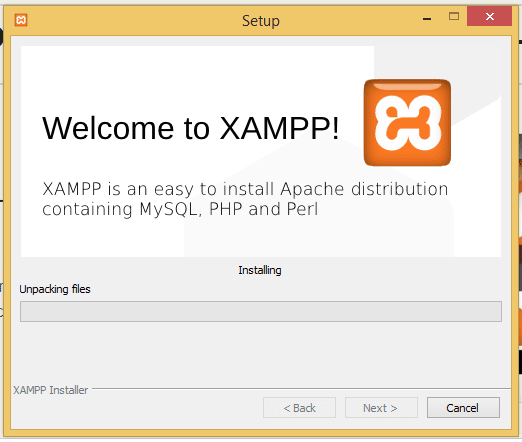
That’s it! XAMPP has been installed.
On clicking ‘Finish’, the Control Panel will open up.
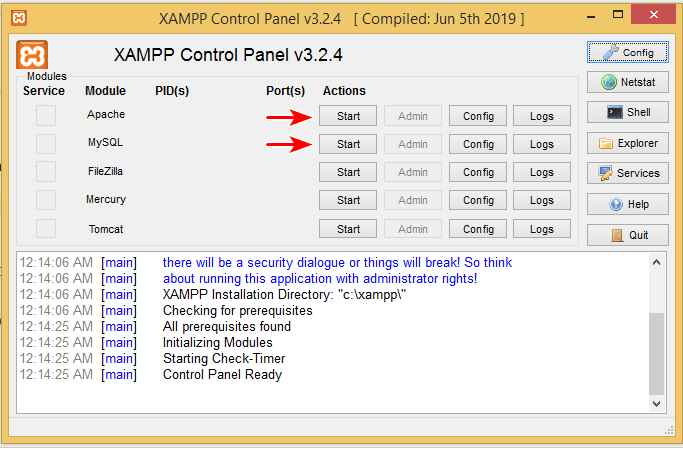
The control panel allows you to ‘Start’ and ‘Stop’ the corresponding services.
Go ahead and click ‘Start’ against Apache and MySQL.
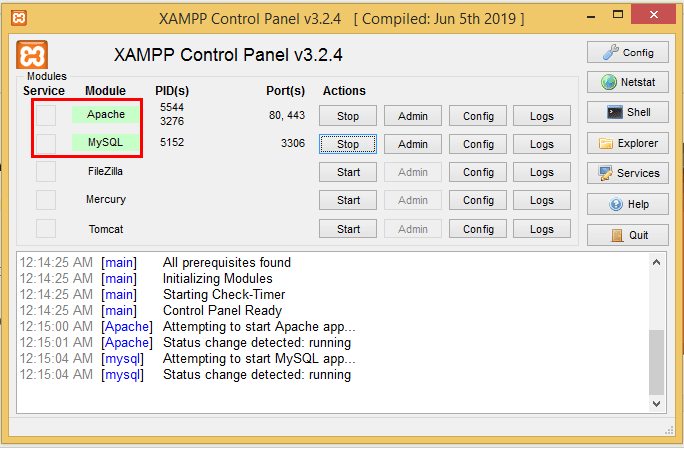
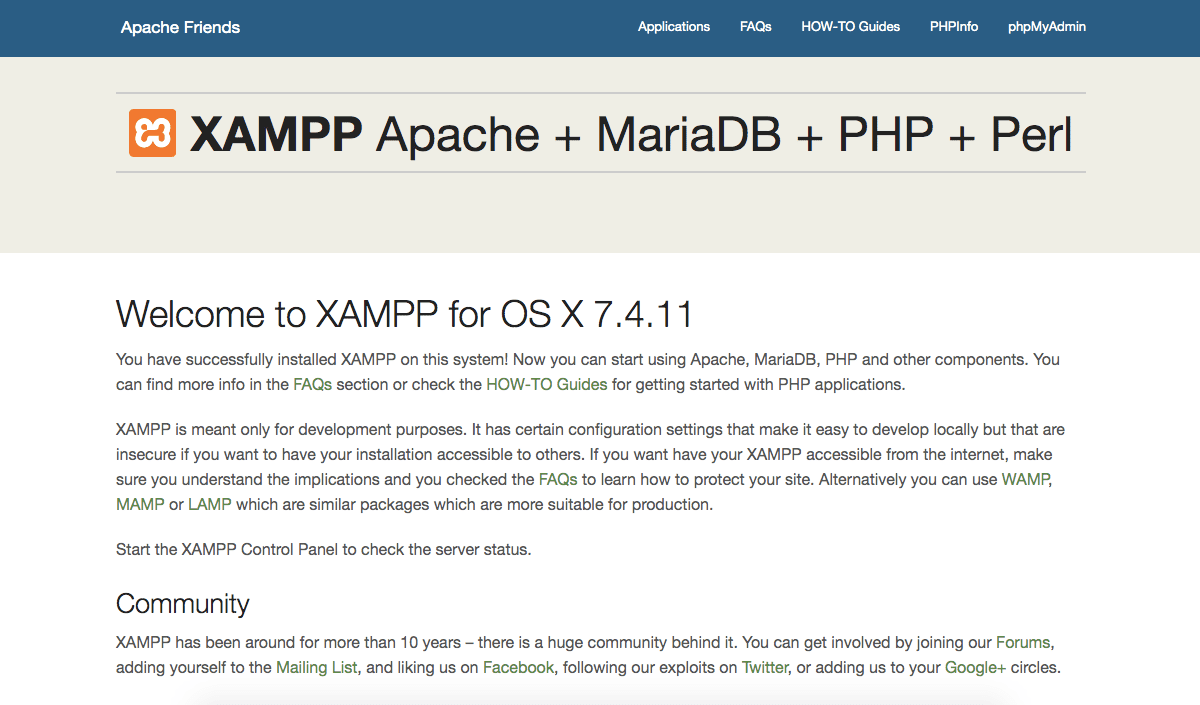
Now, to check if the installation has been completed successfully, type ‘http://localhost’ in your web browser.
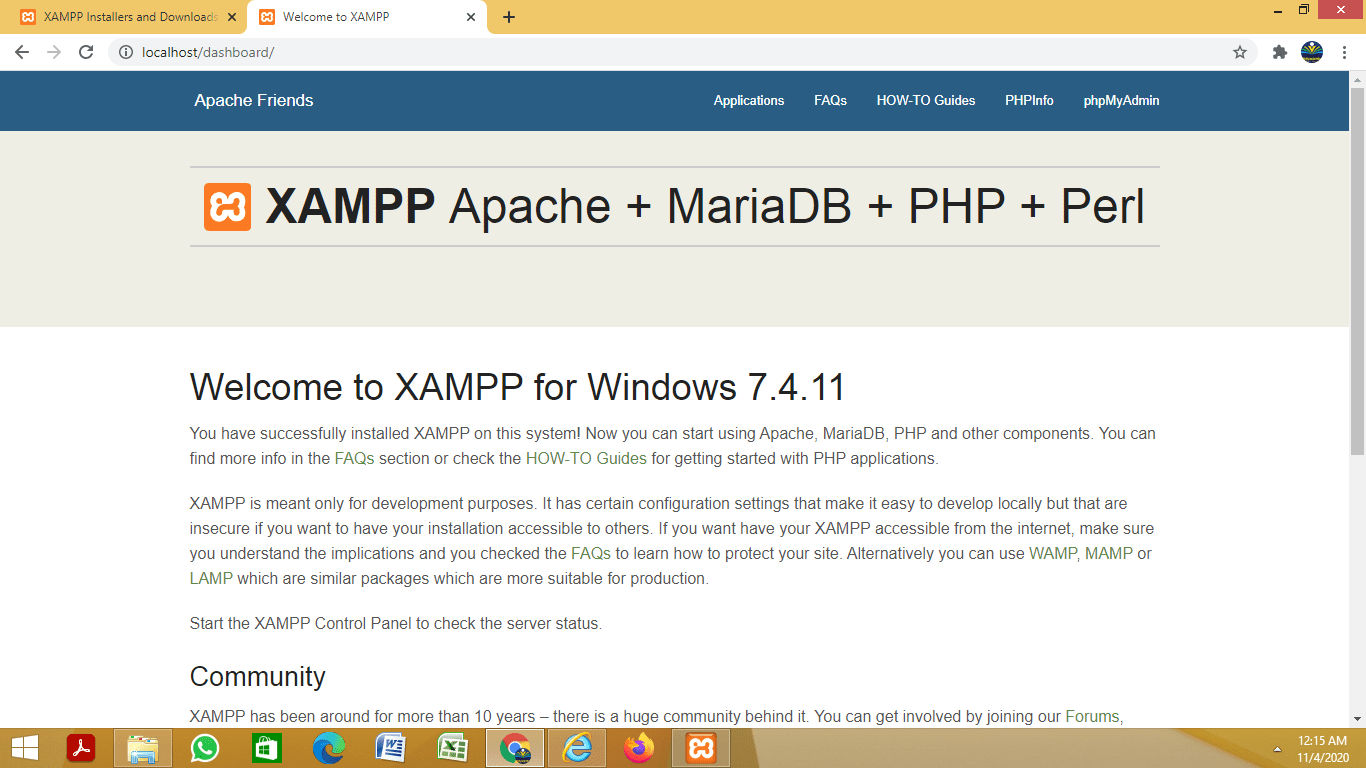
Upon successful installation, you will be able to access the above home page.
Now that we have installed XAMPP locally on a Windows operating system, let’s look at the steps involved to install XAMPP locally on the Mac.
Installing XAMPP on Mac
While the steps are more or less the same, there are a few differences you should take note of.
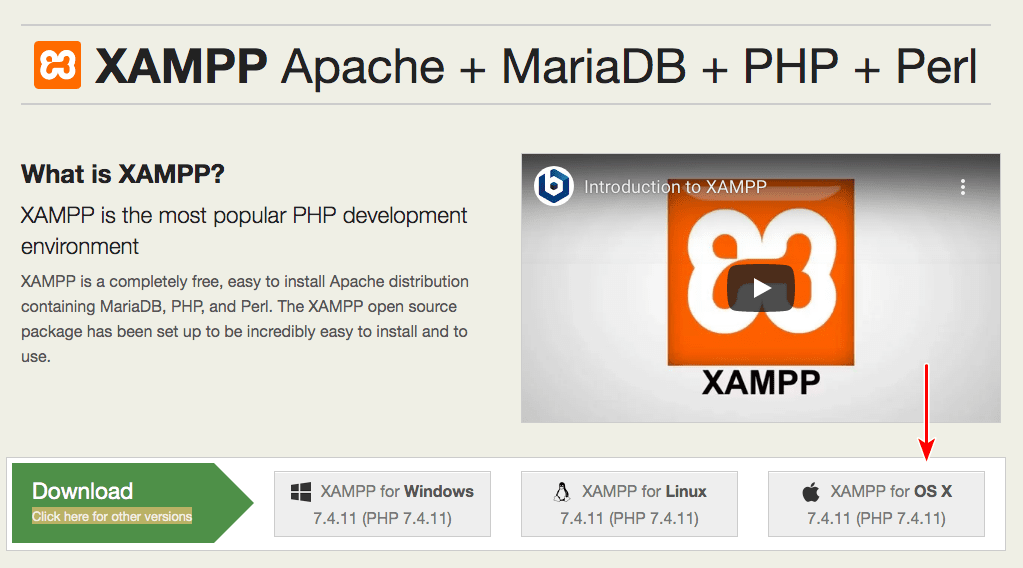
To begin with, instead of clicking on the ‘XAMPP for OS X’ tab on the homepage, click on the ‘Click here for other versions’ link under ‘Download’.
In some cases, the default download file after clicking on the ‘XAMPP for OS X’, may not work. Hence, it is recommended to select a different version of the download file.
Under the ‘other versions’ page, scroll down to the ‘XAMPP for OS X’ section.
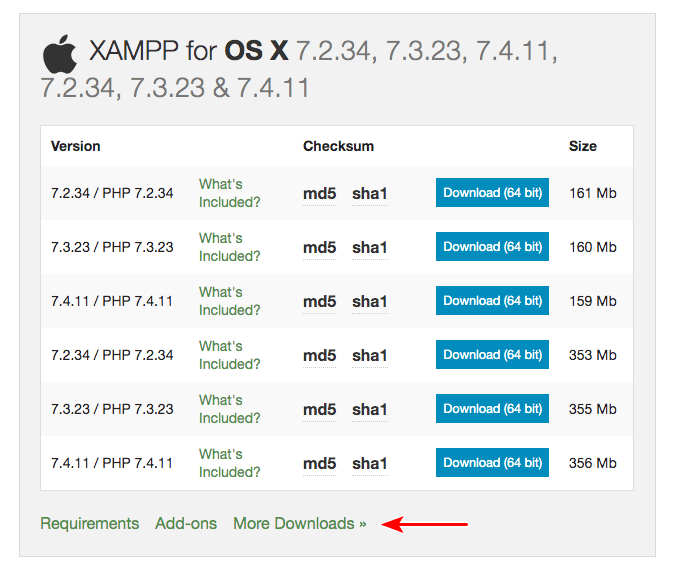
Click on ‘More Downloads’.
You will be directed to an external website.
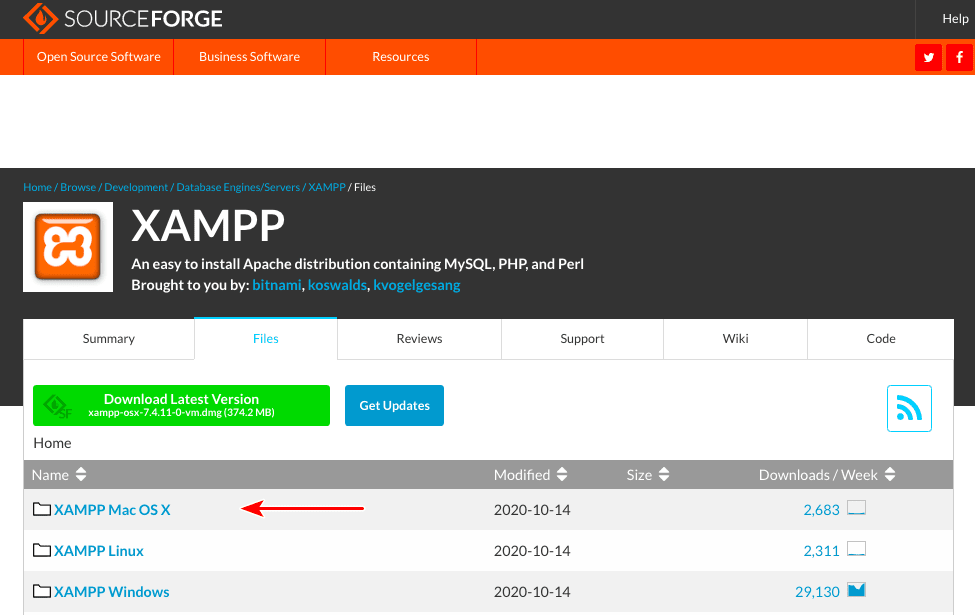
Select ‘XAMPP Mac OS X’.
And then click on ‘7.4.11’. This option will have the maximum downloads per week.
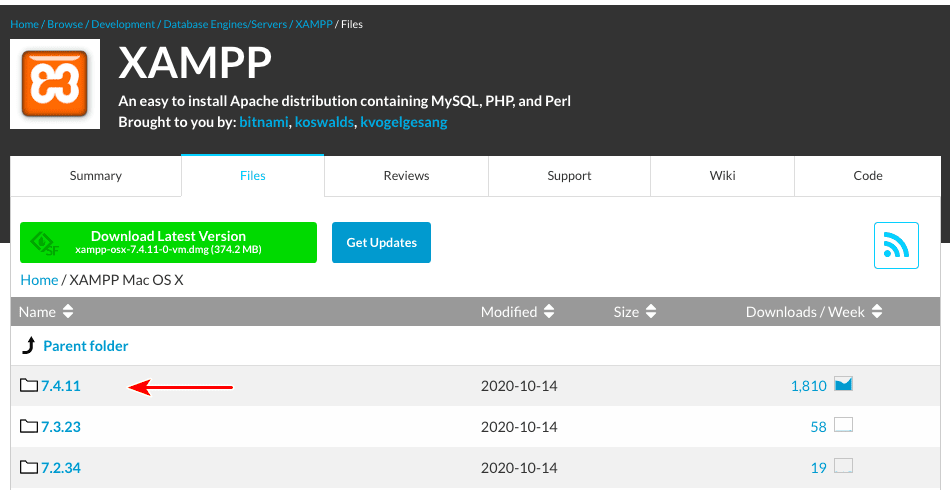
Now, you will notice two versions of the software.
The first being ‘xampp-osx-7.4.11-0-vm.dmg’ and the other being ‘xampp-osx-7.4.11-0-installer.dmg’.
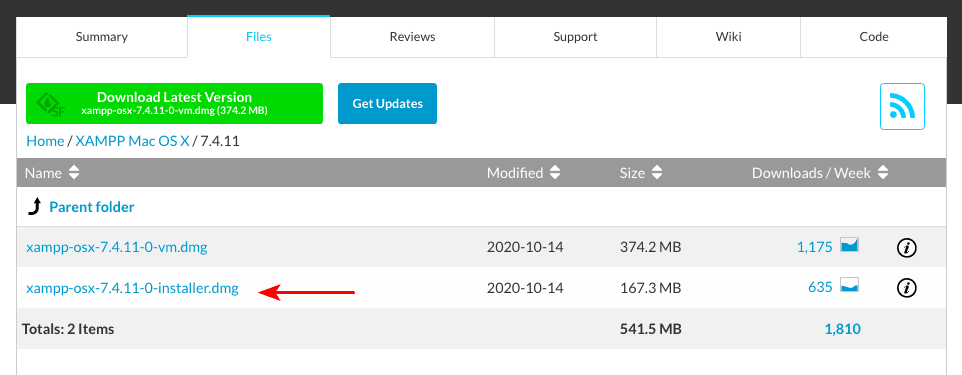
Select the ‘installer’ version.
Once the download has completed, double click on the image to start the installation process.
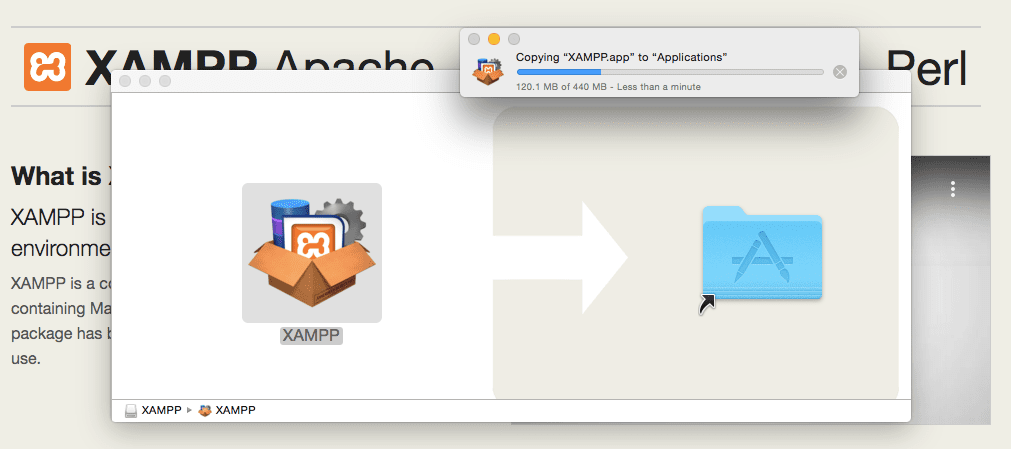
And then, drag the XAMPP folder into the Applications folder.
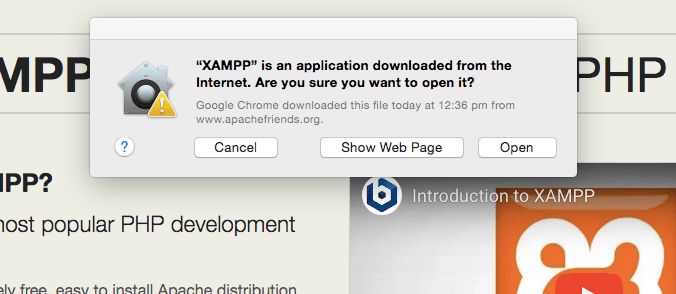
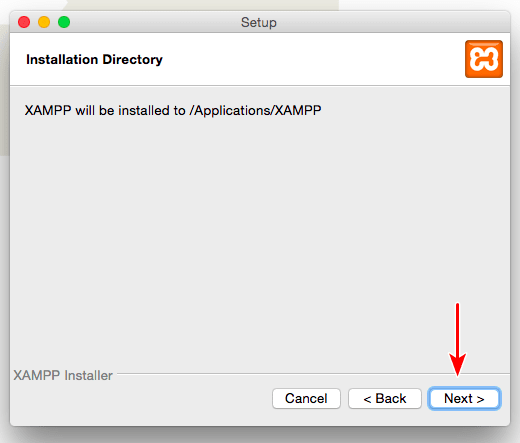
That’s all. XAMPP is now installed below the ‘/Applications/XAMPP’ directory.
Double click on XAMPP. You will be prompted to proceed with opening the application. Click on ‘Open’.
The installation process will start and you could follow through with the next steps, that are self-explanatory, as shown below.
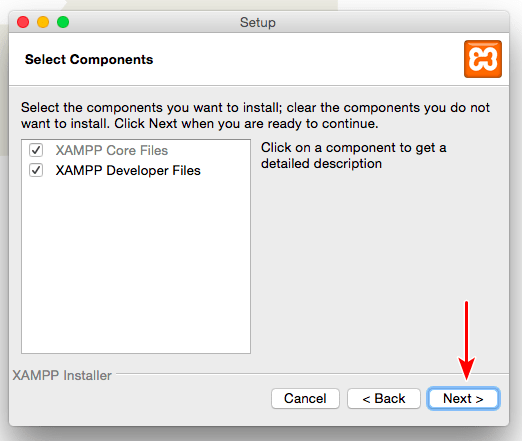
In the above-shown window, you can select or unselect the components you wish to install.
The ‘XAMPP Developer Files’ can be unselected, if you wish to. The ‘XAMPP Core Files’ is mandatory and will remain selected.
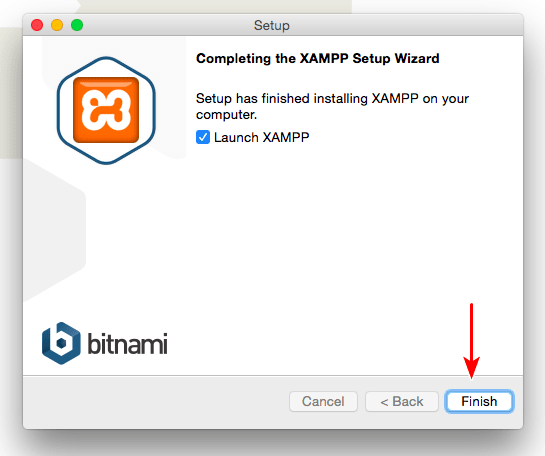
With the installation process complete, launch XAMPP by clicking on the ‘Finish’ button.
This will open up the application window, as shown.
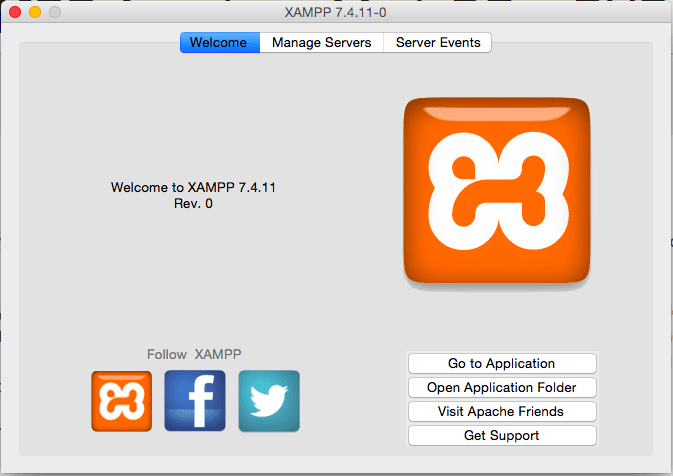
Click on ‘Go to Application’ or type ‘http://localhost’ into the browser to check if your installation process has gone well.
If you find the above page, well then, you have successfully installed XAMPP on your local Mac computer.
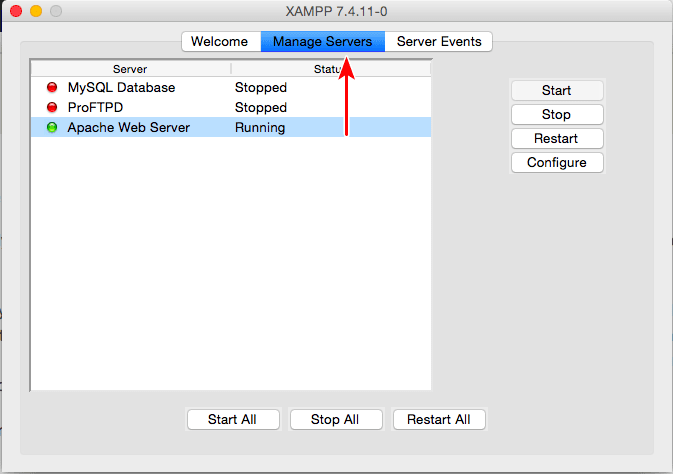
Head back to the application window and click on the ‘Manage Servers’ tab.
You will notice the ‘Apache Web Server’ is running by default. If this isn’t running, you may not be able to access the localhost page. To start the service, all you have to do is click on the ‘Start’ button. Likewise, to stop running the Apache service, click on the ‘Stop’ button.
While we will be covering this in the next step, I would also recommend you start the ‘MySQL Database’ service.
Now that we have installed XAMPP on our local computer, the next step is to install WordPress.
Step 2. Download and install WordPress on your local computer
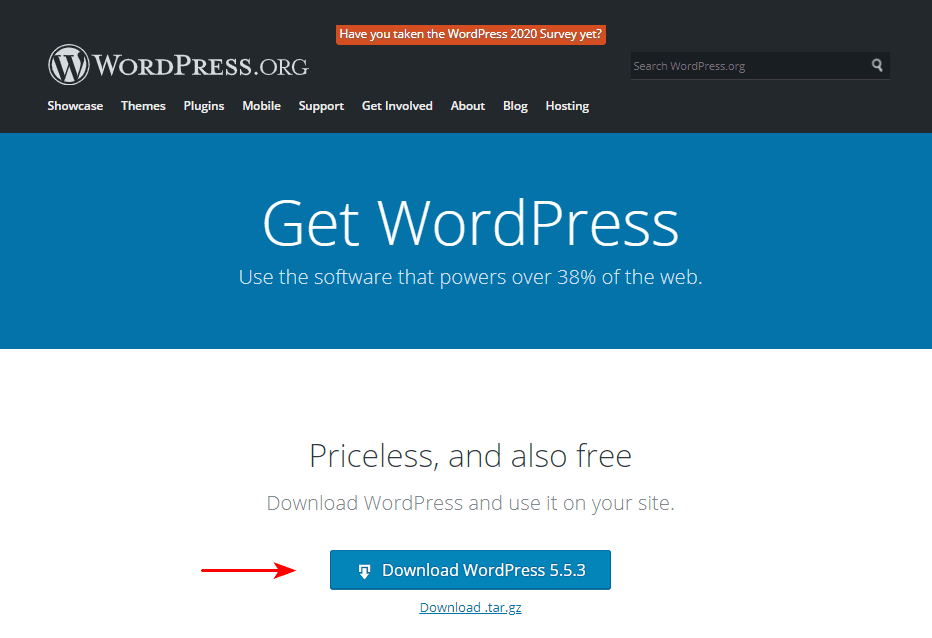
Download the latest version of WordPress (currently 5.5.3) from WordPress.org.
A ‘wordpress-5.5.3.zip’ file will get downloaded. Extract the contents of the file.
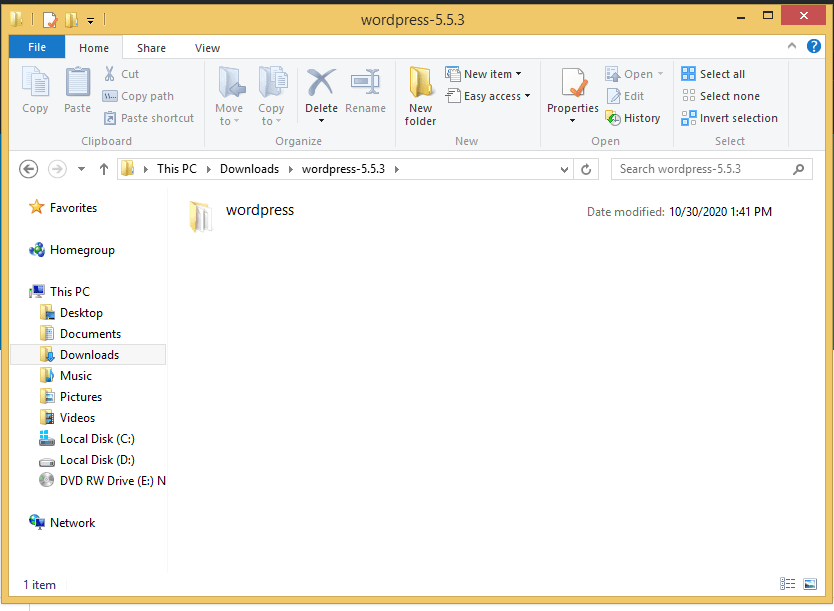
As shown in the image above, the contents of the file have been extracted to a folder ‘wordpress-5.5.3’. Yes, if you have a different version of WordPress, the folder name will change accordingly.
Now, copy the ‘wordpress’ folder. This folder contains all the files required to create a WordPress website.
Head over to the XAMPP folder.
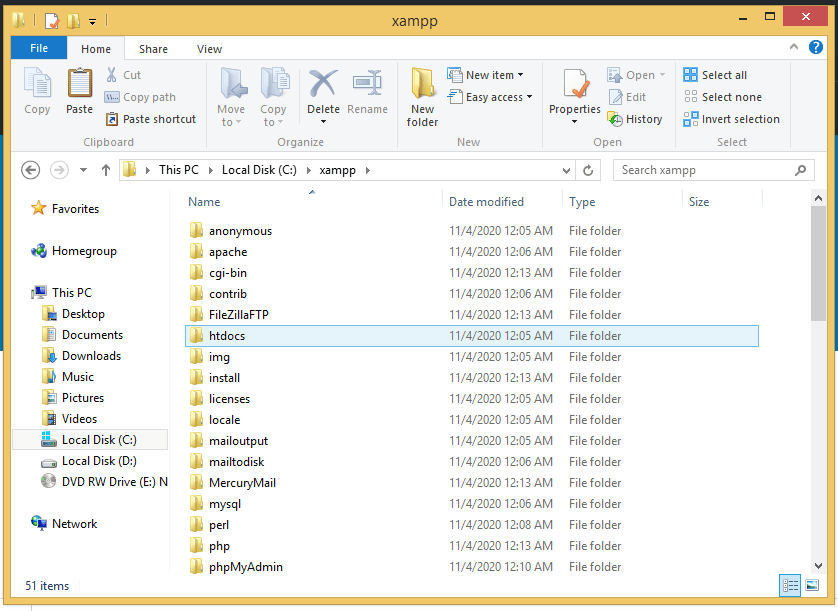
Under XAMPP, you will notice the ‘htdocs’ folder.
Go ahead and paste the ‘wordpress’ folder inside ‘htdocs’.
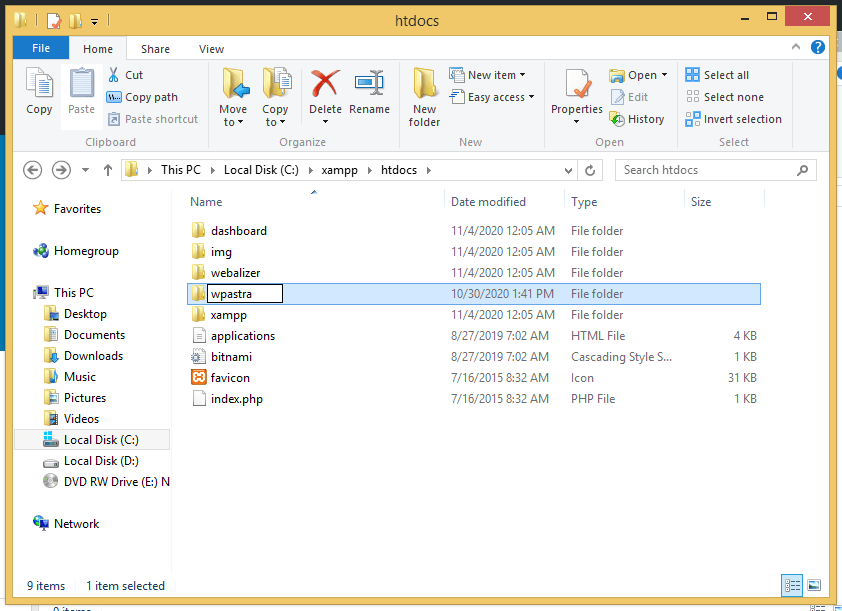
Once you have transferred the folder into ‘htdocs’, you can rename the folder to that of your choice. Typically, you can name it as the website you are creating.
For example, I’ve renamed the folder to ‘wpastra’, as shown in the image above.
Now, to access your WordPress website and to verify if the installation has gone through without any errors, type out the URL ‘http://localhost/<wordpress-folder>’ in the web browser. Where ‘<wordpress-folder>’ is the name of the folder you’ve entered.
Which in my case will be ‘http://localhost/wpastra’.
Upon successful installation, you should reach the following page.

Select the language of your preference and click on continue.
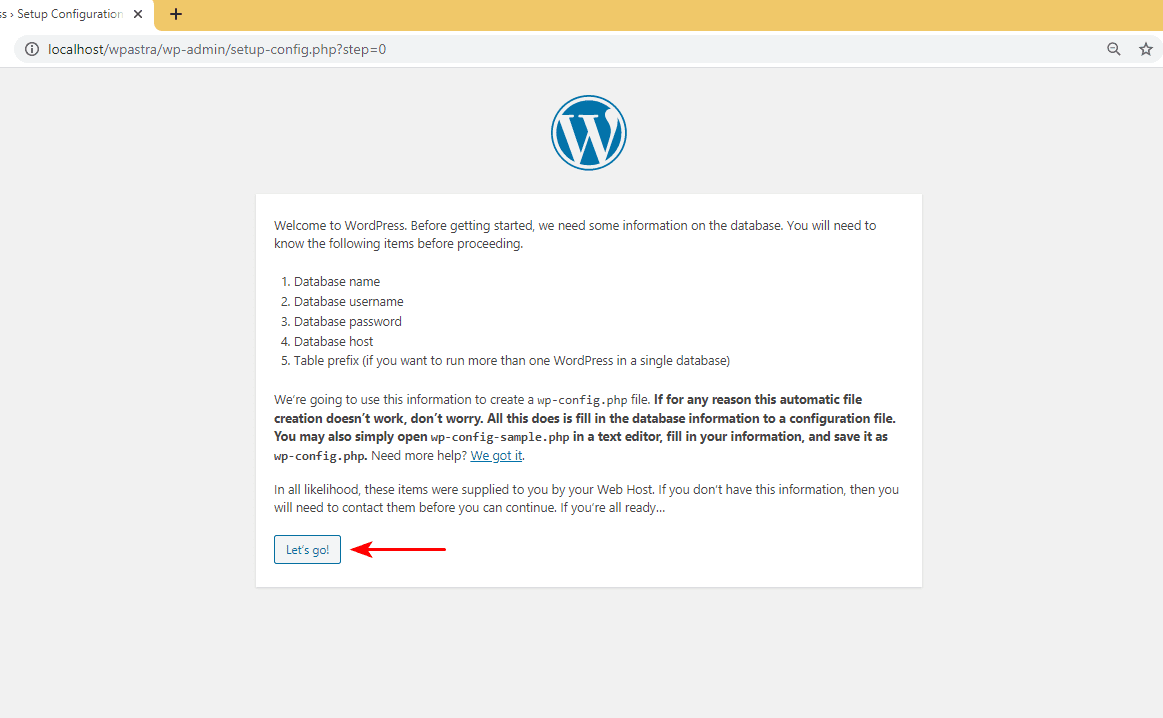
On the following page, as shown below, you will be asked to enter in details of your database.
And how exactly do we get the details of the database?
Well, that is where our final step comes into play.
And just to add, the steps involved to install WordPress locally on a Mac is the same until here.
Step 3. Setting up the MySQL Database
Head back to the localhost main page, i.e., ‘http://localhost’. You should be directed to the Dashboard (http://localhost/dashboard).
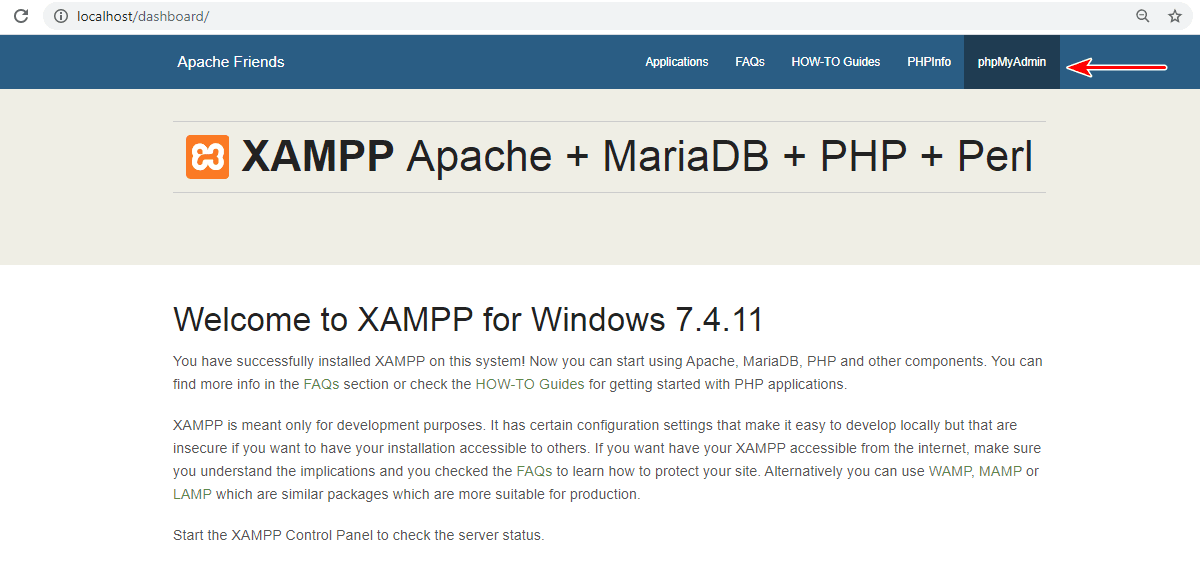
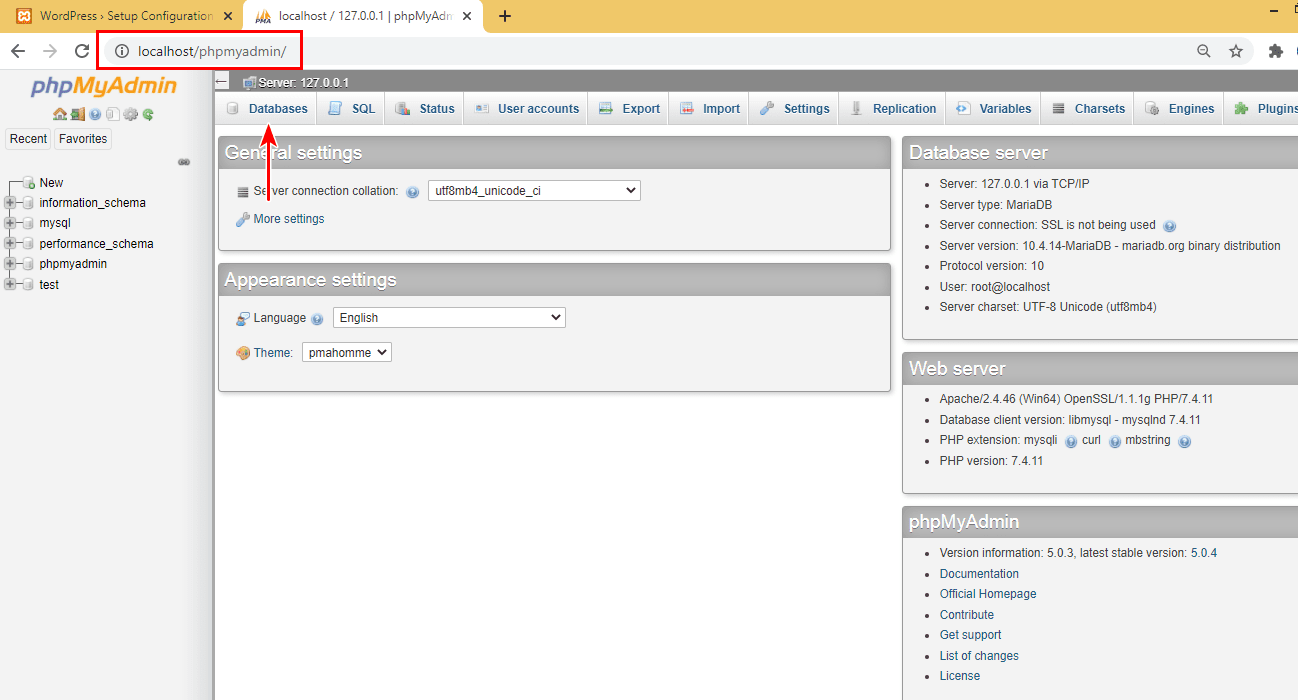
Click on the ‘phpMyAdmin’ link on the top right-hand corner of the page.
You will be directed to the ‘phpMyAdmin’ dashboard.
On the left-hand side, you will notice several existing database names.
To create a new database, click on the ‘Databases’ tab on the top.
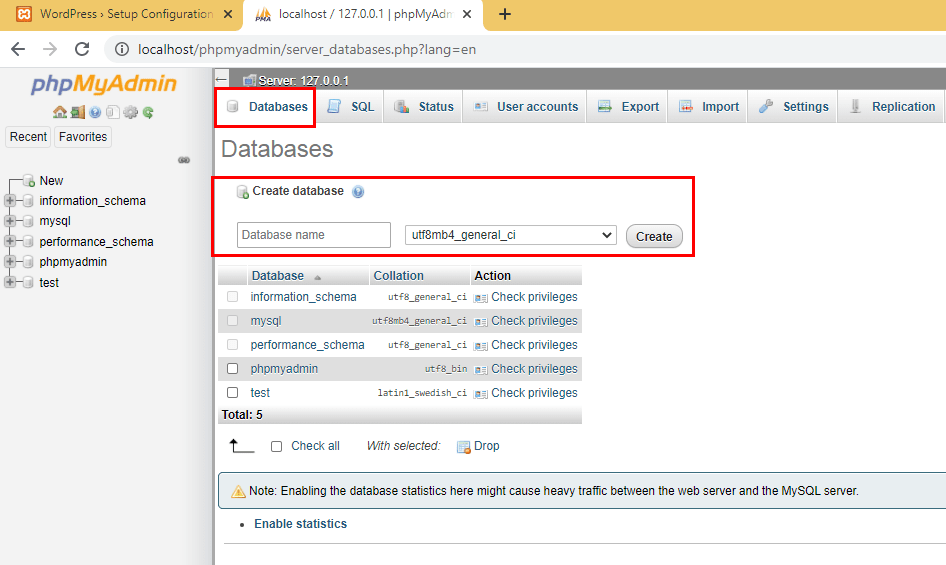
Enter a ‘Database name’ and click on ‘Create’.
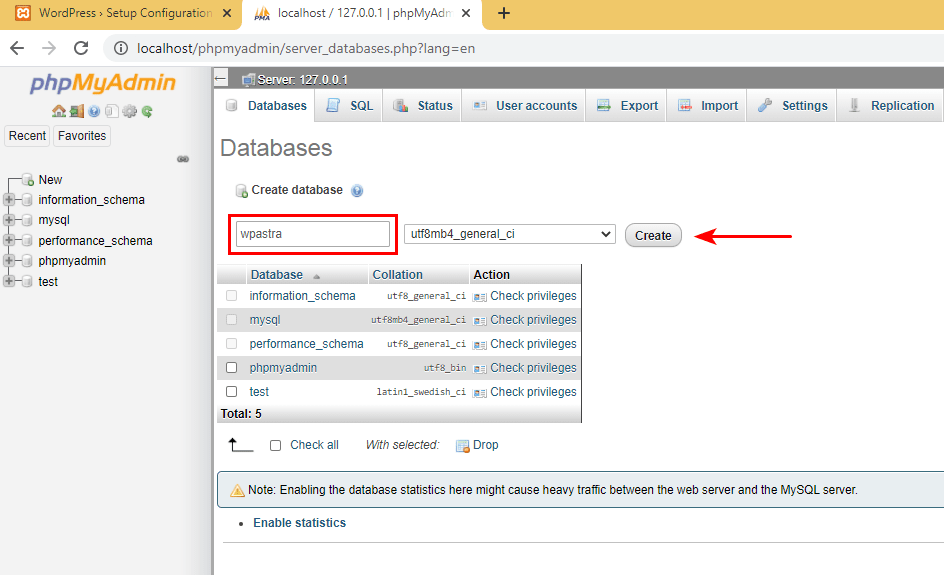
For example, I’ve created a database by the name ‘wpastra’.
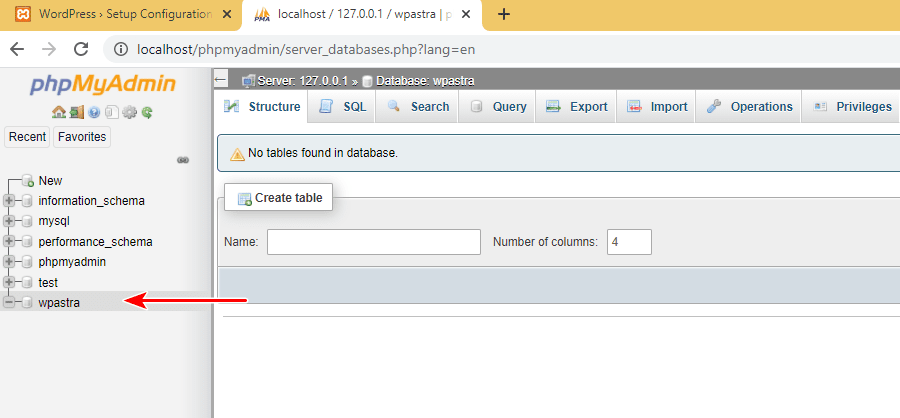
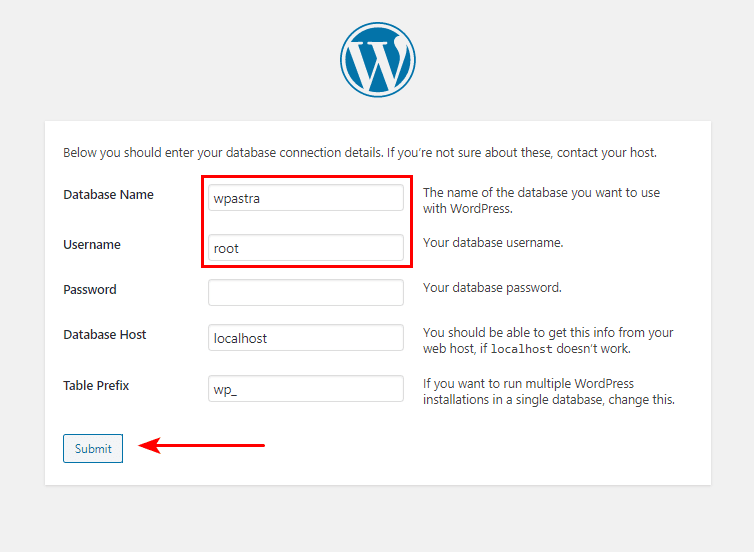
Now that the database has been created, head back to the WordPress installation page and click on ‘Let’s go!’.
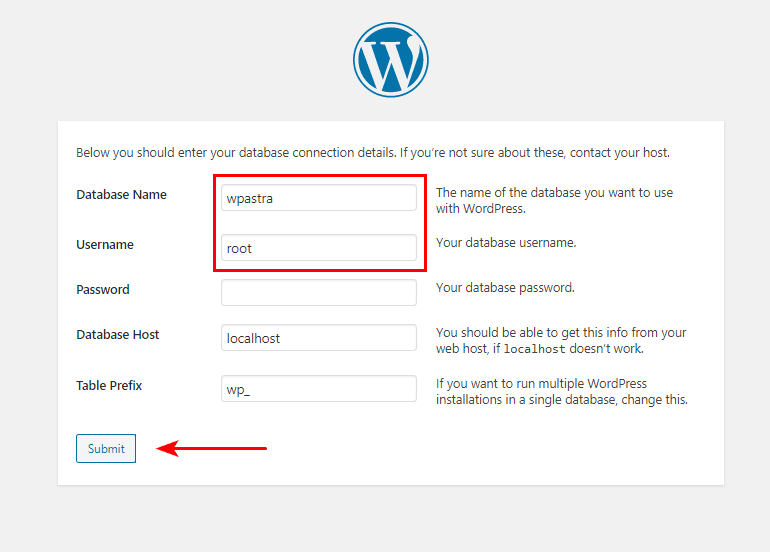
To begin, enter the name of the database you just created under ‘Database Name’.
As for the ‘Username’, enter the same as ‘root’. And the ‘Password’ field can be left empty. Leave the remaining two fields, i.e., ‘Database Host’ and ‘Table Prefix’, as the default values. Which are ‘localhost’ and ‘wp_’ respectively.
Once completed, click on ‘Submit’.
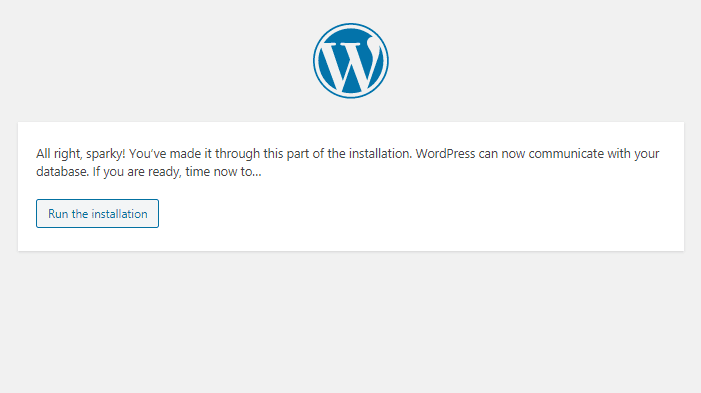
You should now reach the following page. If you have, well then, your connection to the database is working just fine!
Go ahead and click on ‘Run the installation’.
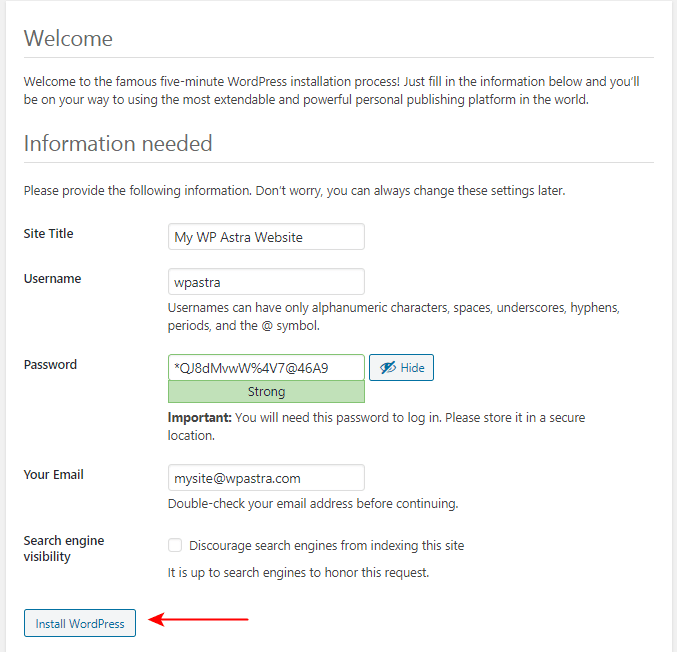
Key in the ‘Site Title’, the ‘Username’, the ‘Password’ and ‘Your Email’.
As is shown in the image above, I’ve keyed in the required fields.
And then, click on ‘Install WordPress’.
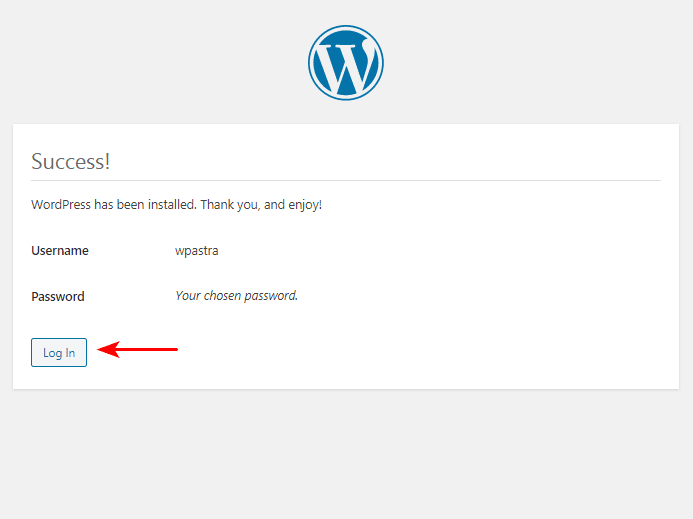
Click on ‘Log In’ once the installation has been completed successfully.
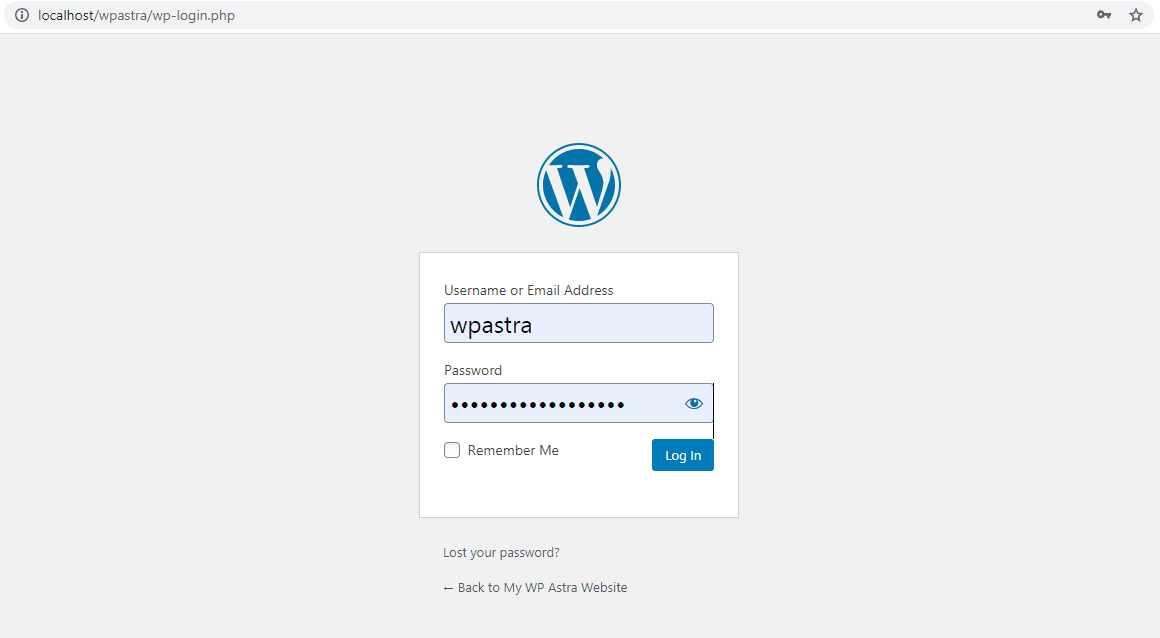
And you will get to see your WordPress login screen.
Enter the username and password you just created.
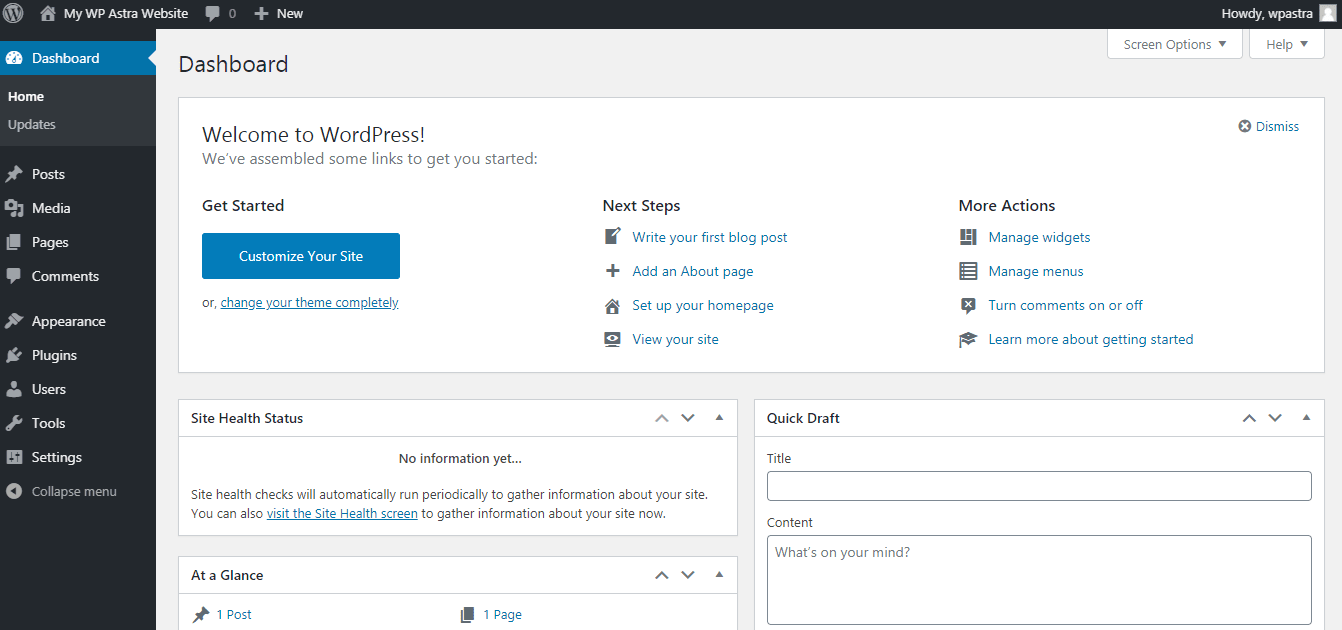
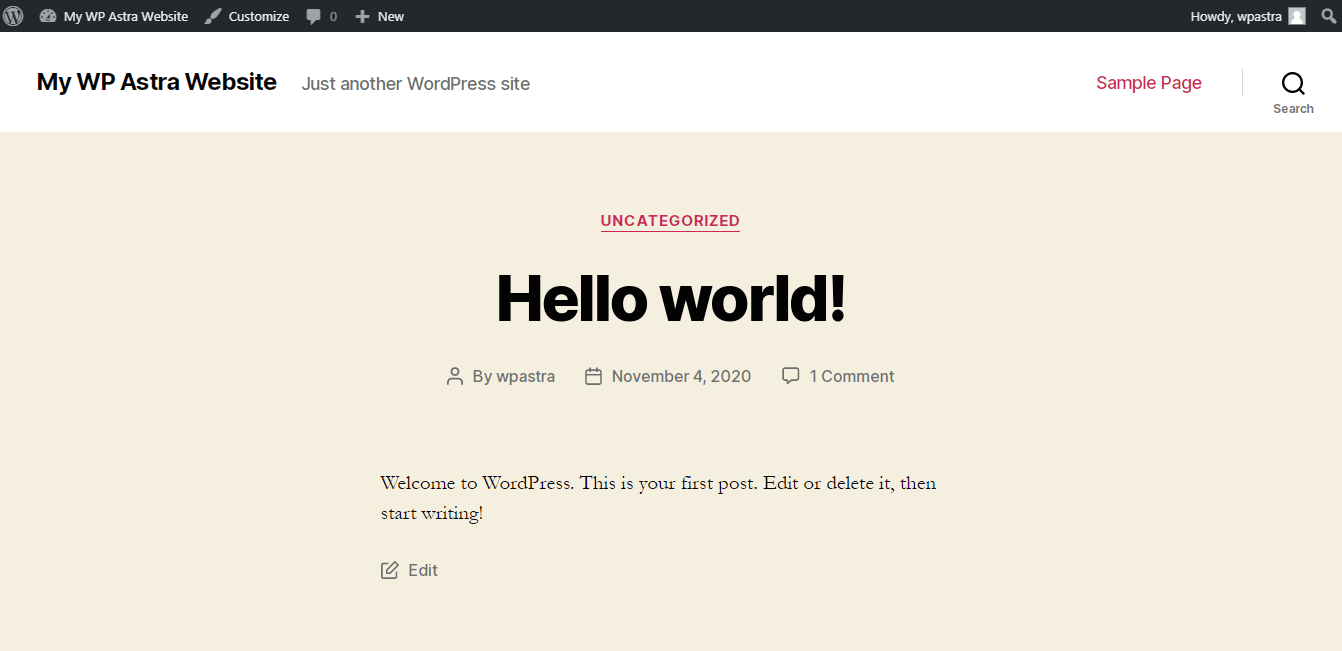
And voila! You are on the WordPress dashboard. You have created a local WordPress website using XAMPP.
You can access your website by entering in the URL, which for this example is ‘http://localhost/wpastra’.
Go ahead, install your themes, the plugins, test the complete functionalities, and create your WordPress website locally. The local installation works exactly the same as a hosted version.
Related articles
- How to Install Astra Theme?
- How to Install Starter Templates (Free) Plugin?
- Best Free Theme for Elementor
- Things to do after installing the WordPress site
Setting up MySQL on Mac
While most of the steps mentioned above while setting up MySQL and creating the database locally on the Windows operating system are the same, there are a couple of differences to be noted.
And the steps to be noted are after entering in the database details.
As shown above, the steps until here are the same as explained earlier.
After entering the database details, click on ‘Submit’.
You will now find yourself on a page, as shown below, with some bit of PHP code.
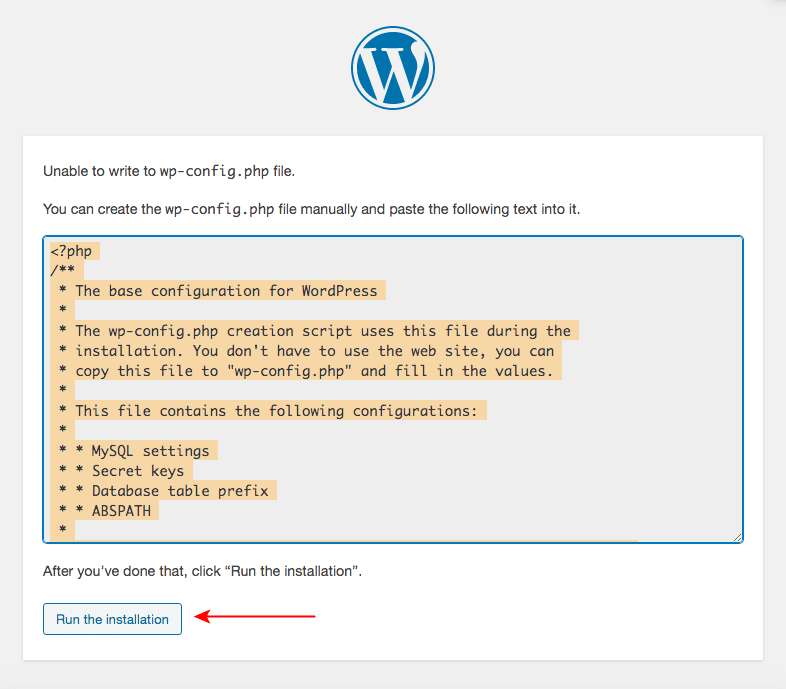
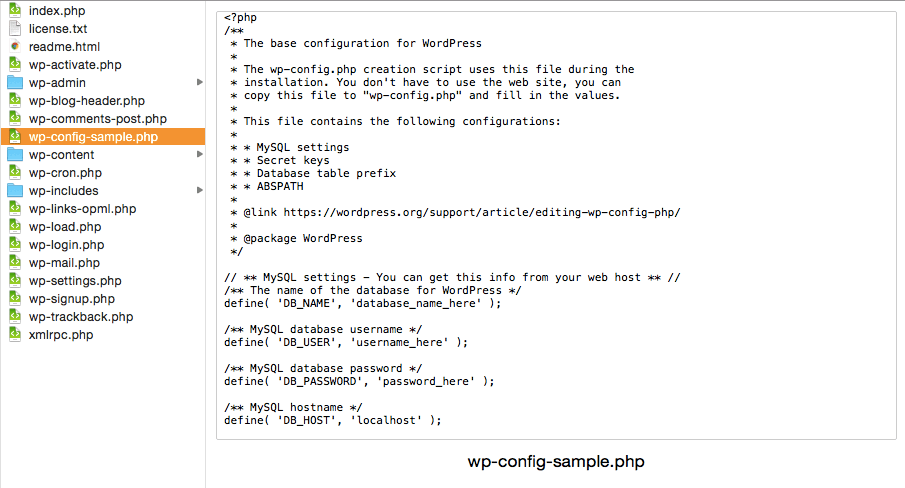
You will have to copy the code highlighted above and create a file ‘wp-config.php’.
Alternatively, if you check the ‘wordpress’ folder you transferred into the XAMPP folder, you would notice a file by the name ‘wp-config-sample.php’.
Open this file in a text editor of your choice. Delete the contents of the file and replace it with the code you just copied. And save the file.
Once you’ve completed this step, rename the file to ‘wp-config.php’.
And then, go back to the installation process and click on ‘Run the installation’.
The remaining steps are the same as what has been covered earlier while setting up MySQL for the Windows operating system.
And you will have successfully installed WordPress locally on your Mac system as well.
Troubleshooting Common Issues While Installing XAMPP and WordPress
I may have been lucky while installing XAMPP and WordPress while creating this article. However, if you face any issues during installation, here are links to some common issues and their solutions.
Creating a Test Environment with ZipWP

While setting up WordPress locally is great for testing, it still has limitations.
You’re working in an offline environment, meaning you don’t get a real-world experience of how your site performs on the web. That’s where ZipWP changes the game.
Instead of setting up servers, databases, and configurations manually, you can launch a fully set-up WordPress sandbox site online in seconds.
With ZipWP, you can:
- Instantly create multiple test sites – No need to set up XAMPP or worry about configurations.
- Compare themes and plugins side by side – Create multiple environments to test layouts, features, and design options.
- Generate content with AI – Get AI-assisted content creation to speed up your workflow.
- Experience real-world performance – Test how your site functions online instead of a local-only setup.
- Finalize your design with confidence – Once you’ve tested everything, your ready-to-go site can be transferred to live hosting effortlessly.
See ZipWP in Action
Curious how ZipWP works? Watch this short video to see how you can build and test WordPress sites instantly without any setup.
Conclusion
Setting up WordPress locally with XAMPP gives you a safe and controlled environment to build, test, and fine-tune your site before taking it live. It’s a great way to experiment without any risk.
But now, you also know about ZipWP, an instant, hassle-free sandbox that lets you skip the installation process and start testing WordPress in seconds.
Both options have their advantages – XAMPP gives you full local control on a local machine, while ZipWP offers instant online access with zero setup.
The choice is yours!
Whichever method you choose, the important thing is to have a reliable testing ground to perfect your website before launch. Let us know which one works best for you!

Pratik Chaskar holds the pivotal role of CTO at Brainstorm Force, serving as the backbone of the company. Renowned for his organizational skills, strategic thinking, problem-solving attitude, and expertise in leading and executing plans, Pratik plays a crucial role in the BSF’s technological landscape.
Disclosure: This blog may contain affiliate links. If you make a purchase through one of these links, we may receive a small commission. Read disclosure. Rest assured that we only recommend products that we have personally used and believe will add value to our readers. Thanks for your support!


This is just perfect for newbie like me, I tested free WordPress hosting, but god they were so slow and annoying.
If you are learning WordPress then go for this.
Get this done so easily and everything working perfectly fine.
Thanks for this amazing tutorial
Easy to follow steps, done it in no time.
Love the way you explained everything
Got this done, get one small error but got solved in not time.
It’s looks something technical, but it’s not. Just follow the steps and make sure to read everything.
Hello Ralph,
Glad you found it useful! 🙂
Why not just use Laragon? It’s free and does all the installations automatically. Saves a ton of time. And it works great.
Indeed, Mike!
XAMPP is a great software that works fine on Mac and Windows. While Laragon only works on Windows as of now! 🙂
Thanks for the idea, we shall consider writing an article on Laragon too.
This is a great solution! Is it also possible copy a live WP website to this local version? If so, how can this be done?
I have a question about this. Suppose I follow these instructions and create a site on my localhost. Then what? Eventually I would need to port that site to an actual web server. How would one accomplish that?
I want to create a website for a client. I am using a paid theme. First I will do modification and settings in Local Host and then migrate the site on the clients hosting and domain.
My question is can I buy premium Astra theme and do the changes first in local and then deploy it ?
Hello Ayush, yes sure you can import any of our templates on a Local or Staging environment and migrate to a live environment without any issues. 🙂
Hello Everyone from Support!
I would like to know, given that I am using a Dell 11 3180 Netbook with a very limited 25 Gb capacity hard drive at the moment, whether I can download & install XAMPP, Wordpress and the MySql Database onto my secondary 250 GB SSD Hard Drive & run them from there? If this process will not run smoothly, I would appreciate to get a guide from you about how to forestall any problems – thanks.
Thank you for your emailed answer + Have a nice day,
Herve.
Hello there, it depends on the XAMPP and memory usage if it is able to handle this setup on the limited resources.
Further, you can give a try Laragon[laragon[dot]org/download/index.html], which might help with the local installation or setup of WordPress.
Hello Sujay,
Can Wordpress be loaded locally on an Ubuntu Linus 22.04 laptop?
I have XAMPP 8.1.2-0 loaded with MySQL DB, which is actually 10.4.22-MariaDB.
I have multiple databases. I created a new one for Wordpress and cannot get Wordpress to execute.
I receive this error: “Error establishing a database connection”
OMG what an excellent doc. I was trying to do WP on Xampp from videos but could never remember the steps. This writeup was exactly what I needed- works great. It should be included with Xampp downloads.
Thankyou many times for your effort with this
cheers
Barry
Glad you liked it, Barry! 🙂