Ever wondered about making easy money? Creating a directory website is one of the great, if not the greatest, answers to this question.
If you want to build a directory website from scratch by hiring developers, chances are high that it might break the bank.
Today, we’ll show you the easiest way to create a directory website yourself with minimal effort.
You’ll only need to pay only a little for the domain and hosting service for your WordPress website. The rest will utilize completely free tools.
In this article, we’re going to discuss directory websites. We’ll show you how to build one using only free tools.
Then we’ll talk about their benefits and how to make money from them.
Finally, we’ll go over the steps with some bonus tips on customization.
- What is a directory website?
- How to create a directory website
- Step 1: Get a domain
- Step 2: Get a hosting service
- Step 3: Install WordPress
- Step 4: Install and activate a free WordPress theme
- Step 5: Install and activate a free WordPress directory plugin
- Step 6: Configure the setup wizard
- Step 7: Create categories, tags and locations for your directory website
- Step 8: Adding a free payment gateway
- Step 9: Adding rank featured listing field on the add listing form
- Bonus tips: Adding advanced features to your directory website
- Creating a directory website is more lucrative than you think
- Wrapping up
What is a directory website?
A directory website, also known as a listing website, provides a list of resources, businesses, or information organized in a specific category, tag and location.
You can use directory websites to find literally anything, from contact information, driving directions, to research topics.
Some common types of directory websites include business directories, user directories, online yellow pages, and government websites.
Directory websites can be extremely useful when you need to find specific information quickly. However, it is important to remember that not all directory websites are created equal.
Some directories are more reliable than others, and it is always a good idea to do your own research to determine the best source of information for your needs.
Use cases of a directory website
A directory website can be used for a variety of reasons. Here are some use cases, along with real-life examples:
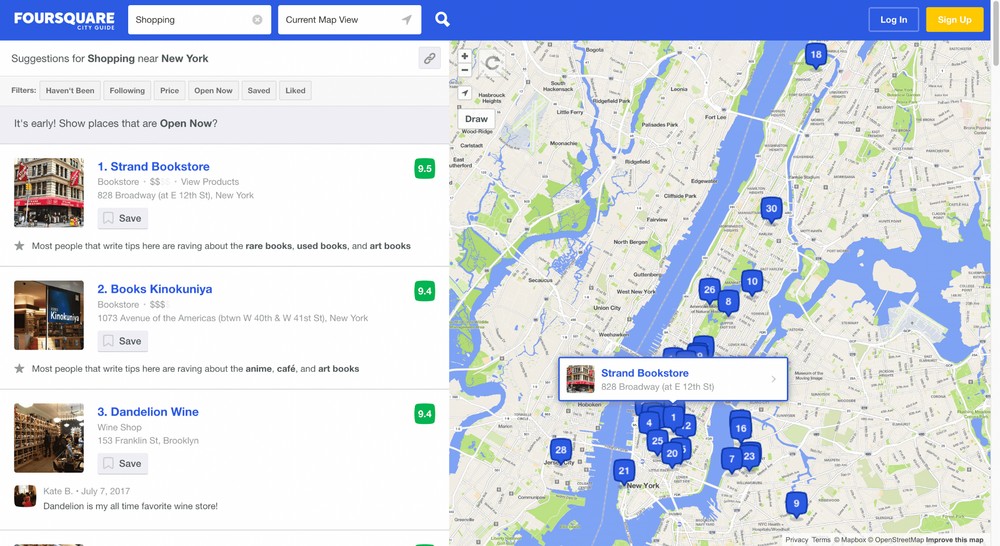
To find a business near you with map directions
Imagine you are traveling to a new city but don’t know how to find the best restaurants near you using a map. What do you do?
You can simply search on an online directory website like Google to find somewhere to eat. In this case, Google plays the role of a directory website.
To get even better results, you could try other business directories like Yelp or FourSquare.
To find the contact information
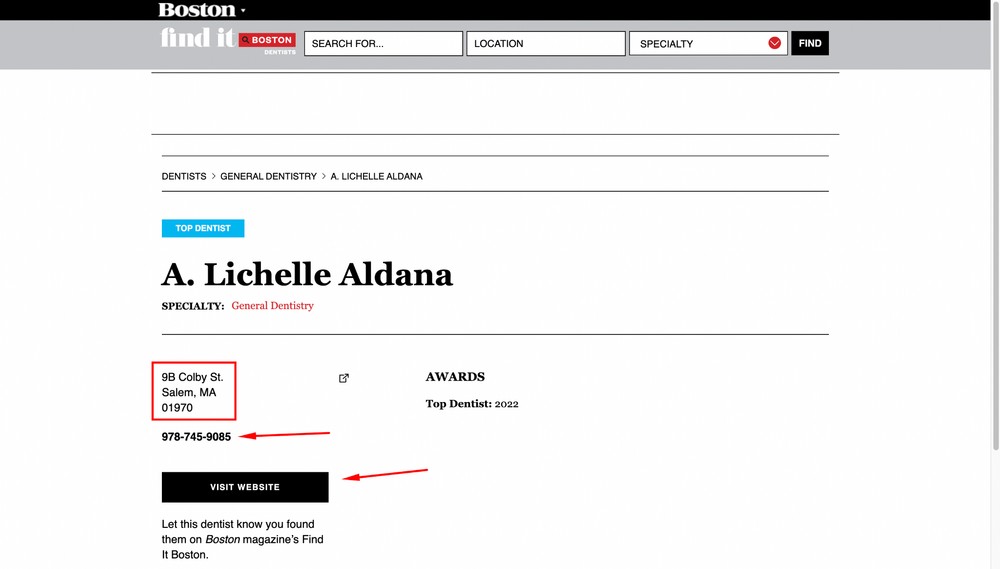
A directory website can also be used to find contact information for businesses or individuals.
For example, if you’re trying to track down the best dentist in your area, you can get the contact information very easily from a directory like Boston Magazine.
To determine if a business is trustworthy
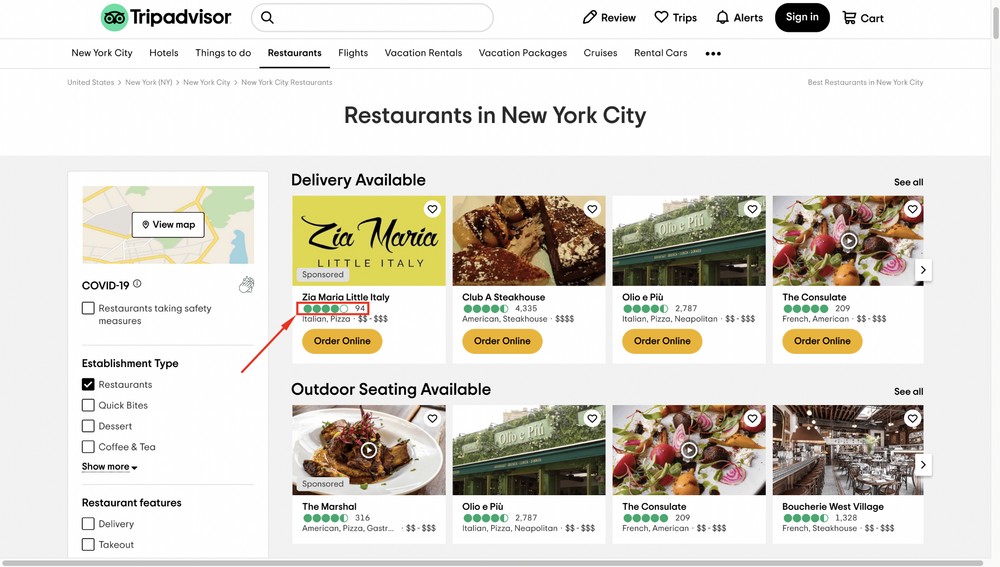
You can use a directory website very effectively to find reviews and ratings for businesses.
For instance, based on others’ reviews and ratings on sites like Tripadvisor, you can effortlessly decide whether to pay a visit to a tourist spot or restaurant.
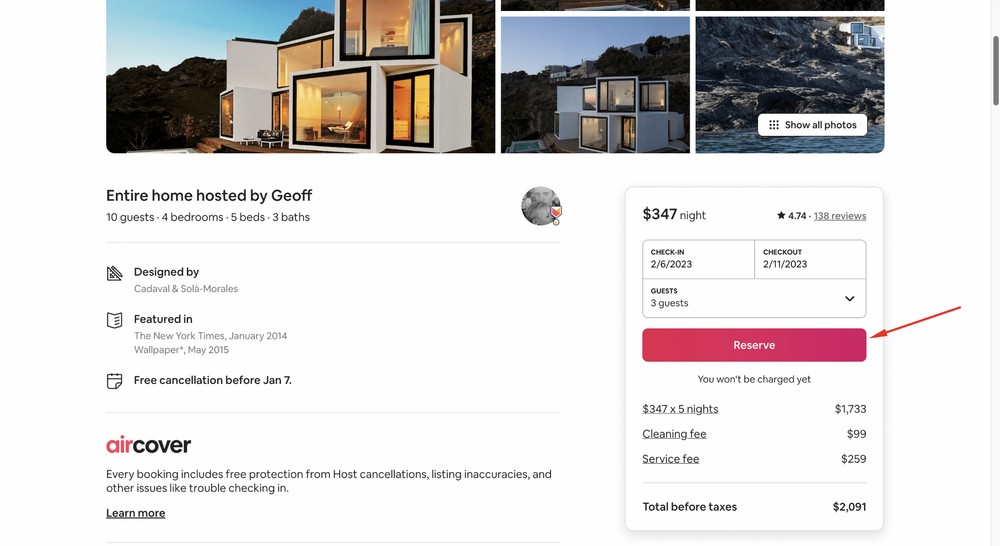
Book a hotel or restaurant
Some directory websites like Airbnb even let you directly book hotels or restaurants as well as Airbnb accommodation. So, you don’t necessarily need to leave the website to contact a third-party hotel or restaurant to book.
How to create a directory website
The process we will show is very simple. Just make sure to follow these steps.
- Step 1: Get a domain
- Step 2: Get a hosting service
- Step 3: Install WordPress
- Step 4: Install and activate a free WordPress theme
- Step 5: Install and activate a free WordPress directory plugin
- Step 6: Configure the setup wizard
- Step 7: Create categories, tags and locations for your directory website
- Step 8: Adding a free payment gateway
- Step 9: Adding rank featured listing field on the add listing form
Step 1: Get a domain
A domain is the unique URL or address of your website. You can have a domain name like www.xyz.com or www.yourdirectory.com.
You can buy a domain name from popular providers like Google Domains, Namecheap, Name.com or any other provider you prefer.
Usually, a domain name with .com extension typically costs around $13 per year.
Step 2: Get a hosting service
A hosting service allows you to make your directory website accessible via the web.
There are many different types of hosting service, each with its own set of features and price points. The most common type of hosting service is shared web hosting, where a single server houses multiple websites.
Shared web hosting is typically the most affordable option for small businesses and individual website owners. It typically costs from around $50 per year.
Dedicated hosting can be more appropriate for larger organizations or websites with lots of traffic.
You can initially go for shared hosting when your website has little traffic. After that, when your website becomes popular, consider upgrading to a dedicated plan.
Some popular hosting service providers include SiteGround, Cloudways, Kinsta, and Hostinger. But we recommend you select Cloudways as you will get the Astra Pro version for free as part of the package.
Domain and hosting are the only two elements you need to pay for. The rest of the steps use completely free tools.
Pro Tip:
Want to skip the manual WordPress installation? With ZipWP, you can spin up a fully set-up WordPress site with just one click.
No hosting setup, no configuration – just jump straight to customizing your directory website. See ZipWP in action in this quick video:
If you prefer manual setup, follow below steps to install WordPress on your hosting platform.
Step 3: Install WordPress
Now that you have the domain and hosting in place, you need to install WordPress.
WordPress is the CMS (Content Management System) that manages all your website content.
The great thing is that most popular hosting providers, including Cloudways, come with WordPress pre-installed.
However, if you want to install it yourself, you can read this tutorial that shows how to install WordPress on your hosting platform.
Step 4: Install and activate a free WordPress theme
A good theme is what changes your WordPress website’s look and feel. Luckily the WordPress ecosystem abounds with fantastic free themes.
We recommend Astra as its our theme and:
- It’s free and loads lightning fast.
- Has 4.9 out of 5-star ratings on WordPress.org.
- Is infinitely customizable with page builders.
- Has over 1 million active users, so you will never feel stranded.
- Integrates with WordPress directory plugins.
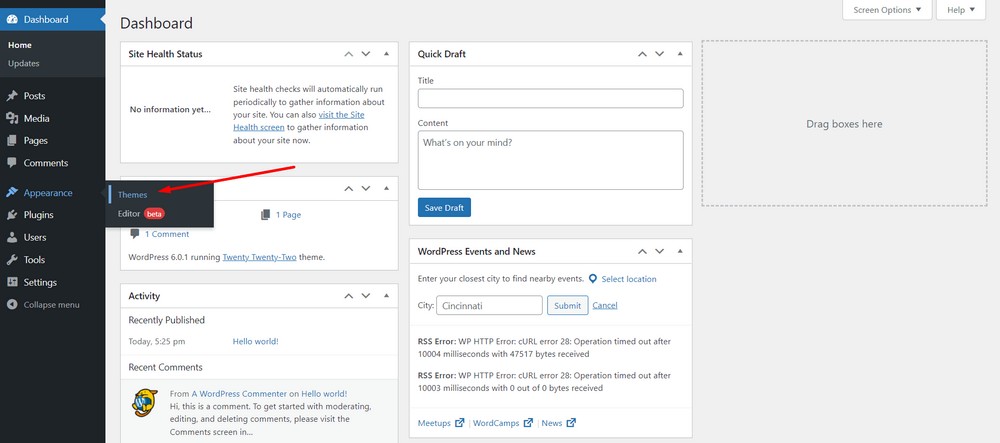
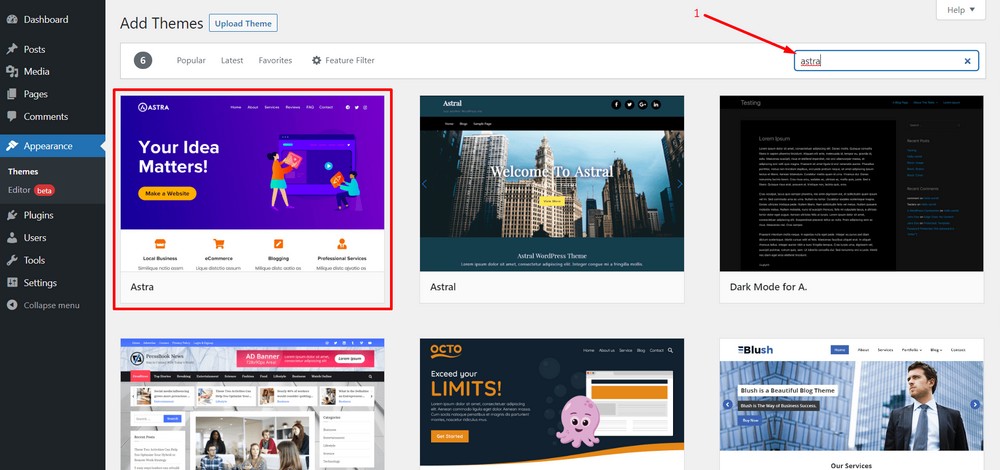
To install Astra, head to the WordPress admin dashboard and navigate to the Appearance > Add New option.
Now, click on the Add New button.
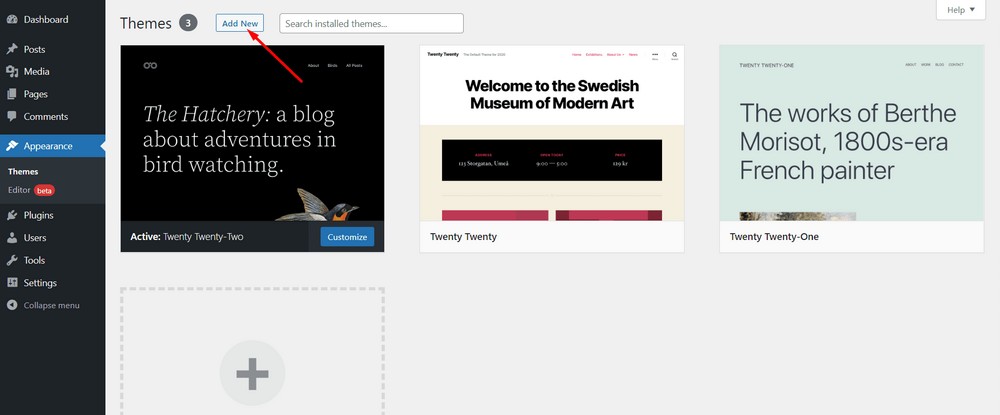
Search with the keyword “Astra” in the search bar.
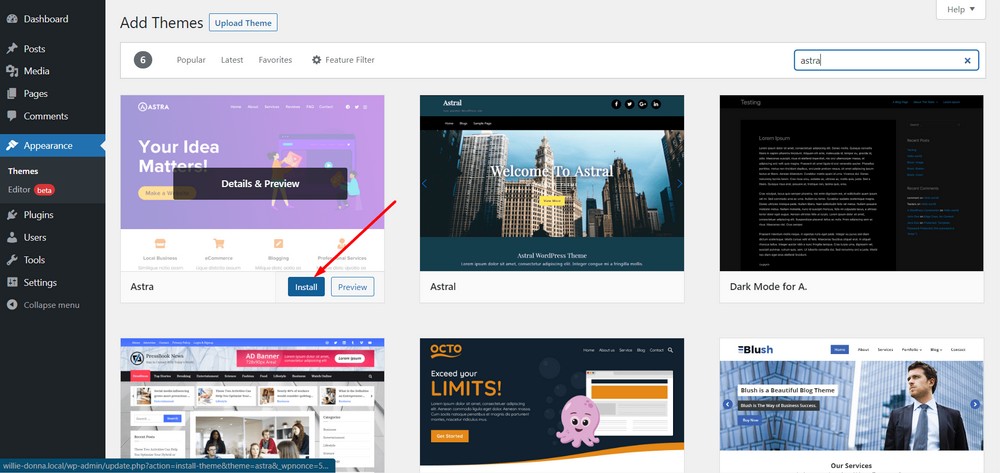
Hit the Install button.
Finally, Activate the theme.
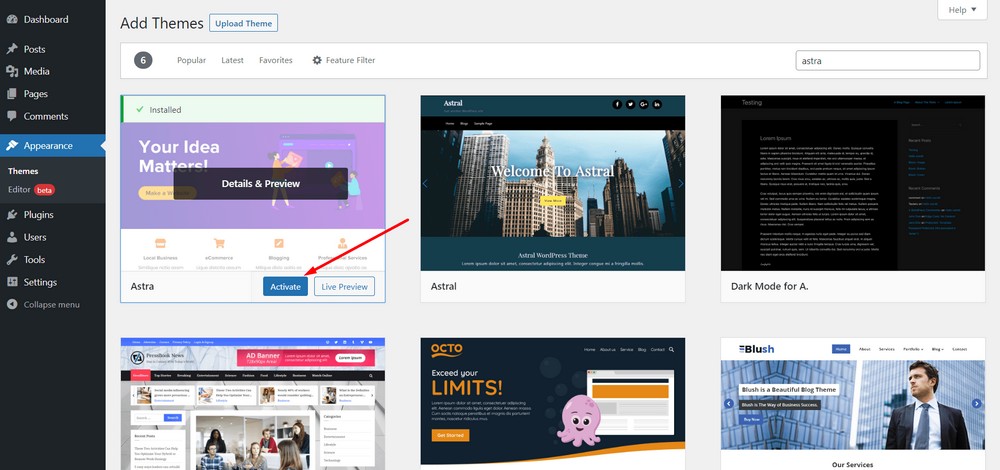
That’s it. You have successfully installed and activated the theme.
Step 5: Install and activate a free WordPress directory plugin
Now, you need to install and activate a free WordPress directory plugin. This is what turns a standard website into a directory website.
You will find a plethora of free WordPress directory plugins like Directorist, Business Directory Plugin, GeoDirectory and Connections Business Directory in the WordPress.org repository.
You can choose any of them but we will be using Directorist for this tutorial. Why?
- It’s free.
- Works great with any WordPress theme including Astra.
- Very customizable and compatible with popular page builders.
- Creates essential web pages on its own.
- Easily scalable with premium extensions.
- Has a 4.7 out of 5 star rating on WordPress.org.
To install Directorist, navigate to the WordPress admin dashboard and then go to Plugins > Add New.
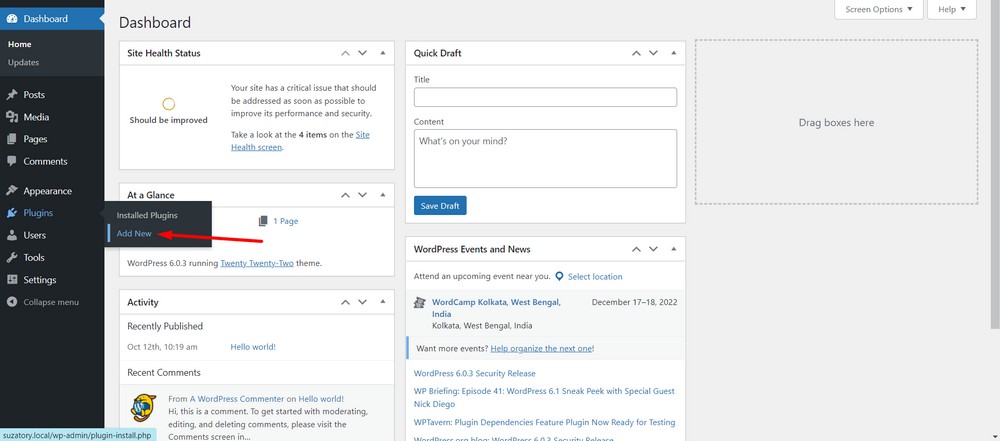
Search with the keyword “Directorist”.
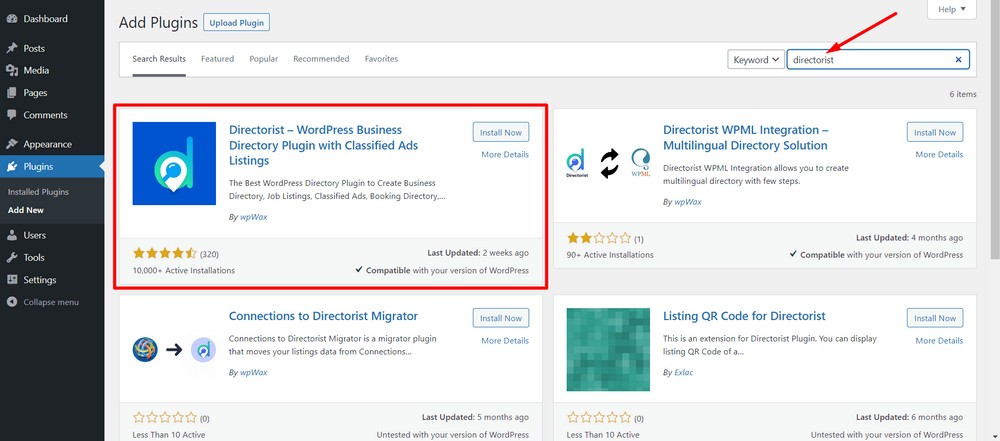
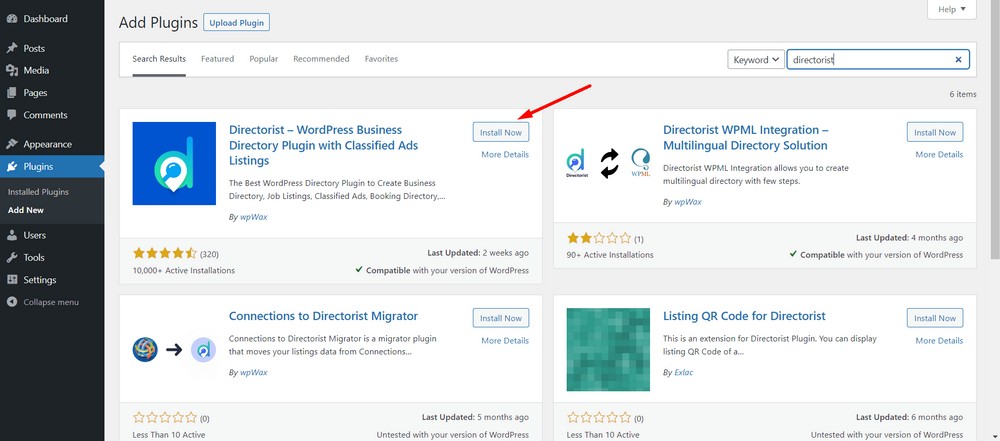
Hit the Install Now button.
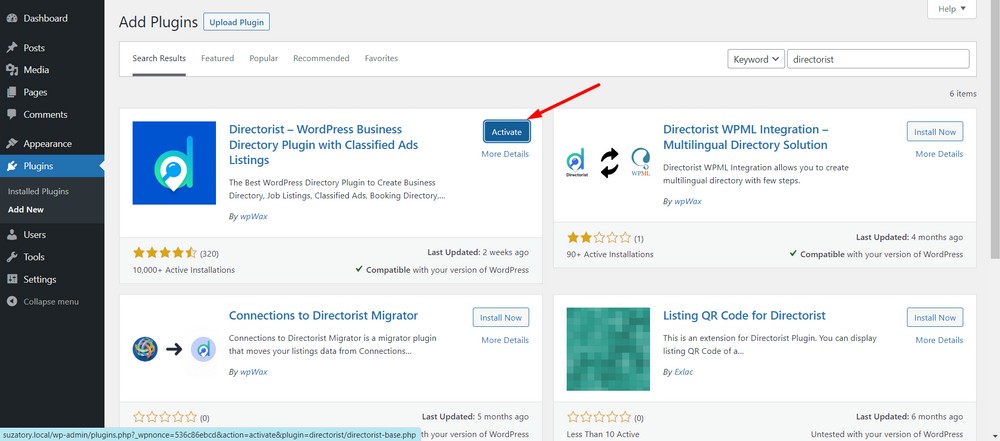
Now Activate the plugin.
Step 6: Configure the setup wizard
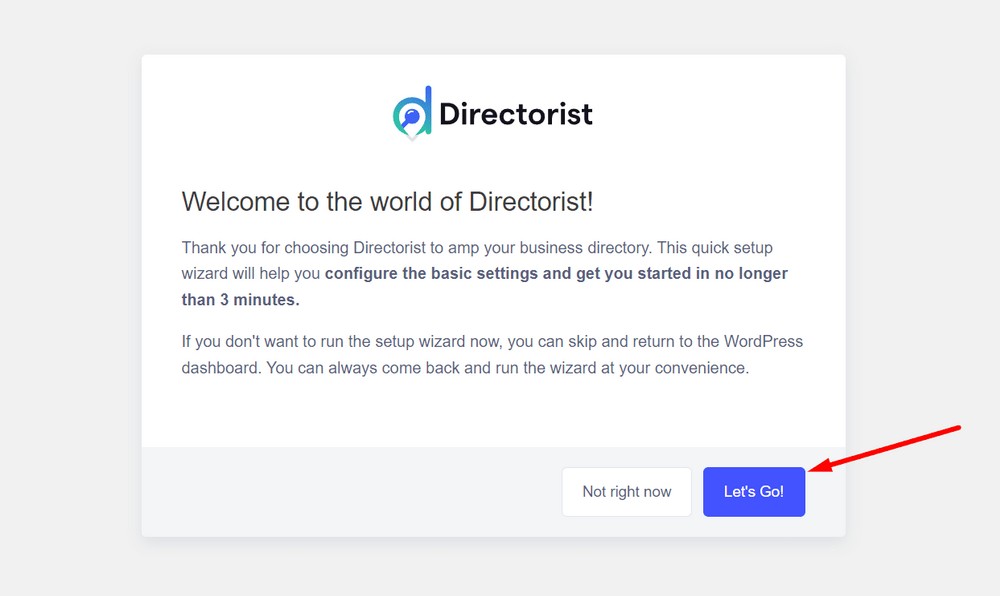
Once Directorist is installed, you will see a setup wizard. This will allow you to configure the basic settings of your directory website straight away.
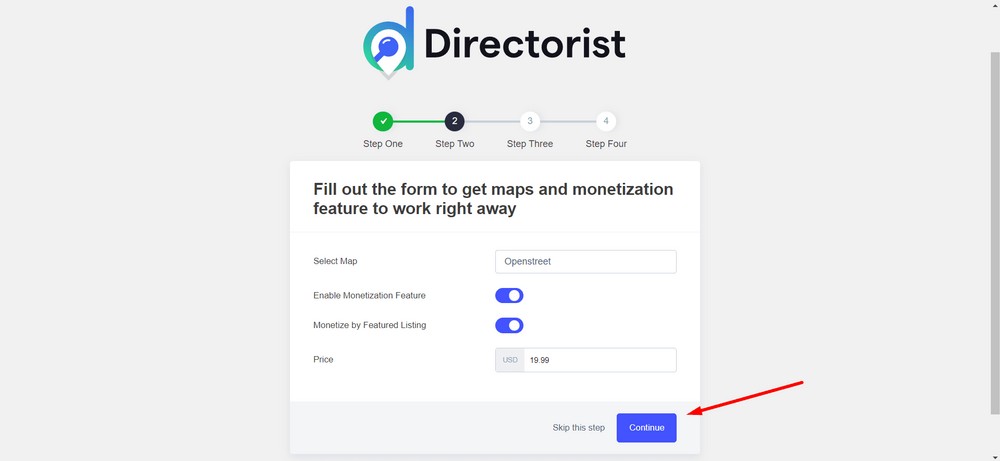
For example, you can select or deselect which web pages to create, import some demo listings with images, monetize your directory website, set pricing and select whether to use OpenStreet Maps or Google Maps.
Now, click on “Let’s Go!” button.
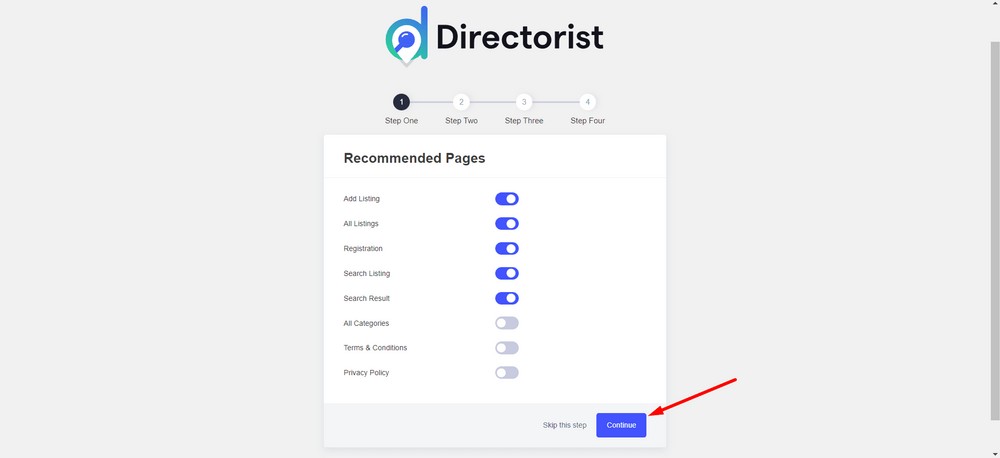
At this point, you will be able to determine which page to create and which one to not.
For simplicity, leave the settings as they are and click on the Continue button.
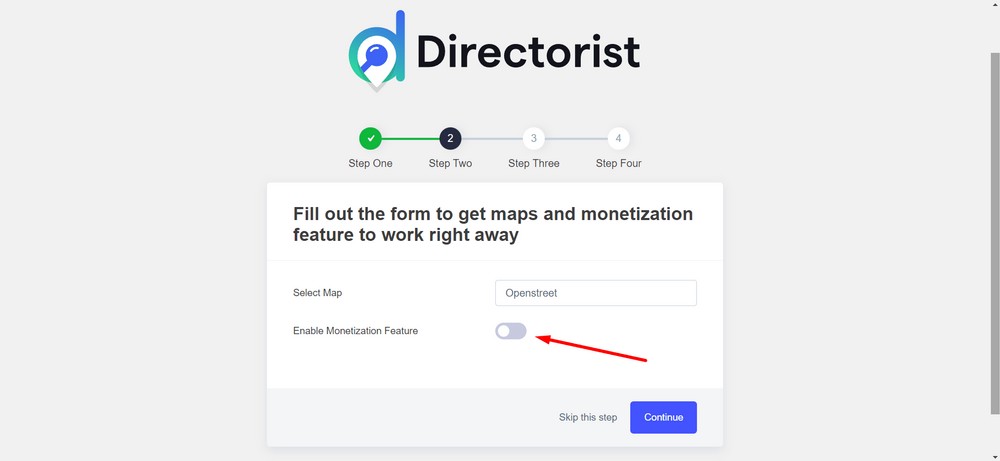
Now, Enable the Monetization feature using the toggle.
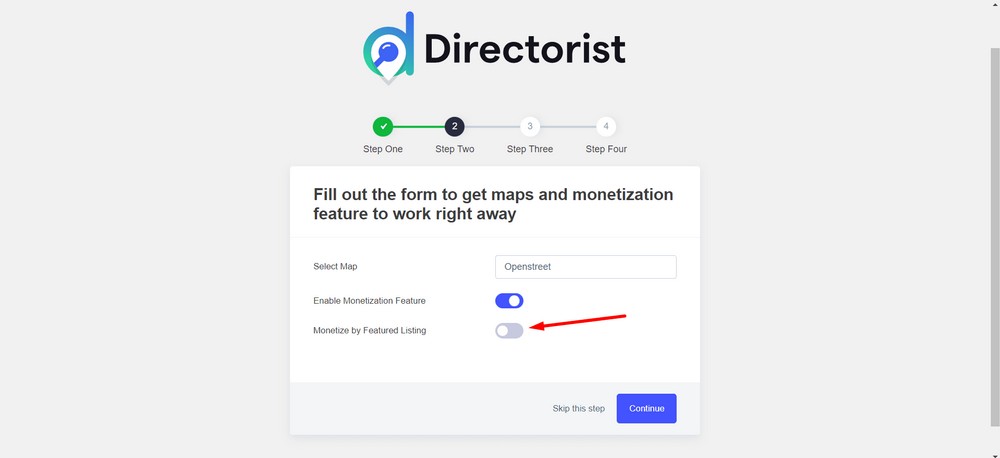
Then, turn on the Monetize by Featured Listing button.
(For your information, a featured listing is when you show a particular listing above all the other regular listings.
In this case, the featured listing gets more exposure and clicks.)
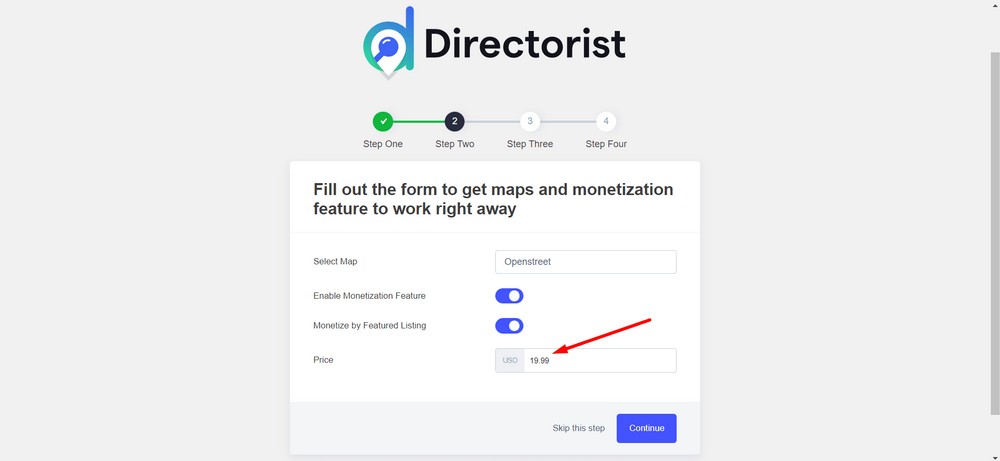
Now, set the price you want to charge for each featured listing.
While setting the price for the featured listing, consider placing realistic and competitive pricing. You can get a rough estimate from other related directory websites.
Click the Continue button.
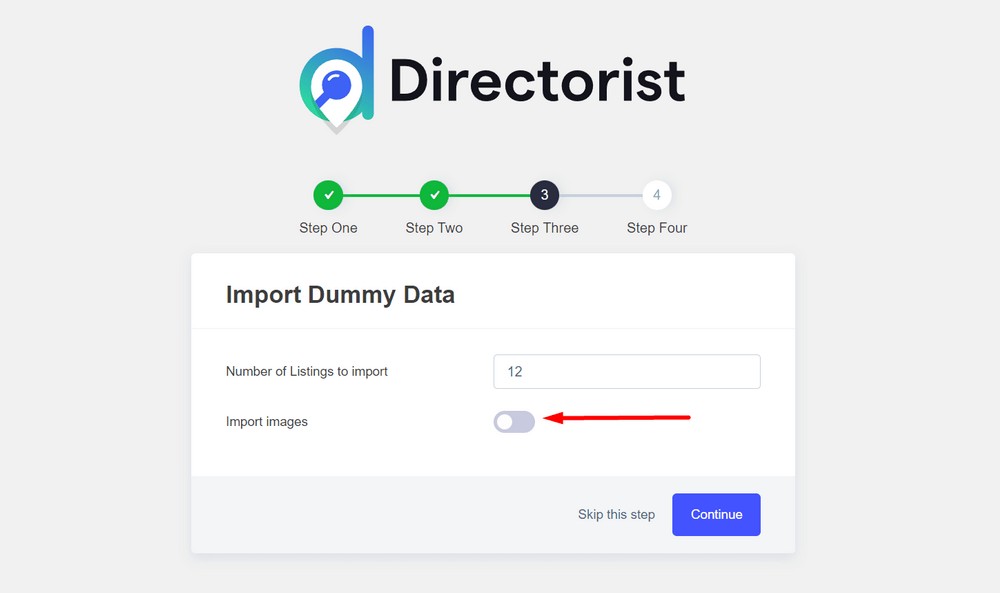
After that, import some images using the Import images option.
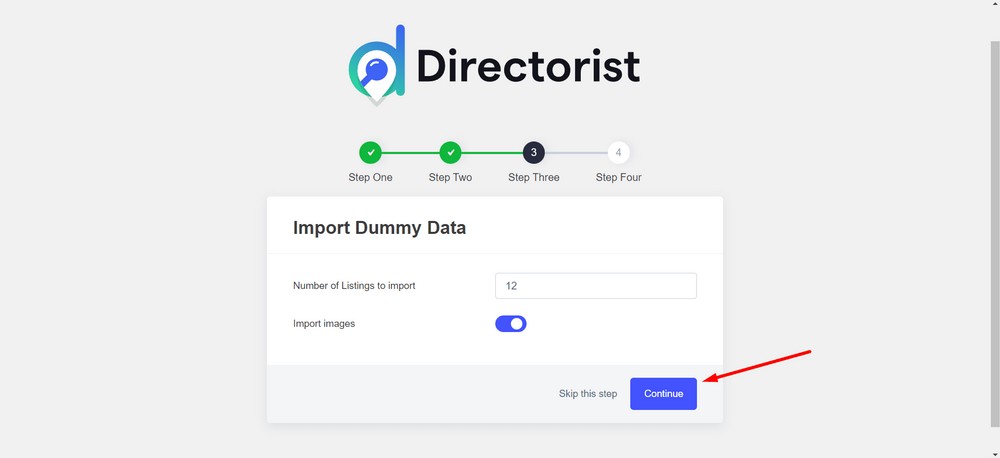
Then, click on the Continue button to initialize the import process.
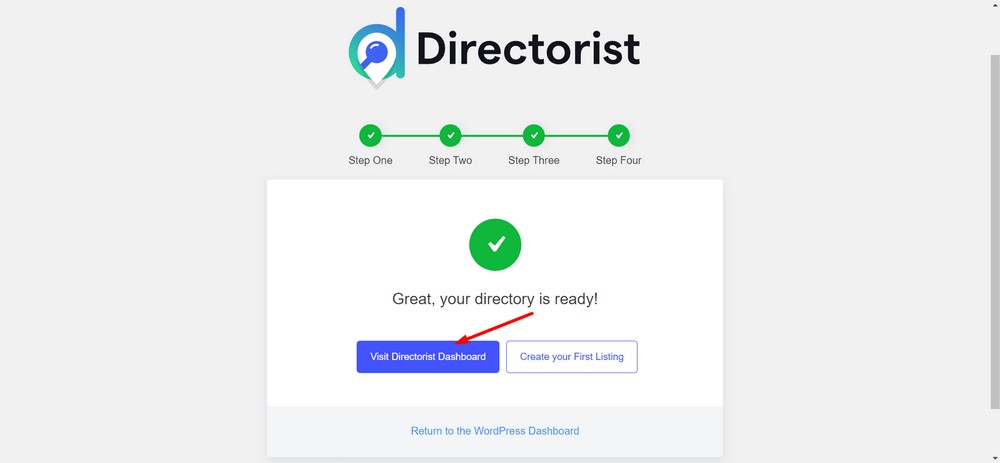
You have successfully configured the basic settings for your directory website at this stage.
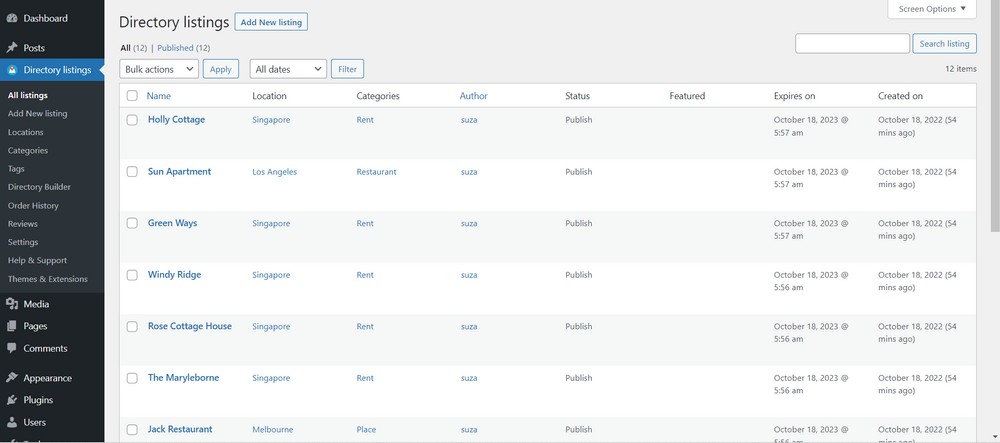
Now, you can click on the Visit Directorist Dashboard to see the imported demo listings.
Here are all your newly created demo listings.
Step 7: Create categories, tags and locations for your directory website
Categories, tags and locations will help your website’s listings become easily discoverable and more relevant.
Visitors can simply select a category, tags or locations and perform their search to get the most relevant listing.
These taxonomies are essential to provide a personalized look and feel for your business directory website.
Adding a Category
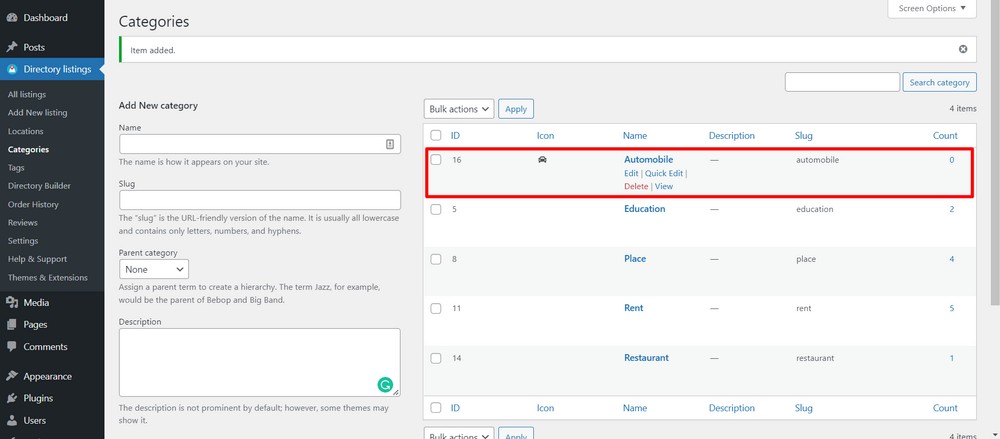
To add a category, navigate to the WordPress admin dashboard and then go to the Directory Listings > Categories.
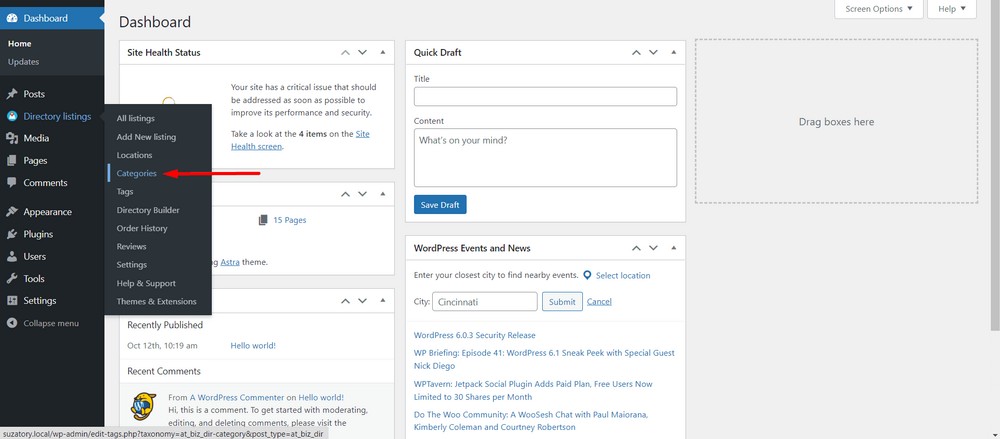
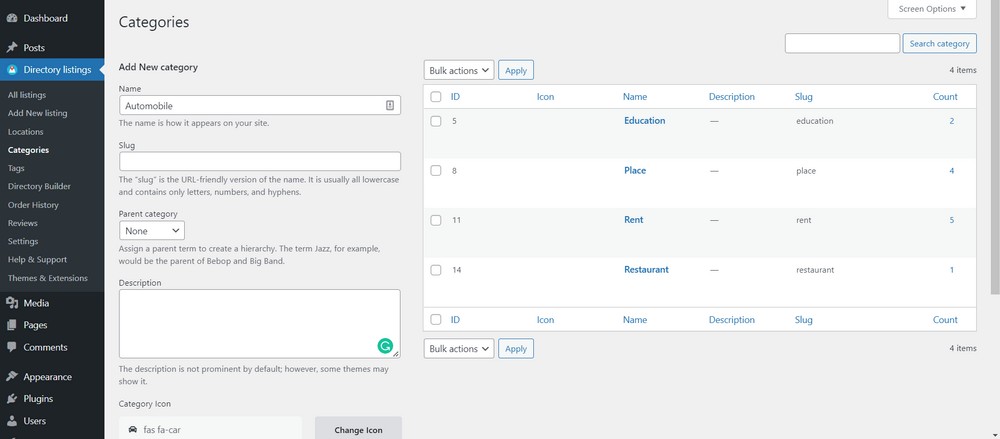
Now, you will find all the fields like category name, slug, description, icon and image to create a category.
Click on Add New Category button once you are done with inserting data.
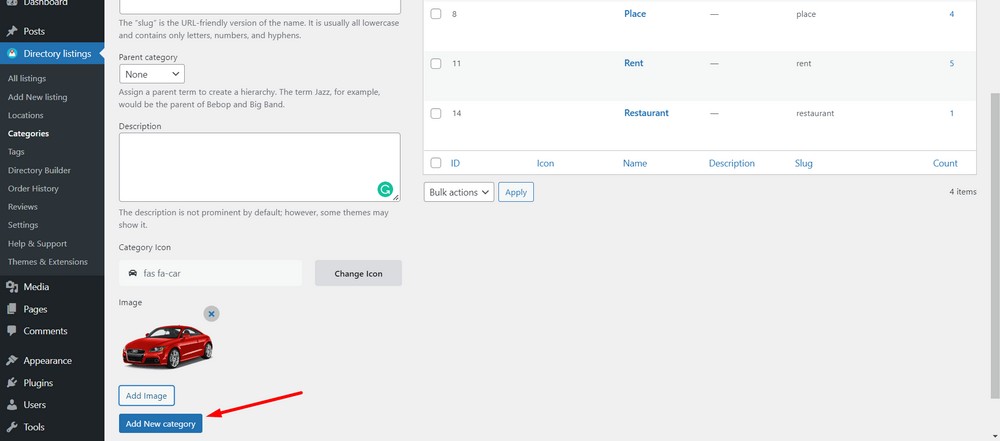
That’s it! You have successfully created a category.
Adding a tag
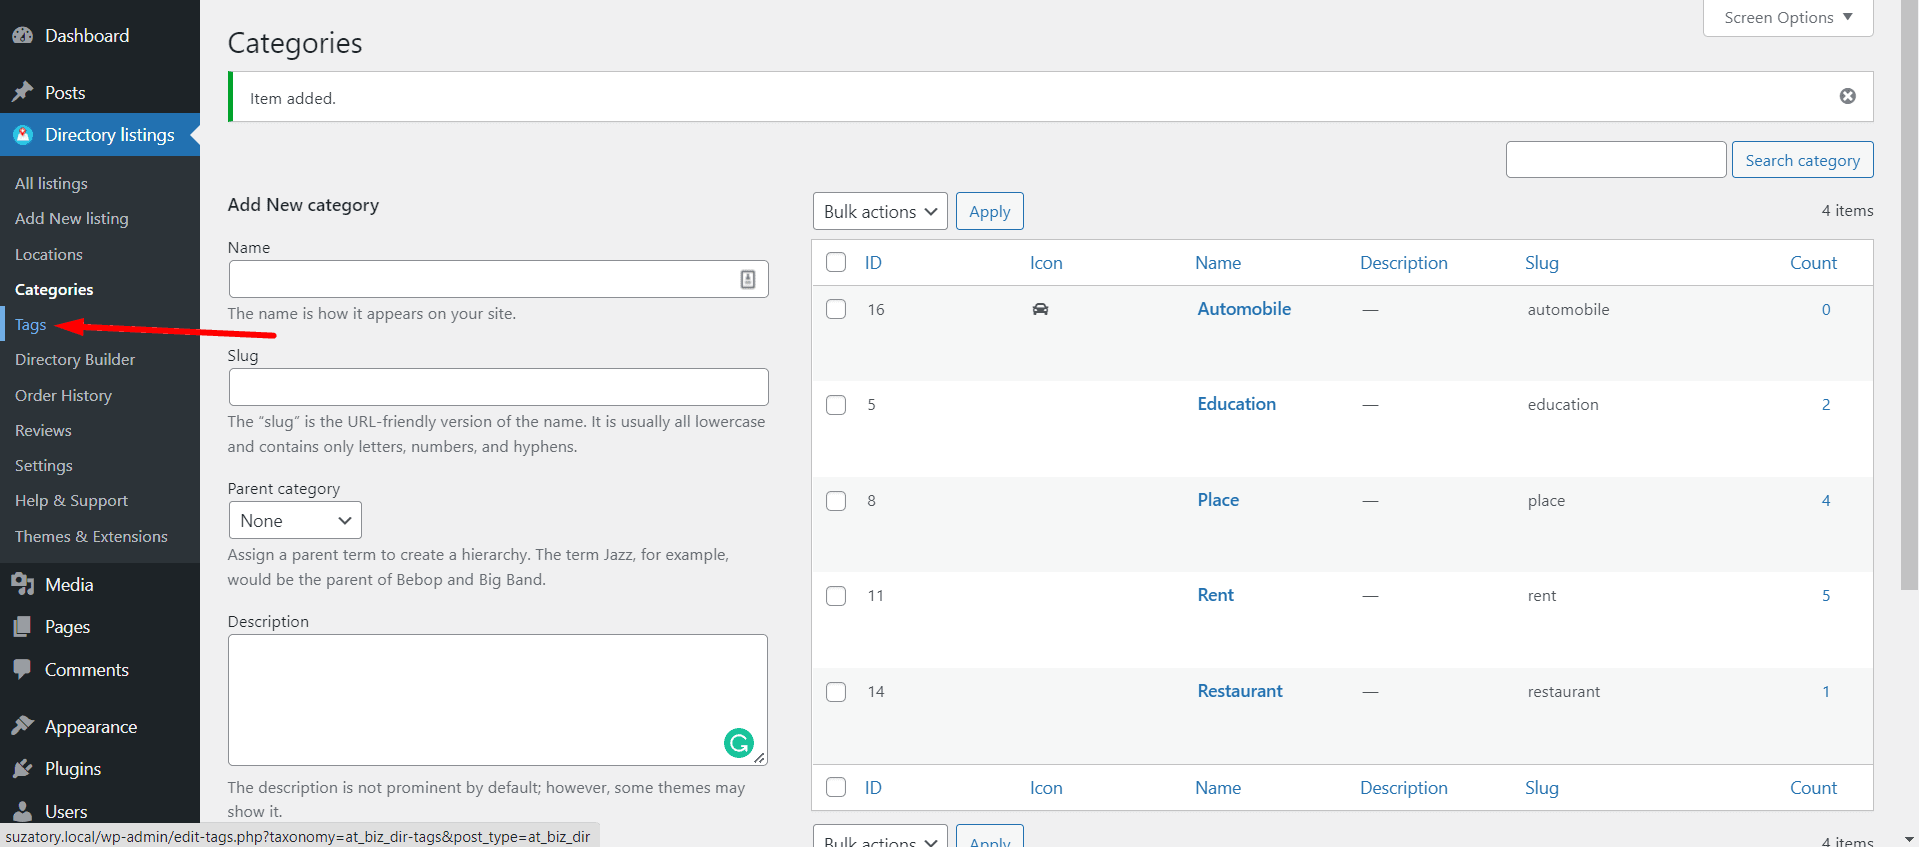
Just like adding a category, you can add a tag for your directory listings. A tag is an alternative to categories and provides another way to sort within WordPress.
To add a listing click on the Tags option from the Directory Listings menu.
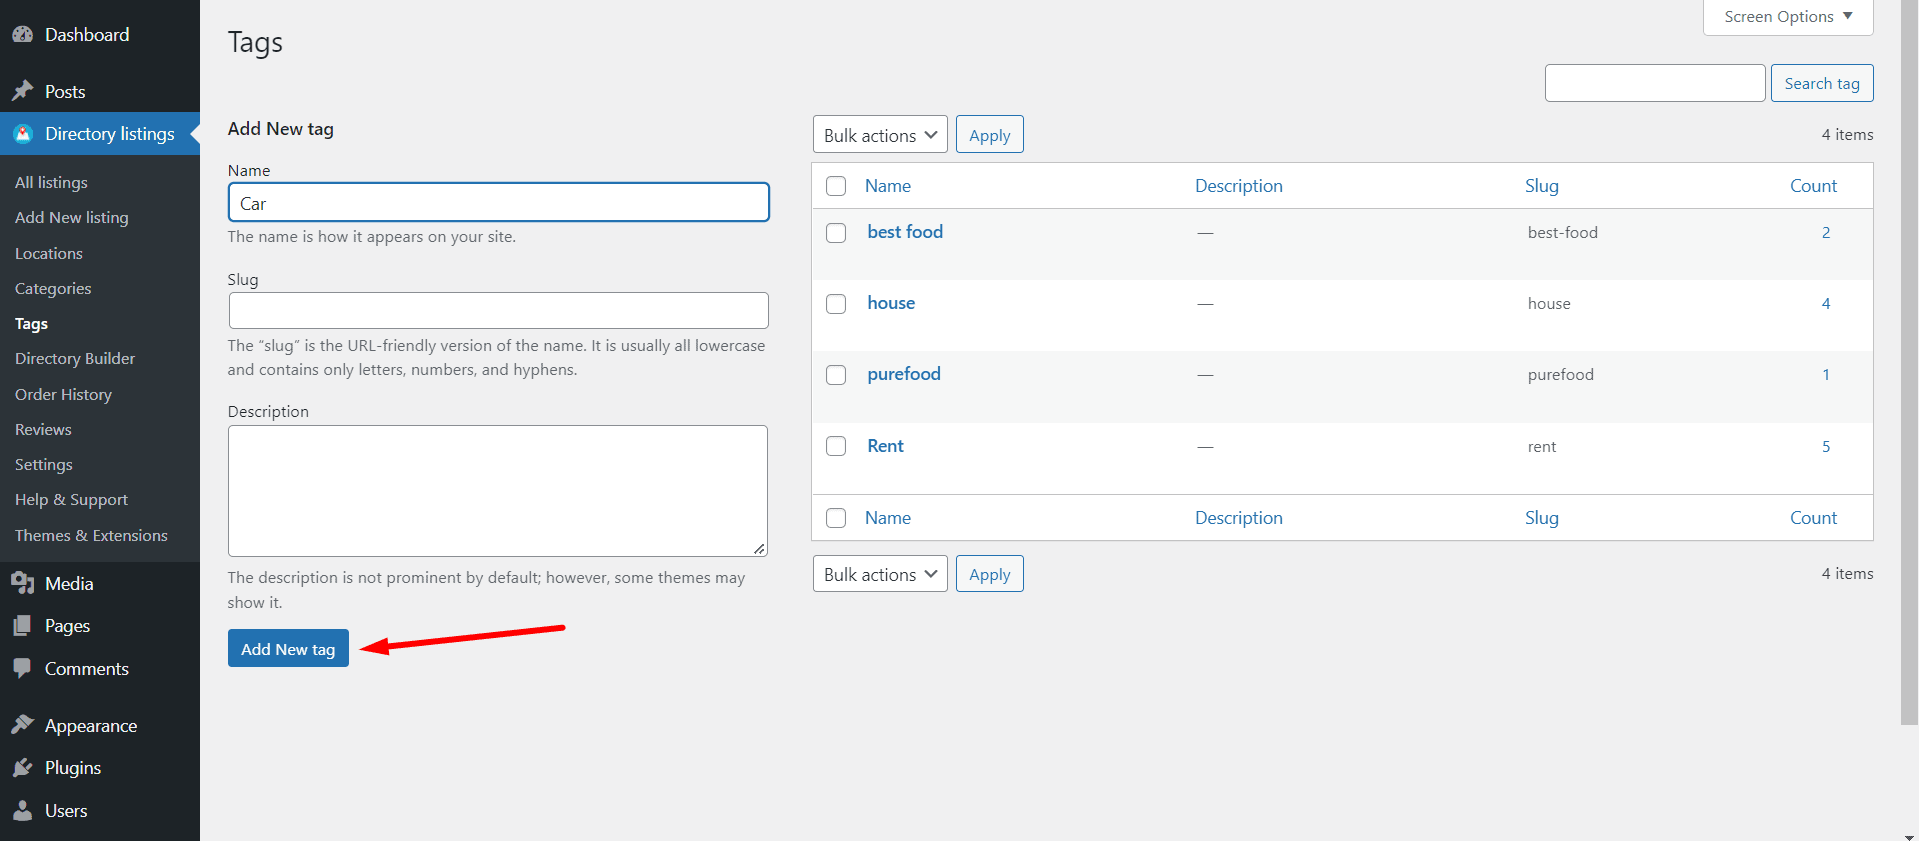
Enter the tag name and other information. After that hit the Add New Tag option to create the tag.
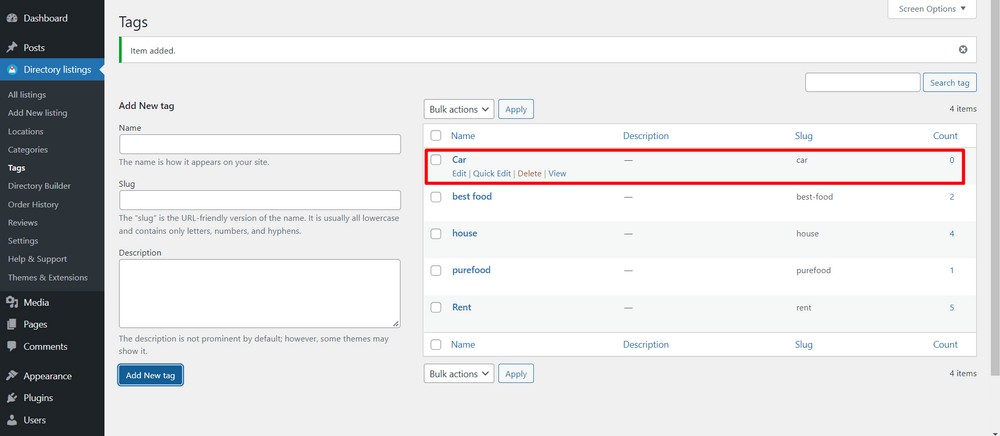
Here is the newly created tag.
Adding a location
Click on the Locations option from the Directory Listings menu to add a location.
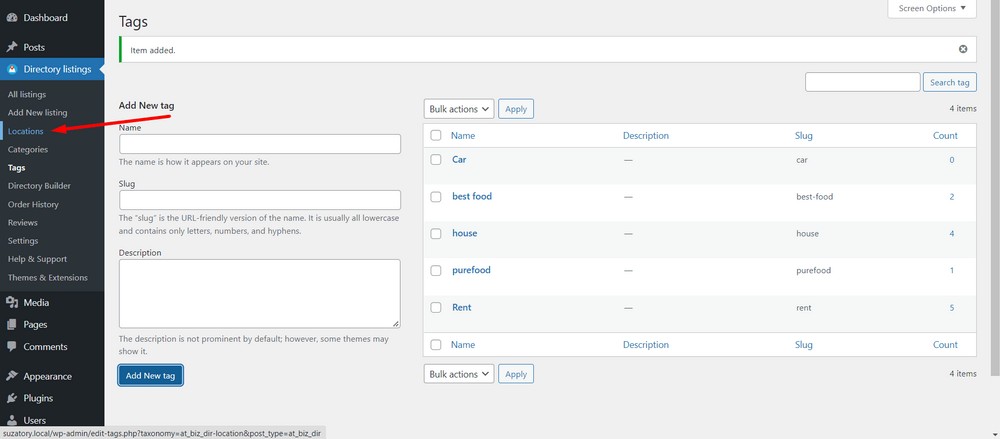
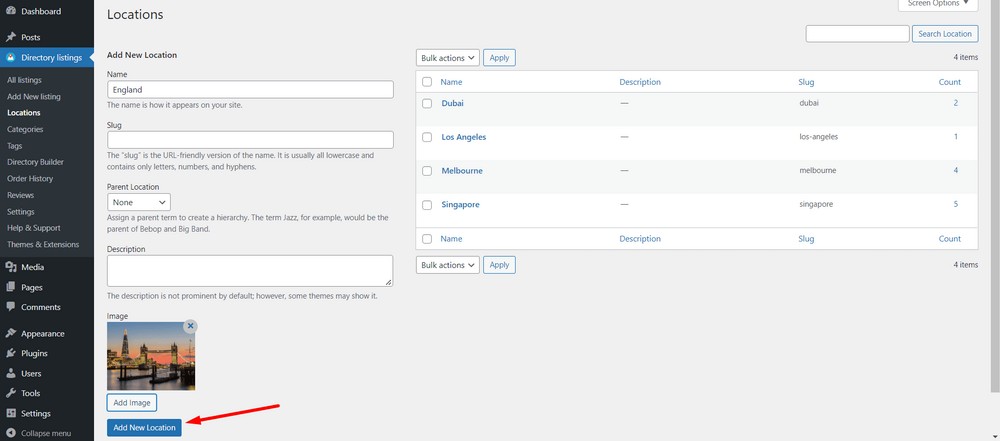
Similar to adding categories and tags, you will get field options to add a location. Insert the location name, slug, description and image.
Finally, click on the Add New Location button to create a new location for your directory website.
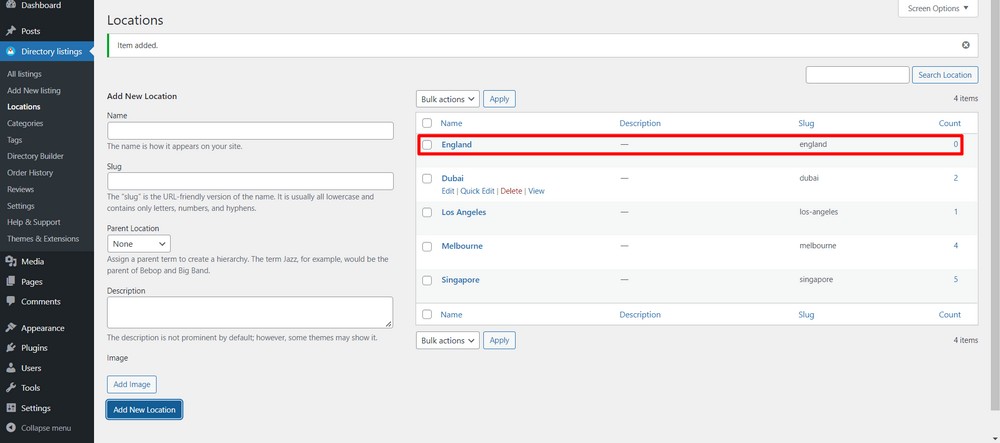
Here’s the newly added location.
Step 8: Adding a free payment gateway
If you want to monetize your directory, you’ll need to set up a payment gateway to receive payments.
Directorist supports both an offline payment gateway and other popular online payment gateways like Stripe, PayPal and Authorize.net.
But we are going to use the free transfer system as the solution.
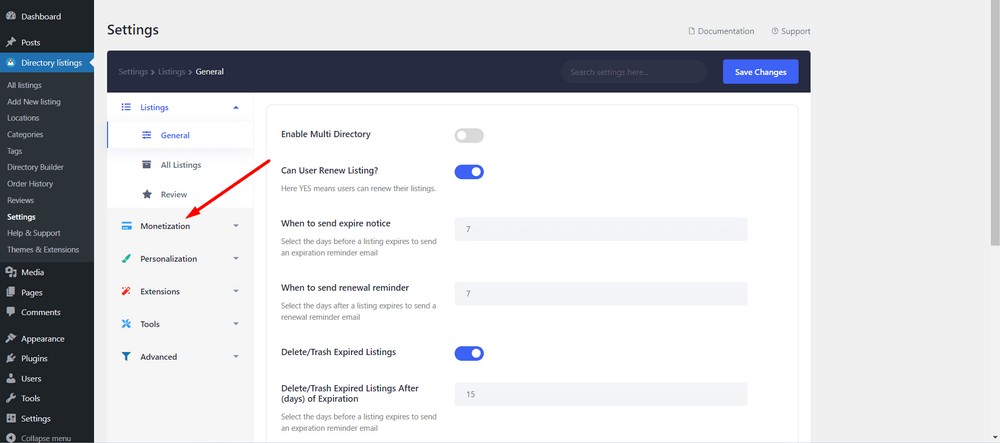
To ensure the offline bank payment gateway is turned on, navigate to the WordPress admin dashboard and then go to Directory Listings > Settings.
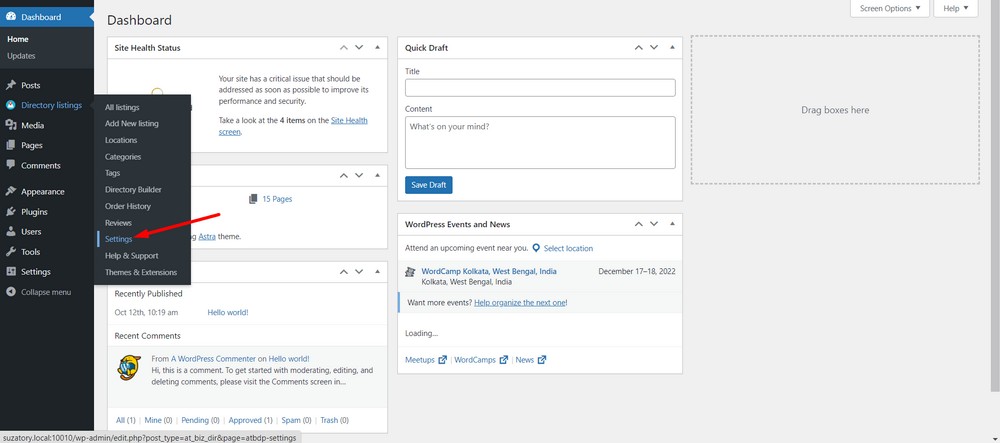
Now, select the Monetization option.
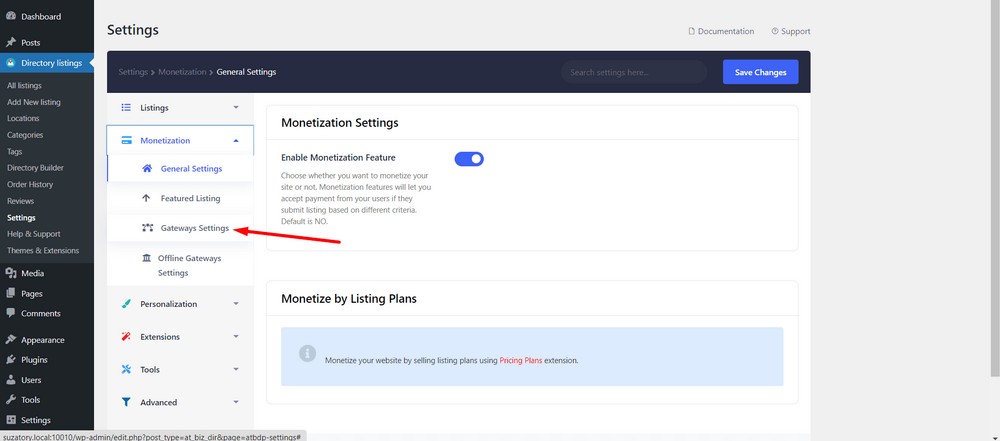
Select Gateways Settings.
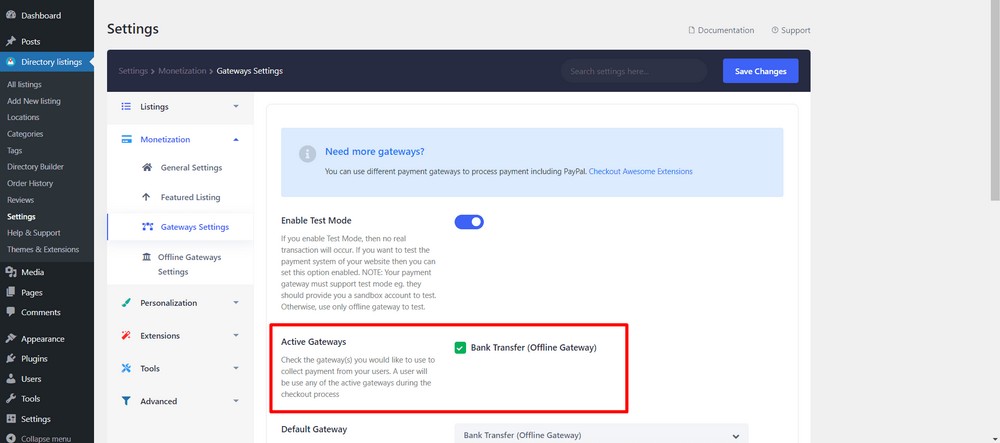
Make sure the Bank Transfer (Offline Gateway) option is enabled from the Active Gateways section.
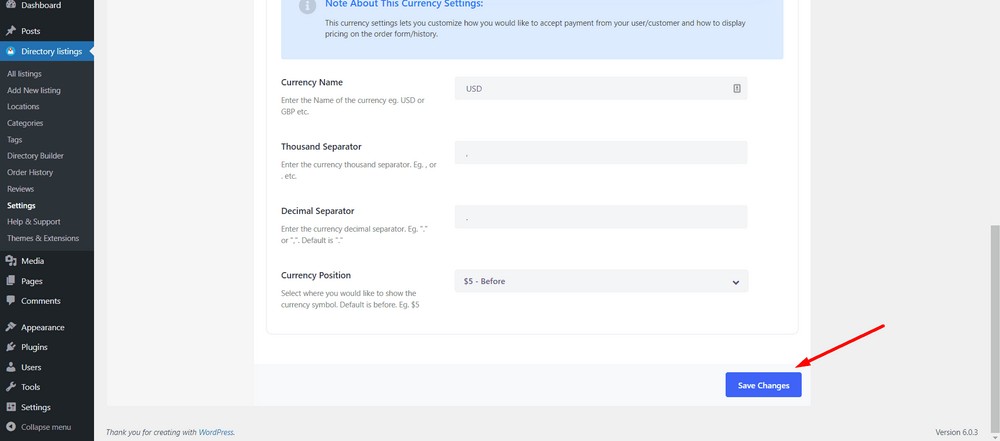
Finally, save the changes.
Step 9: Adding rank featured listing field on the add listing form
We have already turned on and set up a price point for the Rank Featured Listing option in the setup wizard.
So, at this stage, you’ll just need to add the featured listing option in the Add Listing form using the directory builder.
To do so, navigate to the WordPress admin dashboard and then log in to the Directory Listings > Directory Builder.
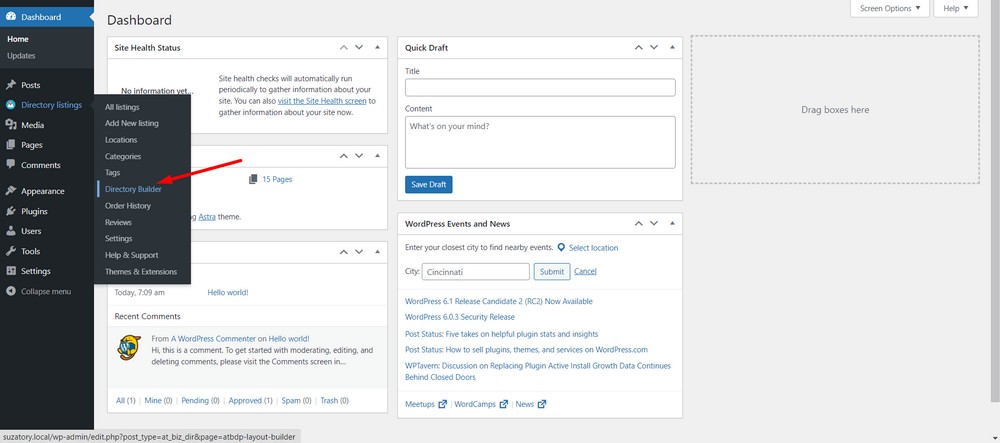
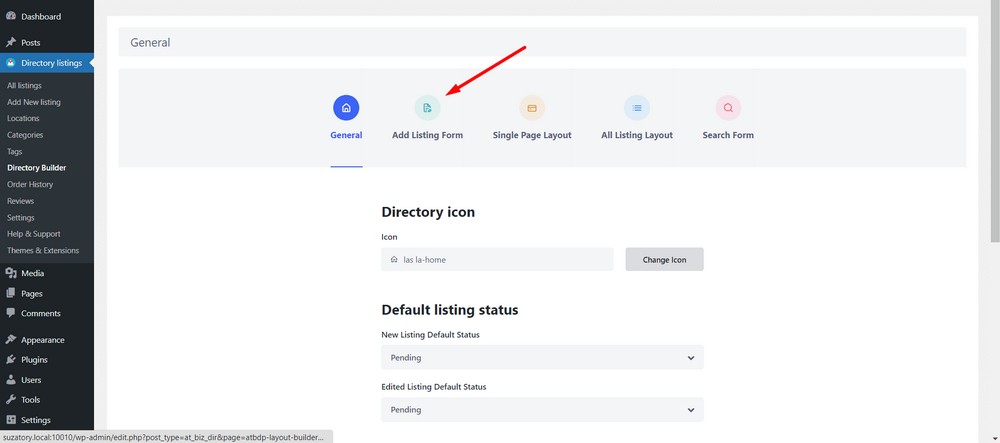
Now, click on the Add Listing Form tab.
Now drag and drop the Listing Type field to the Add Listing form.
Here is the important video demonstrating drag and drop the listing type field to the add listing form
Finally, Update changes.
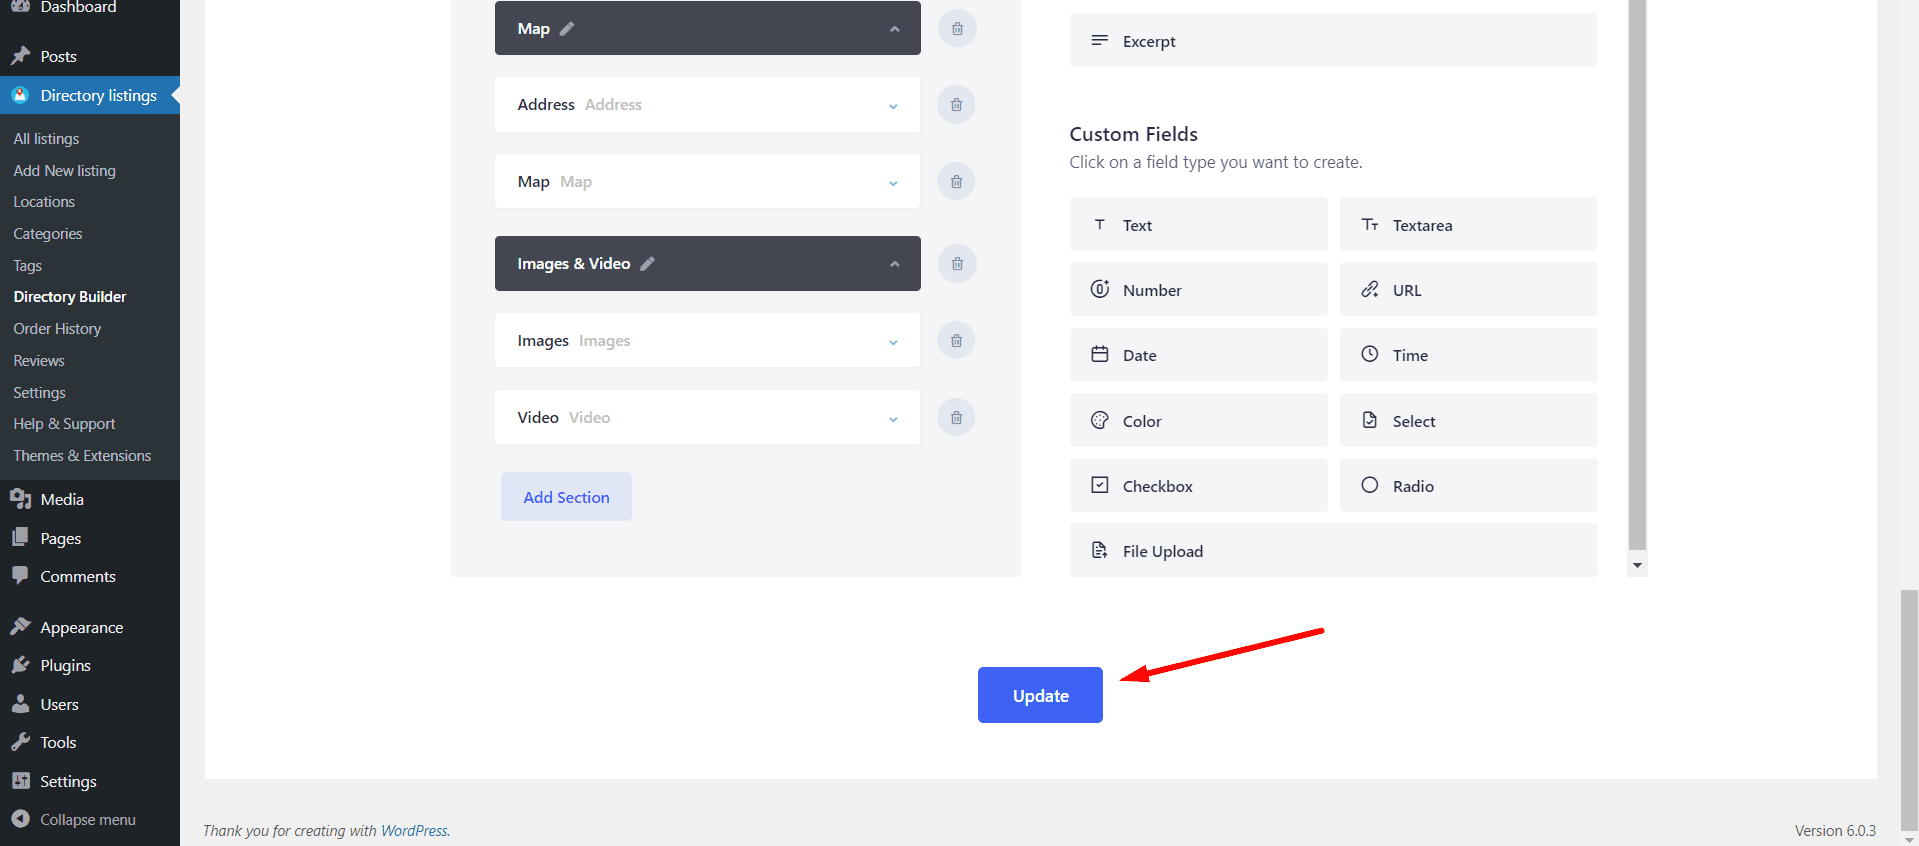
Congratulations! You’ve successfully added the Rank Featured Listing field!
View from the front end
Here is a frontend view of your newly created directory website.
Adding a listing from the front end
Now that your directory website is up and running, let’s add a listing as a visitor.
To submit a listing, a visitor needs to be registered beforehand and then submit their listing form.
Here is a video tutorial.
Receiving and publishing an order (submitted listing)
Once you receive an order, you can review it from your WordPress admin dashboard and then publish the listing instantly.
Here is a short video tutorial that shows how to do so.
Pro tips
Optimizing the site menu:
By default, Directorist creates many pages and adds them to the site navigation menu while setting up the wizard. This can cause the website to look clumsy due to a cluttered navigation bar.
We recommend keeping the navigation menu to a minimum by hiding the less important items.
You can do so from the WordPress admin dashboard > Appearance > Menus.
After that, create a menu and and add only the relevant menu items such as:
- Add Listing
- Search Home
- All Listings
- All Categories
- Login
- Registration
- Dashboard.
Here is a video tutorial for a better understanding.
Setting a homepage:
It’s always a good idea to set a relevant home page.
You can do so by navigating to the WordPress admin dashboard > Settings > Reading.
After that, select A static page option and then select your preferred page that you want to set as the home page.
In this case, we have selected the Search Home page as the home page.
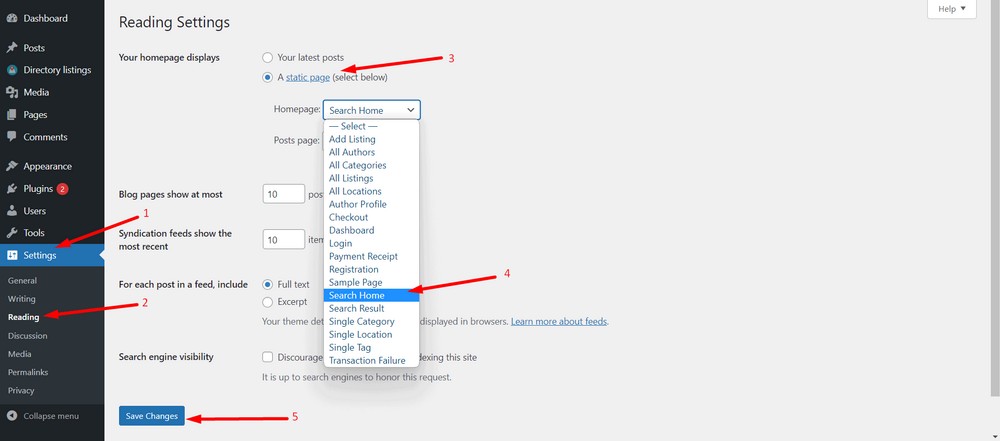
Finally, save the changes. It’s that simple!
Bonus tips: Adding advanced features to your directory website
Here are a few more advanced features that you may need down the road.
Deploy more monetization options (Premium)
With some premium addons, you can deploy more monetization options. Here are a few other ways to monetize your directory website:
- Charging for each and every listing submission.
- Allowing businesses to claim listings in exchange for a certain amount of money.
- Placing paid ads.
- Selling affiliate products.
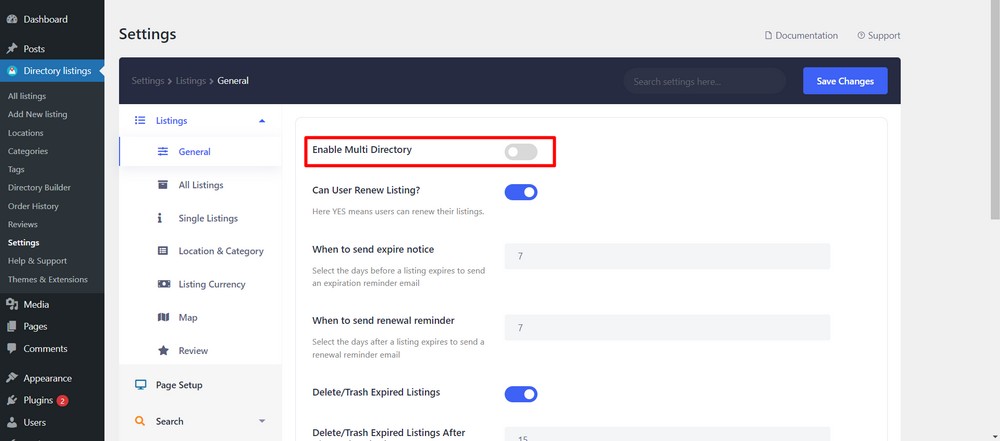
Scale your directory without using the multi-directory feature (Free)
You can also scale your directory website up with other directories without a different domain or URL.
For example, you already have a car directory and want to extend it with an automobile parts directory within the same domain. How can you do that?
Well, you can use the multi-directory option to create unlimited niches within the same website.
Drag and drop based editing experience (Free)
Astra and Directorist both support page builders like Elementor and Gutenberg so you can enjoy the drag and drop-based editing experience.
In addition to that, Directorist has a directory builder that lets you add or omit fields from the add listing form or submission form.
Create a mobile app for your directory website (Premium)
Directorist also allows you to turn your directory website into a native mobile app. You can build the app for both iOS and Android platforms.
Creating a directory website is more lucrative than you think
A directory website is not just yet another website. Over time, if you can attract many listings and visitors, there is a huge opportunity to make money.
Here are a few methods you can make money with a directory website:
- Selling ad space
- Charging for featured listings
- Charging for subscriptions or memberships
- Charging for individual listing submissions
- Charging for claimed listings
- Selling business leads
- Promoting affiliate products
- Allowing sponsored articles/guest posting
- Allowing bookings and appointments
Selling ad space
If you want to make money from your directory website, selling ads is one of the best ways. You can generate passive income from your site’s traffic by showing paid ads.
Please remember the following factors when implementing paid advertising on your website:
- First, decide where on your site you want to show paid ads. Whether in the sidebar, header, or footer, choose a spot that will be visible to visitors without being too intrusive.
- Second, find advertisers willing to pay for ad space on your site. You can contact companies directly or use an ad network like Google Adsense or Mediavine.
- Third, once you’ve found some advertisers, agree on a price and add their ad code to your site.
Your ad pricing will highly depend upon the amount of traffic you get.
Charging for featured listings
A featured listing is a listing that appears above the regular listings in the search results within a directory website.
These listings usually have more information and detail than regular listings and may include images or videos.
Featured listings on directory websites can be beneficial not only for you but also for both visitors and businesses.
These listings provide more information and make it easier to find what visitors are looking for.
On the flip side, featured listings can help increase the listing owners’ website and location visibility and traffic in exchange for a fee.
Charging for subscriptions or memberships
Restricting your website content to paid subscribers or members can be a great way to generate a great deal of revenue.
It’s important to ensure that you offer value in return for the subscription fee. Otherwise, people will simply unsubscribe or not renew their membership.
A good directory website usually helps you create different types of pricing plans for different subscription plans.
Charging for individual listing submissions
Another way to make money from a directory website is by charging for individual listing submissions. This can be an effective way to generate revenue.
If you plan to do that, it’s important to ensure that the listing fees are reasonable.
Otherwise, people will simply avoid listing their business on your website and bounce off of your site for free or lower priced alternatives.
Charging for claimed listings
Another great way to make money is by charging for claimed listings. By doing this, you can earn income from businesses that want to be listed on your site.
Not only will you make money from businesses that want to be listed, but you’ll also be providing value to those businesses by helping them get more exposure.
It’s a win-win for you and the listing owners.
Sell business leads
As a directory business website owner, you’ll be collecting a lot of qualified leads down the line. So, as long as you have permission from those leads, you can sell them.
This can be a great way to make some extra money, and it can also be a great way to help other businesses grow.
Promote affiliate products
You can add referral links to products in your directory. You can earn a commission when someone clicks on the link and makes a purchase.
Choosing the right affiliate products to promote is important, as not all products will be a good fit for your website. You’ll want to consider the type of products your audience is interested in and what other similar websites are promoting.
If you’re just starting with affiliate marketing, it’s important to read the terms and conditions of each program carefully.
Some programs have strict rules about how and where you can promote their products. But once you find a few good affiliate programs that work well for your website, you can start earning some extra income from your directory.
Allow sponsored articles/guest posts
Businesses can pay you to have their articles published on your site. This way, the businesses get exposure to your site, and you get paid for hosting the content.
Of course, you’ll want to vet the businesses and ensure their high-quality content is relevant to your audience.
If you do it right, allowing sponsored articles can be a great way to earn money from your directory website.
Earn from bookings and appointments
Just like Airbnb, you can also let visitors book third-party hotels, restaurants, and places directly from your website.
By charging a small commission for each booking, you could make yet more income.
Pro Tip – Take Professional Help for Directory Website Development
While building a directory website with free tools is a great way to get started, achieving a professional and fully functional site requires expert guidance. Seahawk offers a specialized Directory Website Development Service designed to meet all your needs. Their features include custom design and development to create a unique look, advanced search and filters for easy navigation, and interactive map integration to enhance user experience.
You’ll also benefit from monetization features, secure data management, and seamless payment gateway integration, ensuring your directory website is both profitable and secure.
What sets Seahawk apart is their commitment to accessibility and dedicated post-launch support and maintenance, so your site remains updated and optimized even after it’s live. With pricing starting at just $499, Seahawk provides an affordable, professional solution to take your directory website to the next level effortlessly. For that, you can contact Seahawk today!
Wrapping up
Building a directory website doesn’t have to be complicated or time-consuming.
With ZipWP, you can launch a test site in seconds, experiment with plugins, and have your directory up and running effortlessly. No need for tedious manual setup when you can start instantly.
Once your setup is ready, the only real costs are your domain and hosting. Everything else can be done with free tools, and you can always explore premium options once your site starts generating revenue.
To stand out from the competition and turn your directory into a profitable business, focus on choosing the right niche, driving traffic through SEO and social media, and converting visitors into paying customers.
The more listings you attract, the faster your business will grow.
If you’re serious about building a successful directory website, now is the time to take action. Get started with ZipWP and see how quickly you can bring your vision to life.
If you found this guide helpful, subscribe to our newsletter for more expert insights, tutorials, and exclusive offers.

Pratik Chaskar holds the pivotal role of CTO at Brainstorm Force, serving as the backbone of the company. Renowned for his organizational skills, strategic thinking, problem-solving attitude, and expertise in leading and executing plans, Pratik plays a crucial role in the BSF’s technological landscape.
Disclosure: This blog may contain affiliate links. If you make a purchase through one of these links, we may receive a small commission. Read disclosure. Rest assured that we only recommend products that we have personally used and believe will add value to our readers. Thanks for your support!
