As a dentist, you may need to serve a number of patients in a day. Maintaining appointments and scheduling their visiting hours is really a tough job.
This time consuming working process might impact on your patient’s care and nobody wants that!
A website is a powerful tool for any business, including dental practices. By creating a website for your practice, you can reach new patients, promote your services and build trust with potential and current patients.
Using WordPress to create your website is a great option. It’s free, easy to use and there are tons of themes and plugins available to make your website look professional.
Upon finishing this easy-to-follow tutorial, you’ll be able to create a dentist website like this.
In this post, we’ll show you how to create a dental website with WordPress for free.
Why dentists need a website
Having a dental website is beneficial for you in many ways. It can save your patients valuable time and makes the appointment process easier.
A website can also help you attract new patients from your working area with ease.
You can even use your dental website for selling dental products and essential medical equipment.
Here are a few more direct benefits of having a dental website:
Get new potential patients: A website acts as an online brochure and marketing tool in one. It can be found by anyone looking for a dentist and provides all the information they need to make an informed decision about becoming a patient.
Share dental care tips: You can use your website to start a blog and write articles on sharing dental care tips. By publishing articles, you can simply educate your patients and create a positive impact. You also place yourself as an authority on the subject, which can help attract even more patients.
Make dental services easier for everyone: A website is a great platform for providing full-time dental services. Your patients can access your website 24/7. They can easily contact you using the website. Also, the detailed information about your dental services will be very helpful for building your brand.
Selling dental care products: Using your website, you can launch an online shop if you want to sell dental care products. This is purely optional but is easily achievable.
Check this article to learn how to create an online store using WooCommerce.
Prerequisites to create a WordPress website
Before you start building your dentist website, you need to meet the following prerequisites:
- Get a domain name
- Purchase a hosting plan
- Install WordPress on your hosting platform
Let’s check the details.
Get a domain name
A domain name refers to the www. name of your website, like the address of your house. Using this domain name, users from anywhere will be able to visit your website.
For example, “wpastra.com” is our domain name.
You can purchase your domain name from a company like Namecheap, Google Domains or your chosen web hosting provider.
Purchase a hosting plan
To run your website, you need to buy a hosting plan. Web hosting stores your website files and makes them available on the web.
You can purchase a hosting plan from reputed hosting companies like SiteGround, Cloudways and Kinsta.
Currently, Cloudways have a great deal for users. If you buy the hosting plan from them, they will give Astra Pro free for the first year.
So we recommend getting your web hosting from Cloudways!
Install WordPress on your hosting platform
WordPress is a free content management system (CMS) that people use to build their websites.
We recommend using this open-source platform to make your dental website. It’s free, scalable and infinitely customizable, which is ideal for building business websites.
Luckily, most hosting providers will install WordPress for you. But, if you want to install it yourself, check out this article to learn how to install WordPress.
How to create a dental website in 4 simple steps
Once you’re ready with your domain name and have installed WordPress on your hosting plan, it’s time to create your website.
To create dental website just follow these steps:
- Install and activate the dental theme
- Install and activate Starter Templates
- Select a free dental website template
- Customize your dentist website
Don’t worry. The steps are simple and easy to do. Just keep reading.
Step 1: Install and activate the dental theme
WordPress offers some themes by default with basic features. But a dental WordPress theme can give you more advanced functionalities to help create a dental website.
We’ve decided to go with Astra because it’s our own theme.
Astra is the most popular WordPress theme in the world with over 1 million active users. It’s free, lightweight, customizable and designed to build any type of website.
It’s time to install the Astra theme.
Log in to your website admin area with the right credentials.
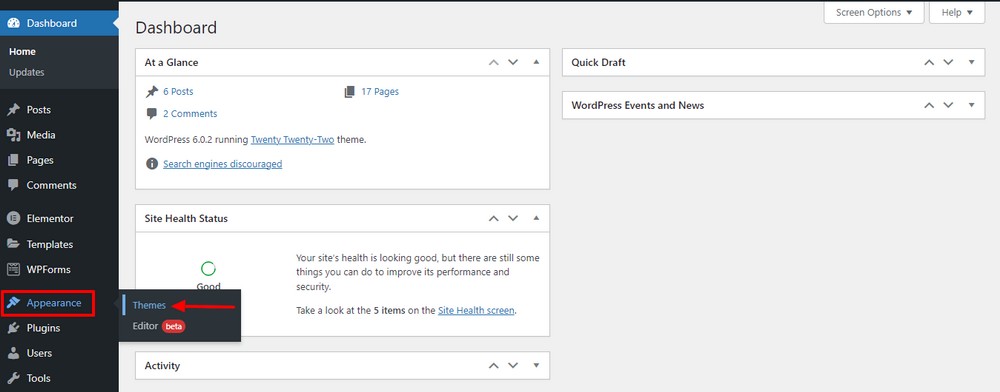
Now, navigate to Appearance > Themes.
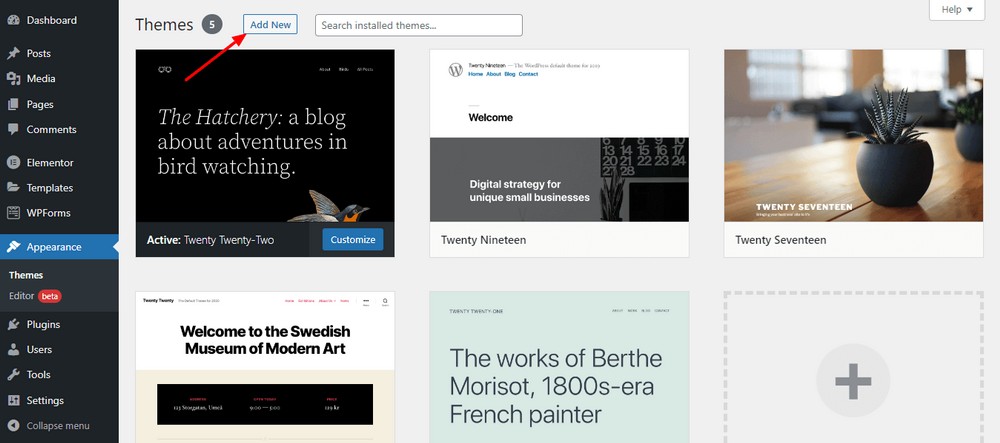
Click the Add New button.
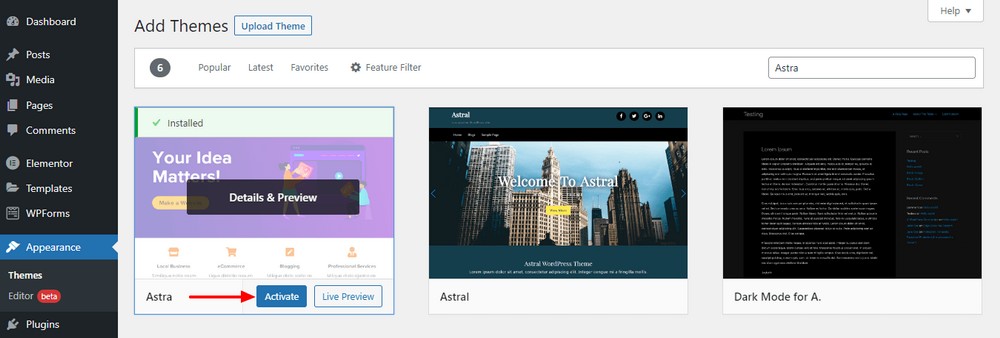
Type the theme name ‘‘Astra’’ in the search bar. Then click on the Install button when it appears.

Finally, hit the Activate button to activate the Astra theme on your website.
You’ve successfully installed the Astra theme on your website!
Step 2: Install and activate Starter Templates
Starter Templates is a popular plugin that comes with tons of website templates for different WordPress page builders. The plugin is free to use and compatible with Astra WordPress templates.
Starter Templates has free dentist website templates you can use right away.
Before starting work with the template, you need to install and activate the plugin on your website.
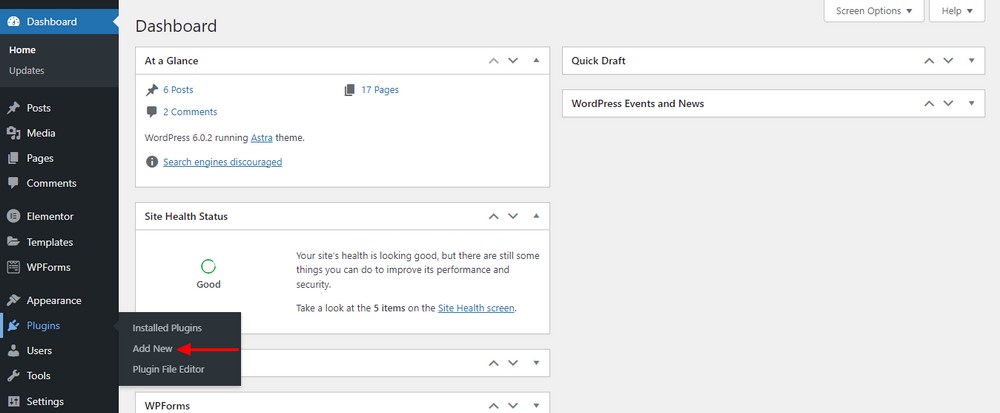
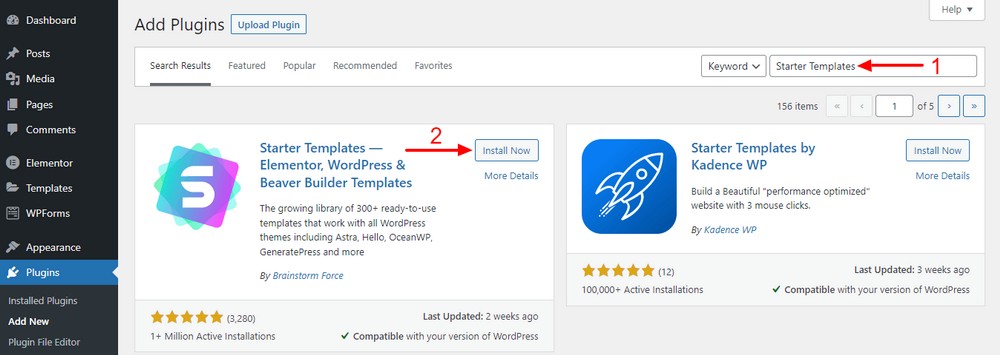
Go to Plugins > Add New.
Type the keyword ‘‘Starter Templates’’ into the search bar section. Now, hit the Install Now button to start the installation process.
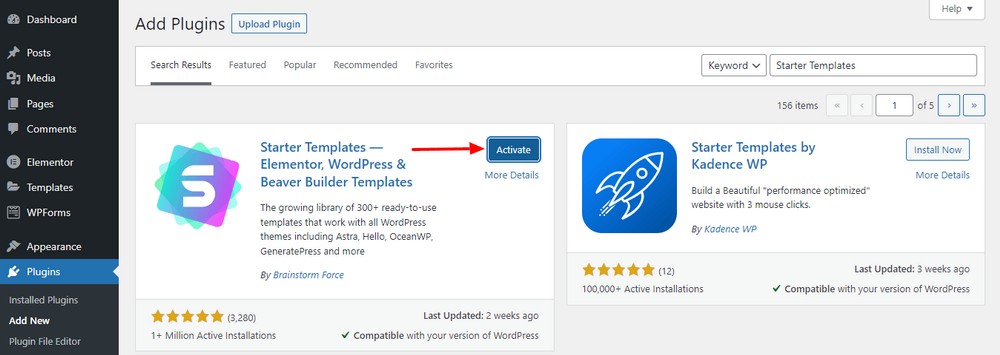
Finally, you need to click on the Activate button to activate the plugin.
You’ve successfully integrated the Astra theme and Starter Templates on your website. Now, let’s move on to the next step.
Read more: Check out the list of the best portfolio themes that you can install on your dental website.
Step 3: Select a free dental website template
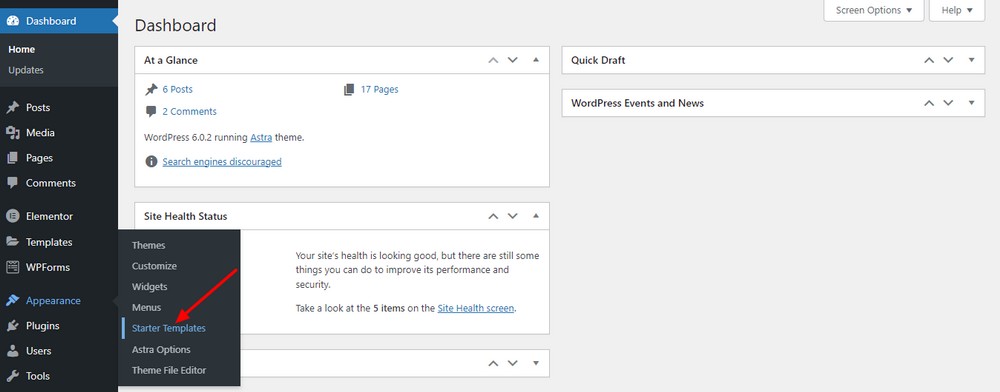
It’s time to select a free dental website template for your website. To do this, you need to go to Appearance > Starter Templates.
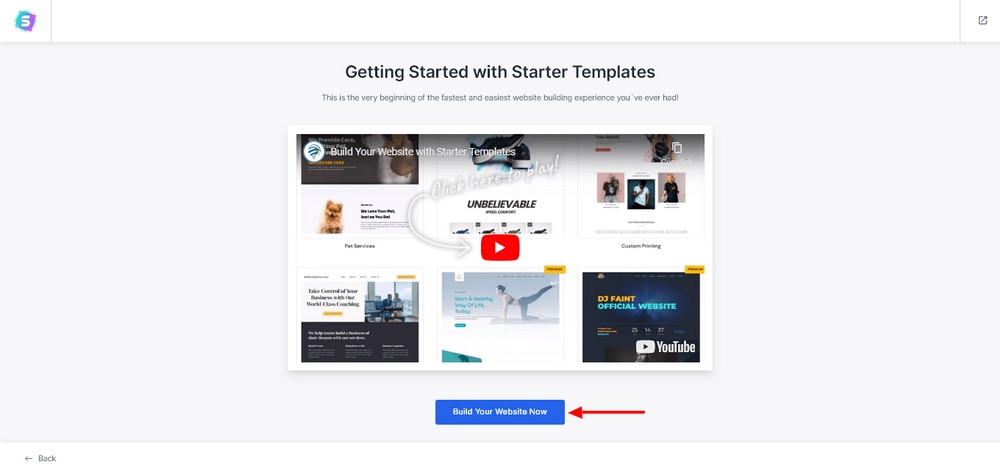
Now, click on the Build Your Website Now button.
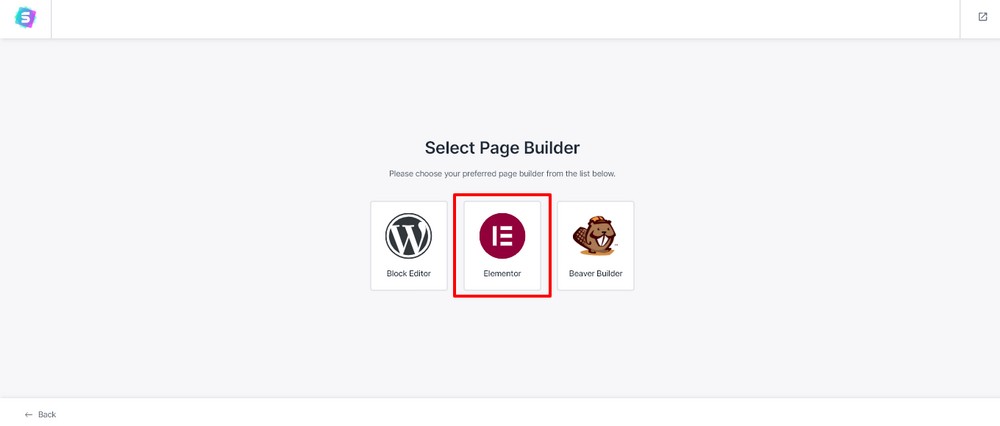
Then choose a page builder based on your requirements.
Here, we’ve selected the Elementor. It’s one of the most popular page builder plugins in the WordPress ecosystem and is very easy to use.
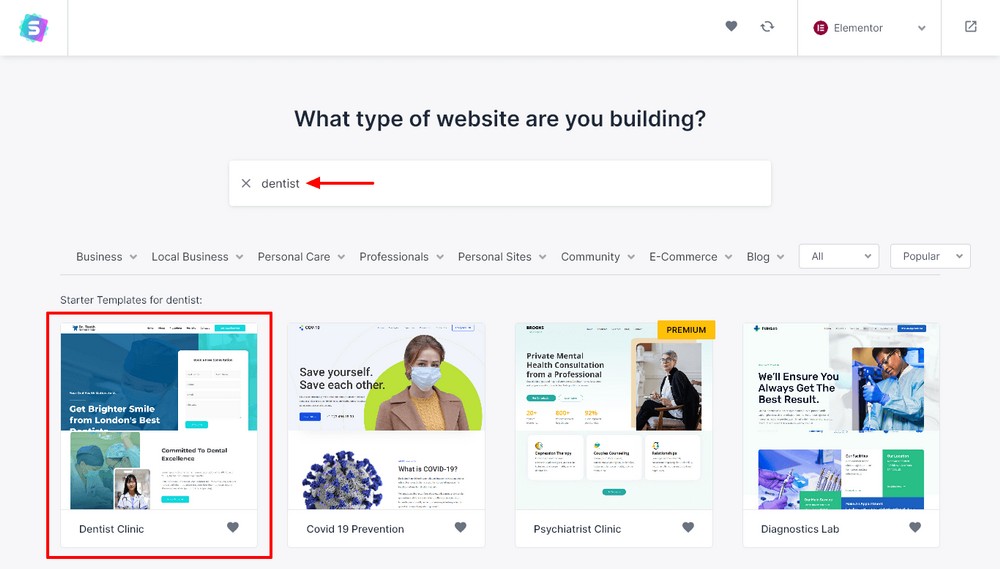
On the next screen, you’ll get all the Elementor website templates. Search for the ‘‘Dentist’’ website template using the search option.
We’ve chosen the first one, which is called Dentist Clinic. It has all the necessary features to make an ideal dental website.
The notable features are.:
- Navigation menu
- Booking form
- Service section
- Testimonial area
- Call to action (CTA) button
- Open hours
- Google map
- Contact details
- Footer section
You can go with the other website templates if you prefer but we think this one is ideal.
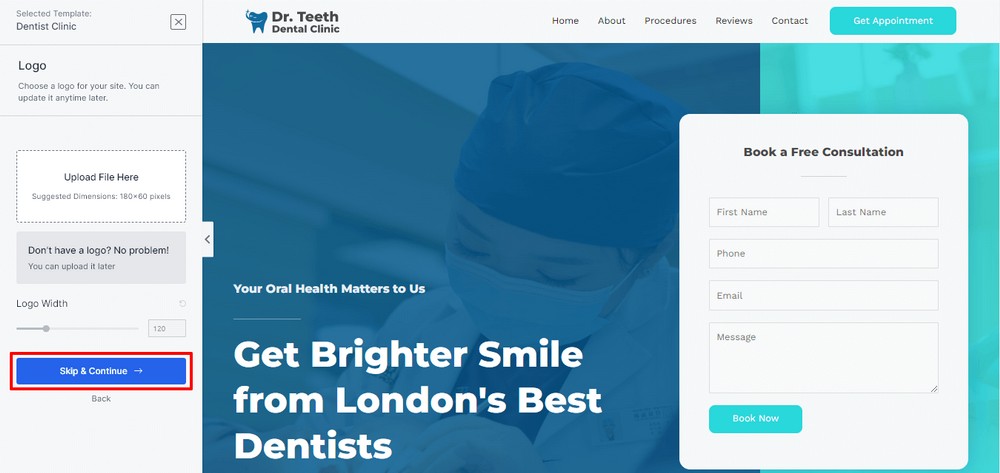
Now, it’s time to do a little customization.
You can add your own website logo and define the logo width in this area. After that, hit the Skip & Continue button to move forward.
Note: If you don’t have your website logo right now then skip this part. You can add it later.
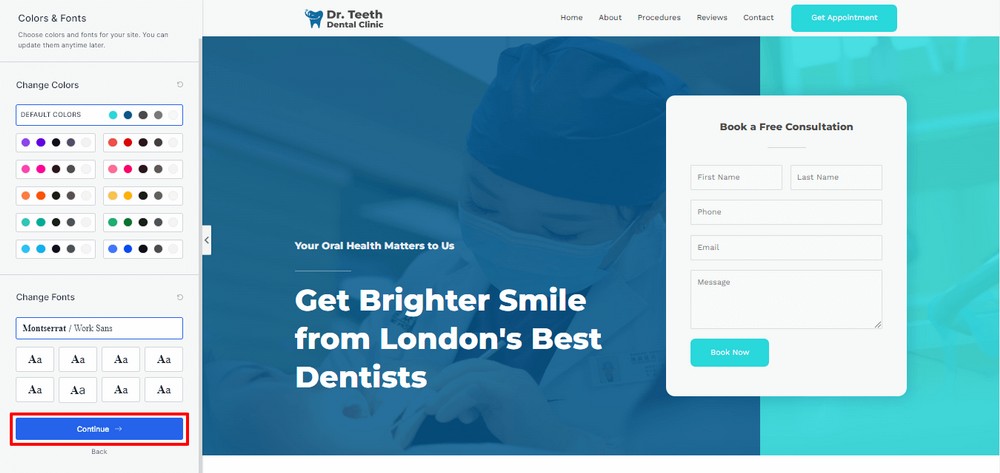
On the following screen, you’ll get two options. You can set your website’s default color and choose a font for your website.
Next, click on the Continue button.
You’re almost done. If you want to receive newsletters, write your name and email into the form.
Now, press the Submit & Build My Website button.
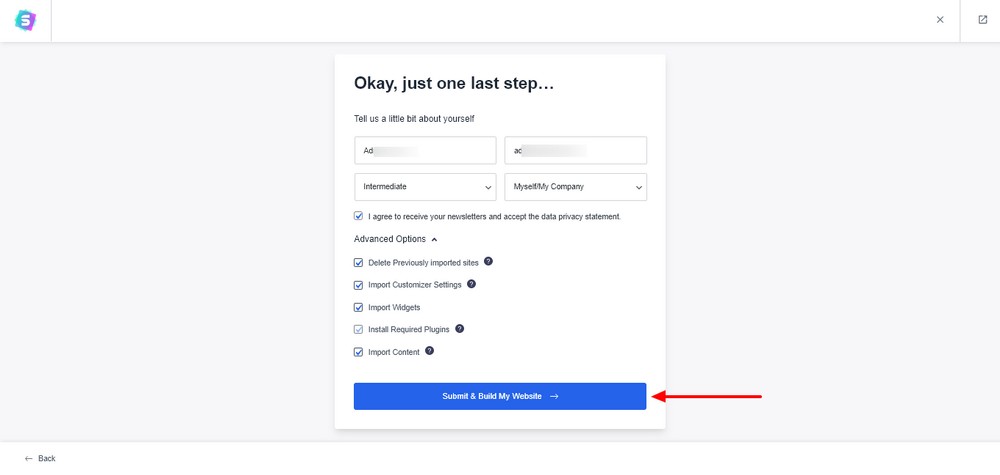
It’s time to build your website. Just wait a couple of minutes for the process to finish.
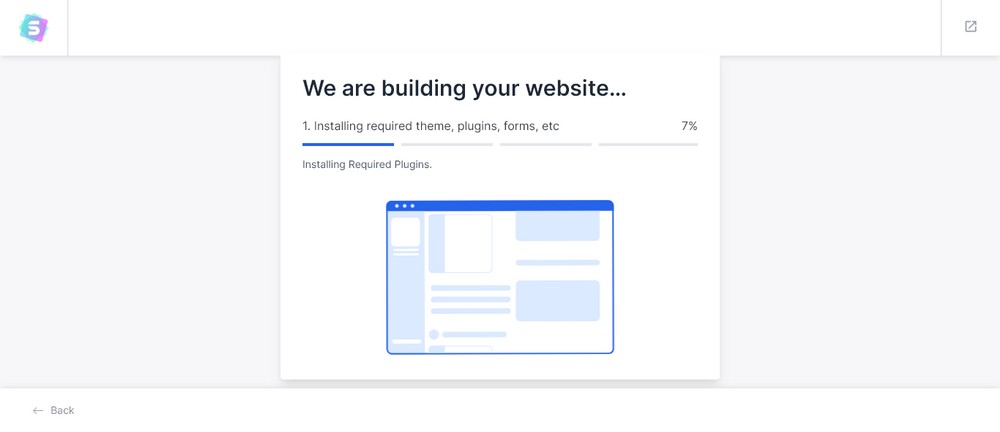
Congratulations! Now you’ve designed your dental website, without needing any coding skills!
How easy was that?
It’s time to see how your website looks from a visitors’ perspective. Click the Visit Your Website button and check out your website.

Here is the video of the current look of our website.
Step 4: Customize your dentist website
To make the dentist website stand out, you can add the following advanced features.
- Adding team members or doctor lists
- Inserting statistics
- Adding FAQs
Let’s start customizing the website.
First, you need to open the page in the Elementor editor panel. As you know, the template is built with the Elementor page builder.
Go to the All Pages area. Here, you’ll find the main page of your website.
Now, you need to click on the Edit with Elementor link to edit the page.

This will lead you to the Elementor editor panel.
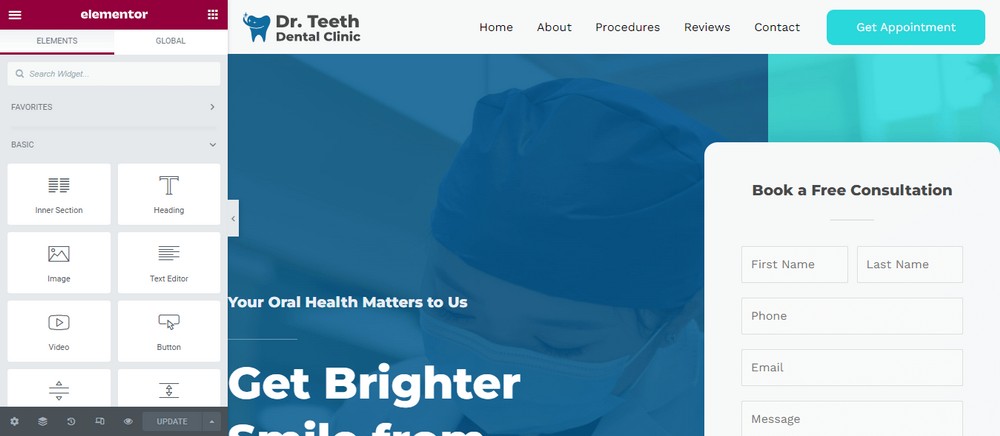
Adding team members or doctor lists
Adding team members or doctors list is one of the essential features of a dentist website. You can add your doctor’s list using a free team block provided by the Starter Templates.
We decided to add a team block before the “Happy Stories” section of our website. But you can select another place on your website.
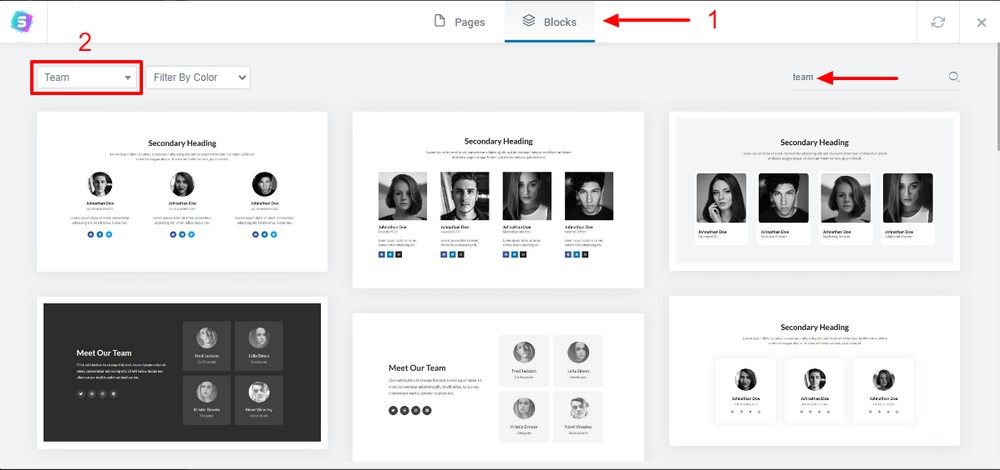
First, you click on the “+” icon. Next, hit the Starter Templates logo.
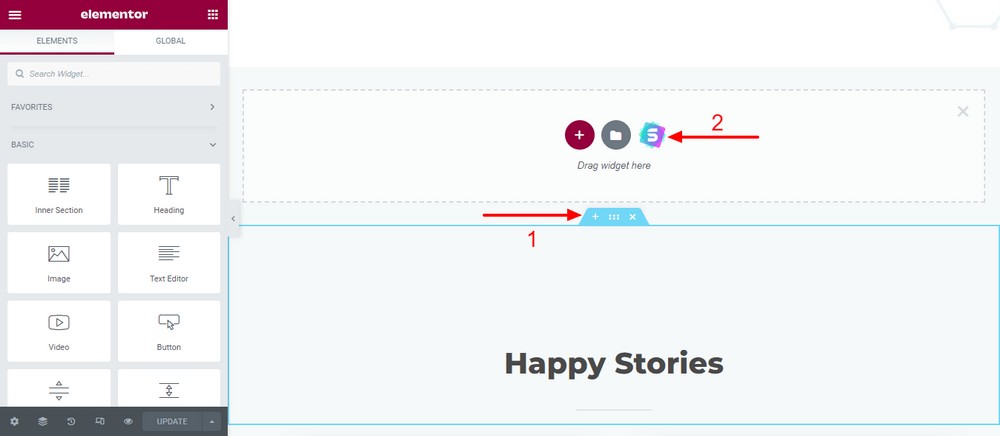
Next, you need to select the Blocks tab.
After that, you can search for the “team” blocks using the search bar. You can also use the drop-down menu to find the team blocks from the left-side area.
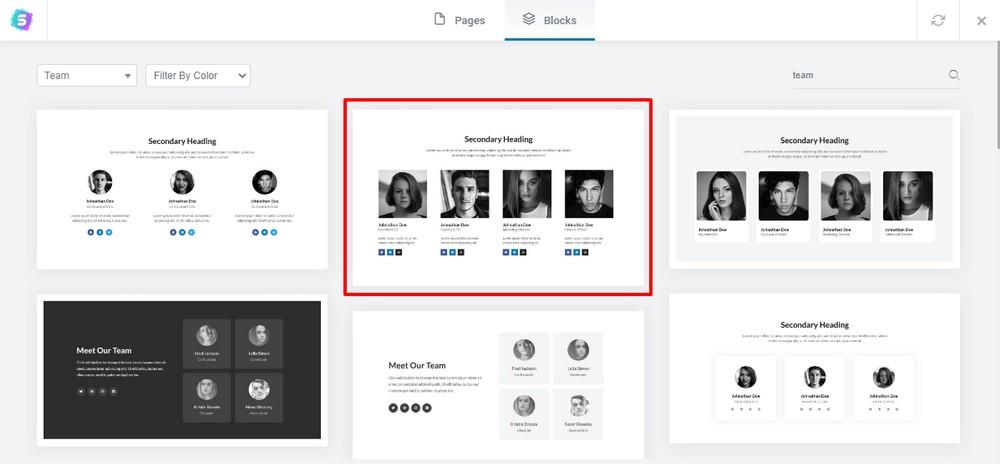
Now, you need to choose a suitable block for displaying your dental website doctors list or members.
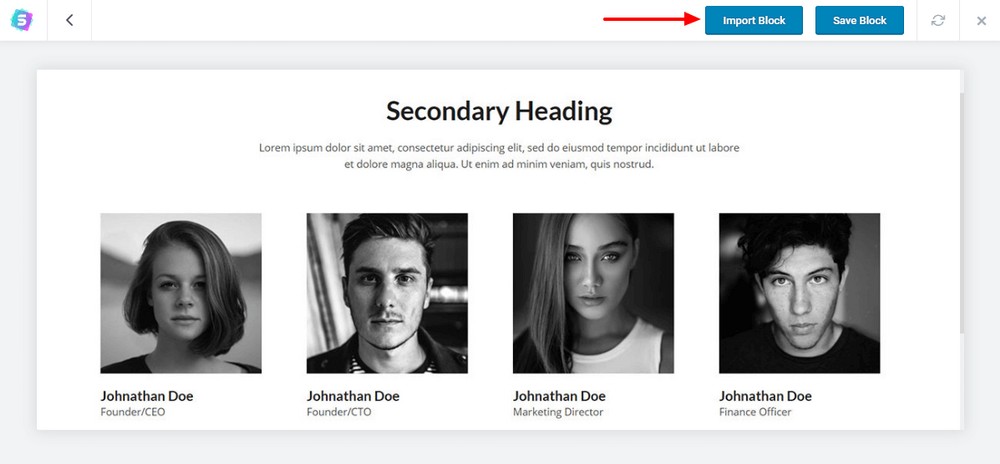
Next, you should click on the Import Block button and wait for it to install.
After importing the block, you’ll see the following:
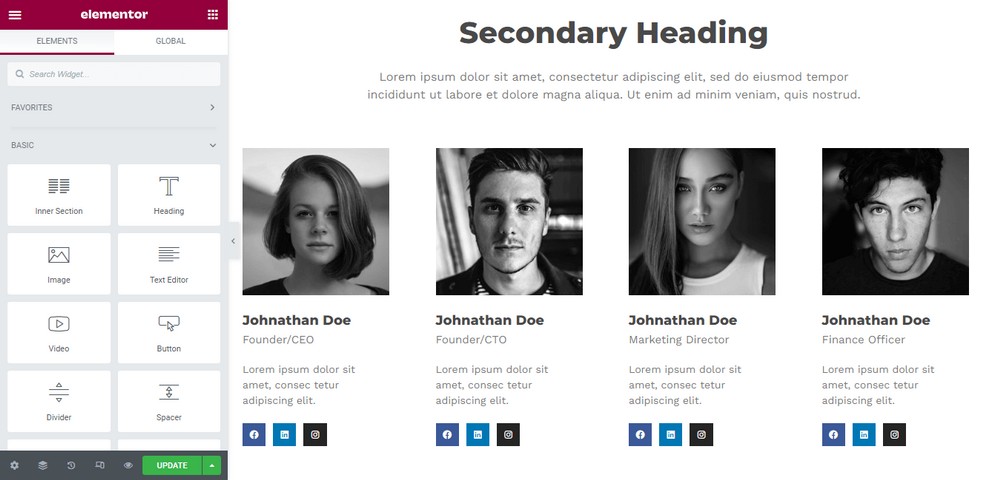
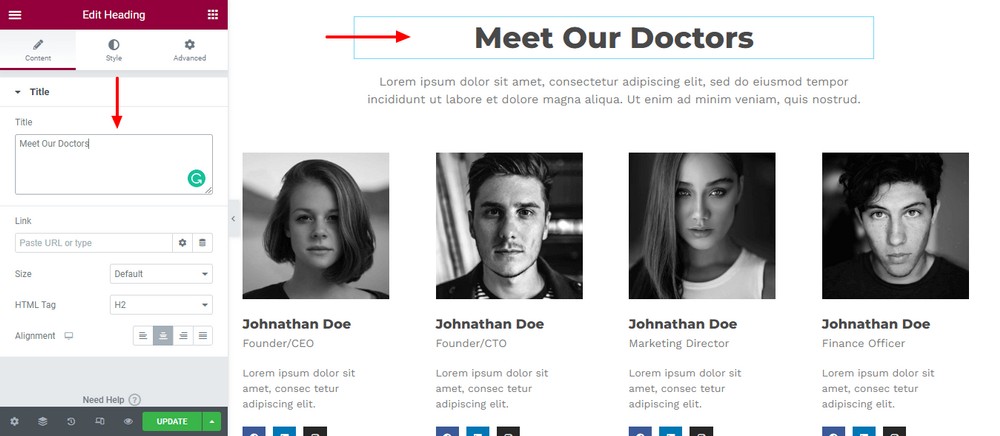
To change the title of the section, you need to click on the title area first.
Now, you go to the Elementor > Content area. You can use the following settings for customizing the title.
- Title
- Link
- Size
- HTML Tag
- Alignment
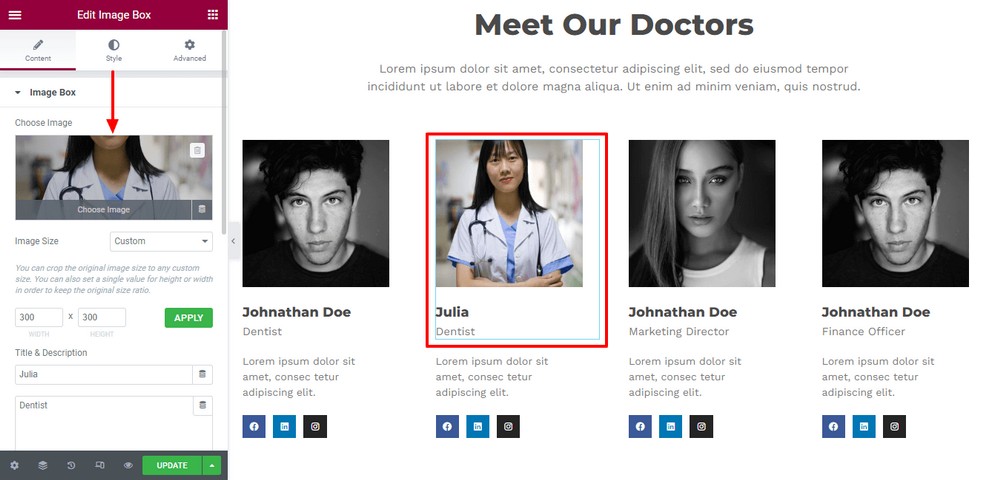
You can also change the default image. Hit an image that you want to change.
You can use the Choose Image option to insert a new image.
Finally, you can manage the attribute of the image using the below settings.
- Image Size
- Title & Description
- Link
- Image Position
- Title HTML Tag
You are able to change the text after the image Title & Description. Also, you are able to add social channel links to the social icons.
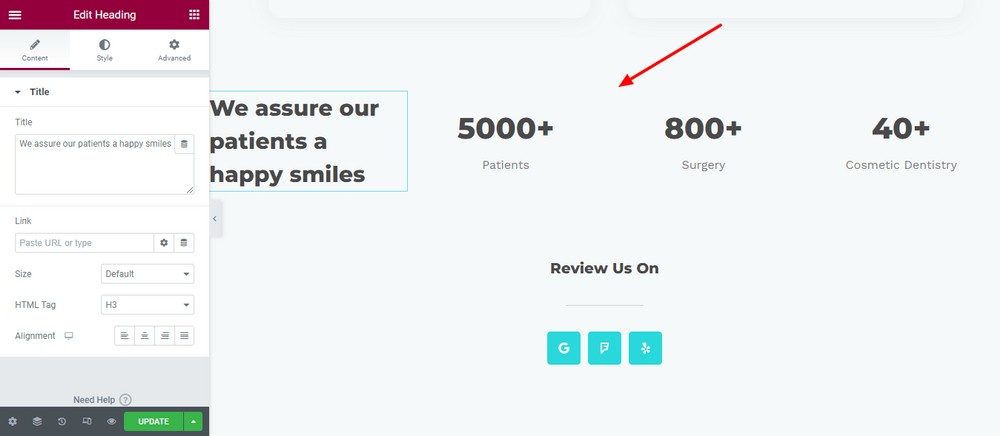
Inserting statistics
Like the team block, you can find a free “Statistic” block in the Stater Templates library.
Go to the library. Next, choose the right block.
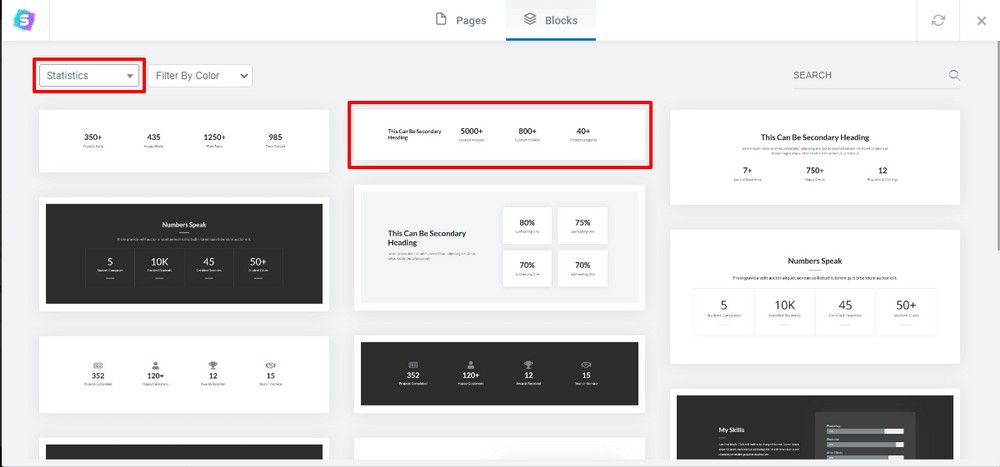
Finally, import the block and place it where you want it.
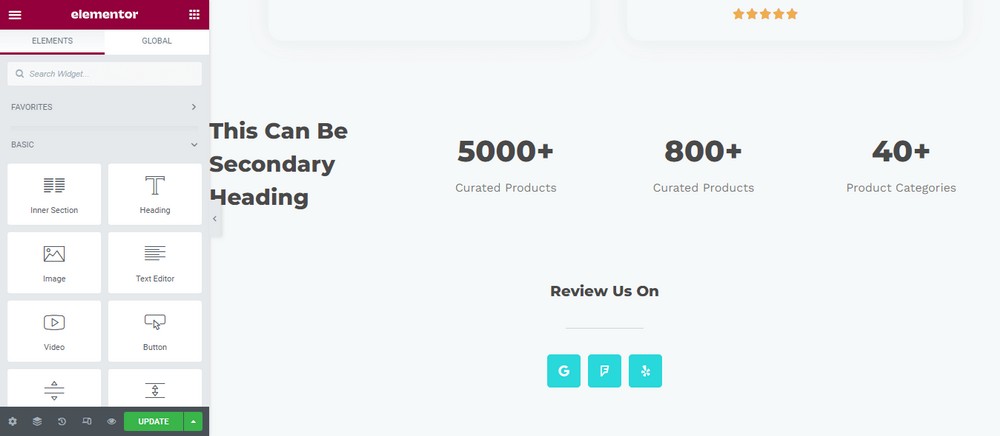
After that, you can display all the statistics of your dental clinic using the block.
Adding FAQs
Your patients may have many questions about your website or clinic. It’d be a smart move to add some FAQs so that they can easily get their questions answered.
Luckily Starter Templates come with several free FAQ blocks. You can use and customize any of them like the other blocks.
Once again, go to the Starter Templates library area. Now, you need to choose a free FAQ block and import it into a suitable place for your website.
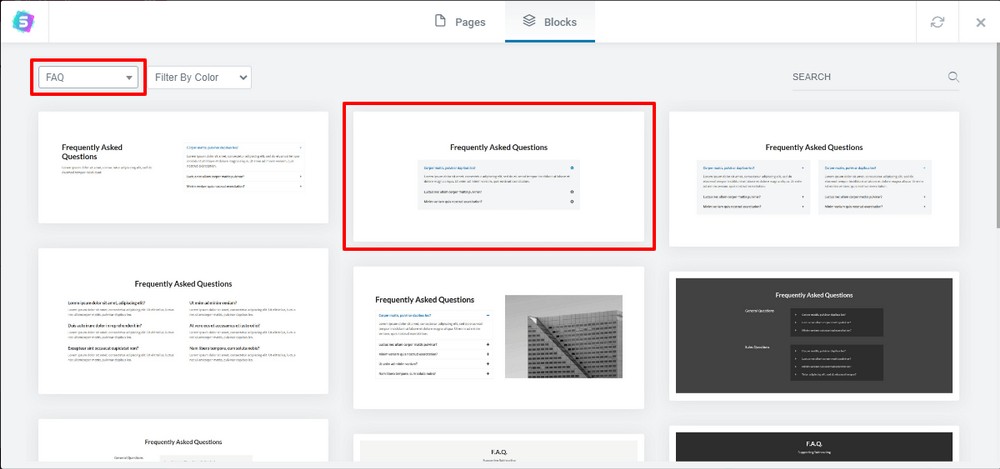
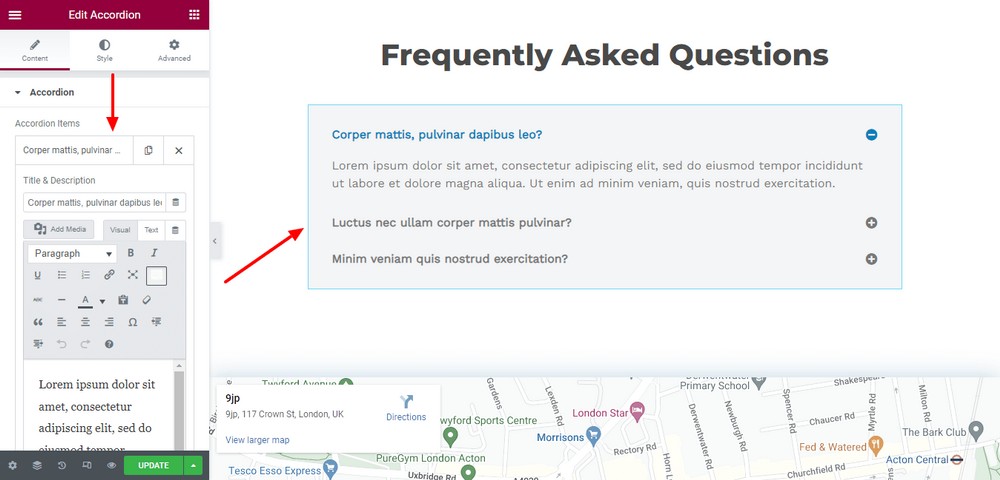
After importing the block, you should add your questions and their answers using the left-side Elementor setting.
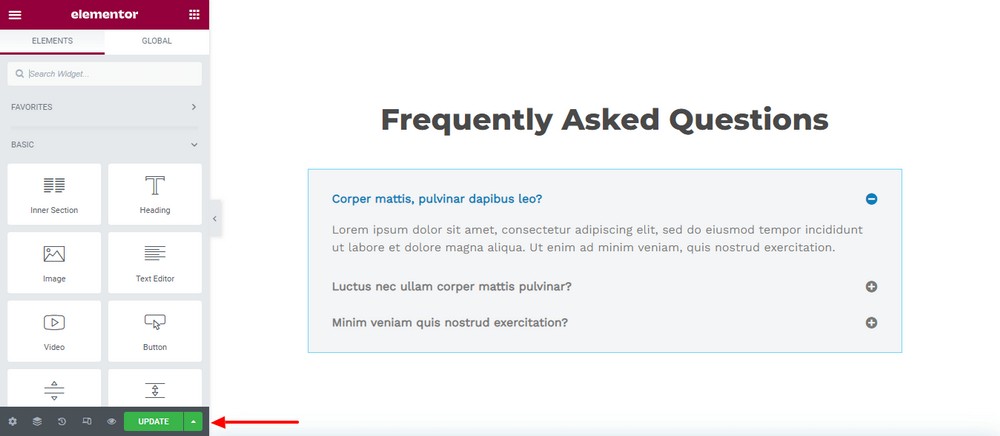
After adding and customizing the additional blocks, you have to click the Update button to save all the settings.
Now, check the final outlook of our dentist website. If you’ve used the above resources and followed the steps, then your website should also look the same.
Wrapping up
Building a dentist website with WordPress is not a tough job anymore. If you have the right resources to hand, you’ll be able to create a dentist website without having any development skills.
When it’s about “right resources”, you should definitely consider the Astra theme and Starter Templates like millions of other users in the WordPress community.
Here we’ve built a dentist website with essential features and functionalities. If you want to add more advanced features to your websites like a mega menu or custom header and footer, you can go for Astra Pro.
We hope this article meets your needs. If you have any queries regarding building a dentist website or anything about Astra, feel free to share using the comment box below.

Pratik Chaskar holds the pivotal role of CTO at Brainstorm Force, serving as the backbone of the company. Renowned for his organizational skills, strategic thinking, problem-solving attitude, and expertise in leading and executing plans, Pratik plays a crucial role in the BSF’s technological landscape.
Disclosure: This blog may contain affiliate links. If you make a purchase through one of these links, we may receive a small commission. Read disclosure. Rest assured that we only recommend products that we have personally used and believe will add value to our readers. Thanks for your support!
